• Skip to primary navigation
  • Skip to main content
  • Skip to primary sidebar

  • home
  • about adrianne
  • buy the books
    • DIY T-Shirt Crafts (2015)
    • DIY Stamped Metal Jewelry (2016)
    • Rock Painting for Beginners (2019)
  • videos
  • crafts
    • diy beauty projects
    • kids’ crafts
    • paper craft projects
    • polymer clay
    • sewing projects
  • jewelry
    • bracelet projects
    • earring projects
    • necklace projects
    • jewelry tools & supplies
  • metal stamping
    • beginners’ tutorial
    • video tutorial
    • project ideas
    • metal stamping supplies
  • recipes
    • cocktail recipes
    • appetizers
    • main and side dishes
    • sweets and treats
  • by season
    • birthdays
    • new year
    • valentine’s day
    • st. patrick’s day
    • easter and spring
    • mother’s day
    • patriotic
    • fall
    • halloween
    • christmas
    • thanksgiving
  • privacy

Happy Hour Projects logo

06/04/2012

DIY Mod Podge Wood Bracelets

I’ve had Mod Podge on my mind, what with it being last week’s theme over at the challenge at One Artsy Mama. (Speaking of which, voting for the fabric round starts today! If you have a minute, go check it out and vote for your favorites!) Anyway, I tried my hand at another Mod Podge project: Wood Bracelets, decorated with creative papers. You can take a wooden bangle and make it into… anything you can imagine!

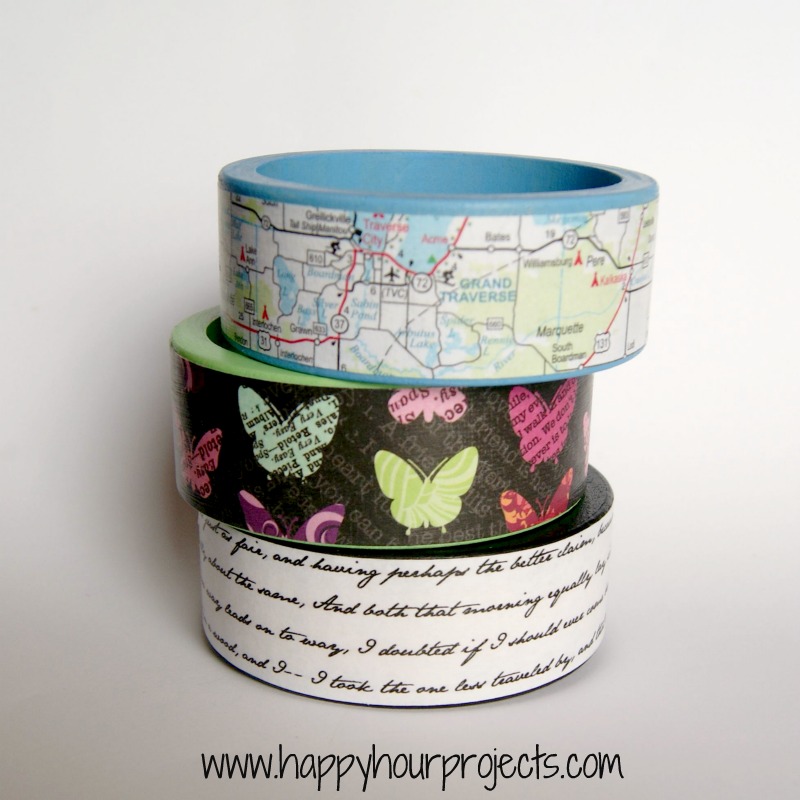
As you can see… I had some trouble deciding what to put on mine, so I ended up making a few. ;)  I ended up using a map of my first vacation my husband and I took together, some text from Robert Frost’s “The Road Less Traveled”, and some butterfly scrapbook paper that I just adore.

Raya immediately claimed the butterfly one:

Yes, I am teaching her to accessorize early.

This was a really simple and quick project – less than an hour for all three bracelets.  In fact the hardest part was finding wood bracelets!  I finally ordered from Banglewood Crafts on Etsy.  I’d really recommend them, she shipped super fast and the bracelets are awesome.

What you’ll need:

  • Flat wooden bracelets
  • Acrylic Paint
  • Mod Podge
  • Graphic or paper of your choice – you may want to use a paper trimmer to cut it evenly
  • Paintbrush

First, trim up your paper to the width of your bracelet.  Then, paint the inside and the edges of your bracelet.    I painted the edges of the outside too, because my paper was ever-so-slightly smaller than the width of the bracelet because I wanted the inside color to really show.

Now, apply some Mod Podge to the backside of your paper, and carefully apply it to your bracelet.  Once you have it nice and smooth and straight, cover it with a coat of Mod Podge.  Let it dry.

When it’s dry, coat the inside and the edges with Mod Podge too.  If you look above, there’s a little smudge on the left edge of that bracelet.  If you get any of those, smooth it out before it dries.  (I did, I just didn’t notice yet when taking the photo.) :)

…Are you looking for more?  That’s it!  Just let your bracelet dry!  I love them, I can’t decide my favorite!

Which one do you like best?

I link up to these great parties!
~ Adrianne

Filed Under: Bracelets, Jewelry, Tutorials Tagged With: Mod Podge

copyright policy and terms of use

I love it when you love my work! All tutorials and photos published at Happy Hour Projects are copyrighted. If you would like to feature my tutorial on your website or share it on your social media you may use one photo to feature, as long as you provide a link back to the original post.

If you feature a photo, it may not be accompanied by the project tutorial or recipe, whether in my own words as it originally appears or paraphrased by you. This also includes personal sharing on social media and Pinterest. Publishing multiple photos from a project, or including instructions with an accompanying photo are not permitted and you will be asked to remove them.

I love to share my projects, and my tutorials, recipes, and e-books are ALL free for your personal use. However, photos and ideas that are published to this site are my protected intellectual property. You may print them at home, but please do not copy or distribute them. I also allow all designs to be made and sold at fundraisers, craft fairs, etc. If you are selling a piece made from one or more of my free tutorials in your online shop, I require that you use your own, original photography, and include a link back to my website to credit me as the designer.

I hope you enjoy what you read here, and please be fair when you share!

Reader Interactions

Comments

  1. Sara says

    10/04/2014 at 12:36 pm

    These are great. You can see a couple bracelets that I have created so far that are similar to these, but in honor of my daughter on my blog. I’d love to know what you think.

    Reply
  2. Pro Carpet Cleaning Guildford says

    04/27/2013 at 3:53 pm

    They look great. Takes me back to a time before video games when we actually made things!

    Reply
  3. Rhonda says

    03/28/2013 at 1:38 pm

    you can also get wood popsicle craft sticks. Boil them for about 30 min, let sit in hot water for 30 min, then you can bend them to fit inside of a drinking glass. When they dry completely overnight you will have a wood bracelet to decorate.

    Keep in mind that you might want to use a glass a little bit smaller than the bracelet you want. The liquid in the paint will cause it to swell slightly until it dries.

    Reply
  4. Carebear50 says

    09/05/2012 at 12:37 am

    I'm perfectly fine visiting both!

    Reply
  5. Adrianne at Happy Hour Projects says

    09/05/2012 at 12:23 am

    I shop at Hobby Lobby and Michael's for stuff like that – so it could have been either. I'm sorry, I really don't remember but it had to be one of the two. ;)

    Reply
  6. Carebear50 says

    09/04/2012 at 11:34 pm

    Where did you buy the super cute butterfly paper? I think my niece would love a bracelet like that!

    Reply
  7. Deryl Jenkins says

    08/16/2012 at 8:42 pm

    I love what you did eith this size bracelet :) I want to try a more narrow size.

    Reply
  8. Caren says

    08/10/2012 at 8:47 pm

    Love this idea! So unique!

    Reply
  9. sou_eu_a_joana says

    06/20/2012 at 10:21 pm

    I just love the map bracelet :)

    Reply
  10. joy personified says

    06/12/2012 at 1:39 am

    Oh my goodness these are too cute! I favorited this a few days ago on craftgawker and thought they looked cute, and now that I get on on my computer and have a closer look, I see where the map is–MY HOME! So cool! These are seriously adorable and now I'm even more in love with them :D

    Reply
  11. Jessi W says

    06/11/2012 at 8:38 pm

    Ooh I love the map bracelet! That would be a fun way to use up all those maps you get from vacations or something. Thanks for linking this up to The Fun In Functional!

    Reply
  12. Full Circle Creations says

    06/10/2012 at 3:38 am

    Love this! What a wonderful idea! Thanks for linking up to the All Star Block Party.

    Holly

    Reply
  13. Pocketful Of Dreams says

    06/08/2012 at 8:58 pm

    Very cool :) Love the papers you chose.

    Reply
  14. Shasta says

    06/08/2012 at 3:12 am

    Thanks for linking the bracelets and the quilt up with us at the All Star Block Party. I'm so in love with the map bracelet. I can't wait to show it to my sister (she's map obsessed like me). I'm pinning this too :)

    Shasta @InTheOldRoad

    Reply
  15. Christina at I Gotta Create! says

    06/07/2012 at 9:11 pm

    I couldn't pick a best one – love em all!! What a great idea to use the map from your 1st vacation.
    Raya's got great taste ;)
    <3 Christina
    http://igottacreate.blogspot.com
    Wildly Original Round Up party is open!

    Reply
  16. Carri says

    06/07/2012 at 3:56 pm

    Cute cute cute…my granddaughter would love these a ton!!!!
    Thanks for sharing..

    Carri
    simplydonewright.blogspot.com

    Reply
  17. Jill says

    06/07/2012 at 1:59 pm

    What a creative idea!!! They are so cute! Thanks so much for sharing this too at Thursday's Temptation.
    Jill

    Reply
  18. Onellyantie Chuah says

    06/07/2012 at 6:34 am

    Love the map bracelet. I wonder if I can do it with a PVC pipe, but, great idea!

    Reply
  19. shopannies says

    06/05/2012 at 8:28 pm

    love your bracelet so easy to decorate whatever your personality

    Reply
  20. Kadie says

    06/04/2012 at 6:53 pm

    Love these! I think the poem and map are my favorites. I can never pick just one!! Raya is to cute with hers on!!

    Reply
  21. MysticMandy says

    06/04/2012 at 4:32 pm

    What a great idea! I love this :)
    http://mysticmandy.blogspot.com/

    Reply
  22. Shannon says

    06/04/2012 at 4:03 pm

    These are SO cute–and the picture of your daughter “accessorizing” is adorable!! I am nominating you for the Sunshine Award–here are the details…http://sewsweetcottage.blogspot.com/2012/06/sunshine-blog-award.html

    Shannon@SewSweetCottage

    Reply
  23. Jillian Nicole says

    06/04/2012 at 1:30 pm

    I love love love love this. I can definitely do this and I like the map idea. My daughter is going to love doing this! Thanks for the idea.

    Reply
  24. allisamazing says

    06/04/2012 at 1:10 pm

    These are so cute and such a great craft idea!

    Reply
  25. Melanie says

    06/04/2012 at 12:12 pm

    Cute! My little one would have claimed the butterfly one, too!

    Reply
  26. Terry says

    06/04/2012 at 12:11 pm

    And it has made all the difference. Love them all,…..I think the poem is my favourite. Super easy and Raya looks adorable.

    Reply
  27. Pamela says

    06/04/2012 at 11:01 am

    These are really cute.

    Reply

Trackbacks

  1. Getting hard time to think what gift you can give to your traveler friends? Let me teach you. – Promote your Business to make Sales says:
    05/13/2018 at 1:18 am

    […] adorable map bracelet by Happy Hour Projects is creative but might also become very meaningful; it’ll remind your friend of you when you’re […]

    Reply
  2. Banglewood Craft GIVEAWAY! says:
    09/26/2013 at 6:18 am

    […] at the beginning of the week I showed you all a little tutorial for dressing up basic wooden bangles.  I picked mine up from Banglewood Crafts on Etsy.  I don’t know about you, but I […]

    Reply
  3. A Inspiring Interview with Successful DIY Blogger Adrianne Surian of Happyhourprojects.com says:
    04/24/2013 at 10:17 am

    […] ordered a few wood bangles from me last summer. She graciously created a tutorial post about decorating them on her blog, happyhourprojects.com. I thought that was awesome so we got […]

    Reply
  4. 24 Blogs with Ways to Use Mod Podge to Create Upcycled Treasures says:
    04/24/2013 at 9:57 am

    […] DIY Mod Podge Wood Bracelets […]

    Reply
  5. 20 easy Mod Podge craft projects for beginners. - Mod Podge Rocks says:
    12/10/2012 at 12:00 pm

    […] Mod Podge wood bracelets at Happy Hour Projects […]

    Reply

Leave a Reply Cancel reply

Your email address will not be published. Required fields are marked *

Primary Sidebar

Hello, and welcome! I'm Adrianne, an artist, author, designer, and blogger in mid Michigan. I work from home, chase my two kids, and this once-city-girl is learning how to care for chickens and adjusting to life out in the country. I have a compulsion for daily creativity... sometimes it's jewelry-making, paper crafting, metal stamping, mixing and baking, or giving new life to recycled items. But with 2 young kids, time is short! My goal here at Happy Hour Projects is to share projects and tips that you can do in an hour or less. The ideas you find here are designed to add a little creativity in your day, no matter how much (or how little) time you have!

BUY MY BOOKS!

Copyright © 2023 Happy Hour Projects on the Brunch Pro Theme