
Hey guys! I’ve got a twist on the traditional beaded bracelet to share with you today. Rather than stringing beads, I poured a few into wreath-making mesh tubing to make a few colorful tube-style pearl bracelets! It was a lot of fun to put an inside-out style together, and I’ll share a few variations as I show you how to make your own pearl mesh bracelets.

I shared this project over at Crafts Unleashed last month, the inspiration blog for ConsumerCrafts.com. It’s where I got all my supplies for this project (disclosure alert: when I design projects for their blog, they send me everything I need to create the tutorial, so all these supplies were provided to me free of charge. This isn’t a review or a sponsored post, I just really enjoyed making this design and wanted to share it with you guys today!) You’ll find links below to all the supplies at Consumer Crafts, so if you’re looking to buy any of these supplies, I’ll make it easy on you!

- Mesh Tubing (this easy kit has 4 colors, in 2 sizes)
- 8mm Plastic Pearl Beads
- 4mm Plastic Pearl Beads
- 3mm Plastic Pearl Beads
- 7mm Jump Rings
- Large Hole Spacer Beads
- 4mm (large) Glue-on End Clasp
- Jewelry Glue
- Scissors

First, cut your tubing to approximately 9 inches. You will be trimming it down later, but it’s helpful to have a couple inches extra at the end to work with. Glue one end of your tubing into one of the end caps. You’ll see in these photos that I used Super New glue, which is a liquid super glue. It worked well to hold the piece together, but because the mesh has holes, I got glue all over my fingers when working. I have linked above to Aleene’s Jewlery Glue, which is a thicker glue that holds equally well. The thick consistency will keep it in the clasp while you are gluing it together better. You will need to hold the mesh in place inside the end clasp for 1-2 minutes while it dries quickly.
(Tip: want to make a wrap bracelet instead of individual bracelets? You’ll need about 7 inches of length for each wrap, then add two inches to the end for your working length. For two wraps, cut 16 inches. For 3 wraps, 23 inches, or for four, 30 inches.)
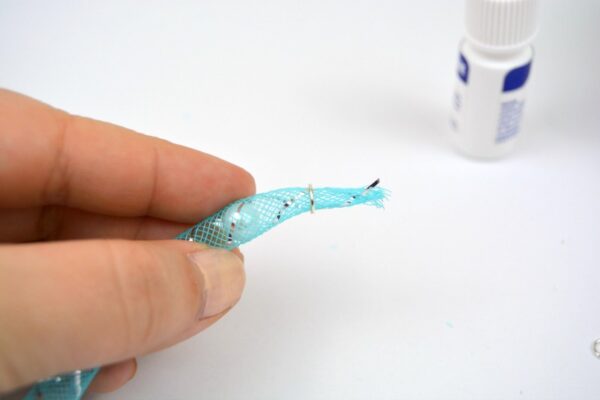
Once your glue has dried enough that it doesn’t pull out of the end clasp, begin filling it with beads. The mesh tubing included with this kit I used contained 5mm and 10mm tubing. I found that beads that were at least 2mm smaller than the tubing size worked best. For this ring-and-pearl alternating pattern, I used 8mm pearls and 7mm jump rings. Just drop a pearl in, then compress the tubing to slip a jump ring around the outside of the tubing.

Continue on for a beaded length of 7 or 7.5 inches. The glue-on clasp will add about a half inch of length to your finished bracelet. A standard length is 7.5 inches for a woman’s wrist, but if you’re planning to stack or layer your bracelets, having a finished length of 8 inches typically works better. You can always adjust for larger or smaller wrists, too! That’s the beauty of making it yourself – the custom look and custom fit.
When you reach the end, trim off the excess mesh, leaving 1/4 inch of mesh without beads inside. You’ll need this excess to glue into the other end of your end clasp. Just as with the first end, you’ll need to hold it in place for 1-2 minutes to ensure that the glue dries enough to hold. The DIY mesh bracelet will need to cure for another 15-20 minutes for the glue to dry fully before wearing it, but after a minute or two, it will “grip” well enough that you can set it aside without worrying about the clasp falling off.

Try adding small beads to the large tubes, or adding decorative spacer beads instead of jump rings. You can even experiment with other types and colors of beads for different looks! There are so many ways to make these pearl mesh bracelets, and you can come up with a whole set like this in an hour or less.

You should take part in a contest for one of tthe finest blogs onn tthe net.
I am going to highly recommend thios site!
whoah thjs weblog is magnificent i love reading your articles.
Keep upp the great work! You understand, many persons are looking round for this information,
you could aid them greatly.
They know what credit score range to lend in and what percentage of
the loans in this range go bad and have being charged off.
After all, there is no-one to really predict an emergency
that cash is going to be needed not today, but yesterday.
On one hand you’ve got Shawn who may have a 720 credit rating and that he qualifies for financing at 5.
Hi, there, you are so good at this. You have a real talent, dear :) Have a beautiful weekend.