• Skip to primary navigation
  • Skip to main content
  • Skip to primary sidebar

  • home
  • about adrianne
  • buy the books
    • DIY T-Shirt Crafts (2015)
    • DIY Stamped Metal Jewelry (2016)
    • Rock Painting for Beginners (2019)
  • videos
  • crafts
    • diy beauty projects
    • kids’ crafts
    • paper craft projects
    • polymer clay
    • sewing projects
  • jewelry
    • bracelet projects
    • earring projects
    • necklace projects
    • jewelry tools & supplies
  • metal stamping
    • beginners’ tutorial
    • video tutorial
    • project ideas
    • metal stamping supplies
  • recipes
    • cocktail recipes
    • appetizers
    • main and side dishes
    • sweets and treats
  • by season
    • birthdays
    • new year
    • valentine’s day
    • st. patrick’s day
    • easter and spring
    • mother’s day
    • patriotic
    • fall
    • halloween
    • christmas
    • thanksgiving
  • privacy

Happy Hour Projects logo

02/09/2015

DIY Riveted Leather Bracelet

I love leather for jewelry making, but it’s not often I attempt to cut it myself.  It’s just SO hard to get a clean cut with a straight edge, and if it’s not straight, my critical eye can’t stand it, haha.  So I’ve been playing around with die-cutting some bracelet blanks, and I whipped up this riveted leather cuff from scrap upholstery leather, a bit of chain, and crystal rivets!

Riveted Leather Bracelet at www.happyhourprojects.com

I’m beginning to think that there’s nothing my Sizzix Big Shot can’t do… I used it with the Magic Bracelet die to create today’s piece.  I know riveting may seem a little intimidating if it’s a technique that’s new to you, but if you are comfortable with a hammer, you can do it!  You just need the right tools, and today’s DIY riveted leather bracelet tutorial, and you can make a great piece of your own.

Riveted Leather Bracelet at www.happyhourprojects.com

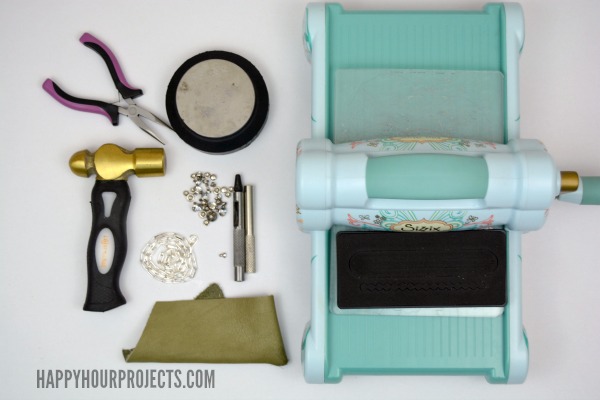
Here’s what you will need:

  • Sizzix Big Shot and standard cutting pads
  • Sizzix Magic Bracelet Originals die
  • Leather upholstery scrap (at least 6 inches long, and 1.5 inches wide)
  • 1 lb. hammer
  • Leather punch with 1/8 inch attachment
  • Steel bench block
  • Rubber bench block
  • Assorted size snap-set crystal rivets
  • Rivet setting tool
  • 2 inches of chunky oval chain, two 10 mm jump rings, and lobster clasp
  • Flat nosed jewelry pliers

Riveted Leather Bracelet at www.happyhourprojects.com

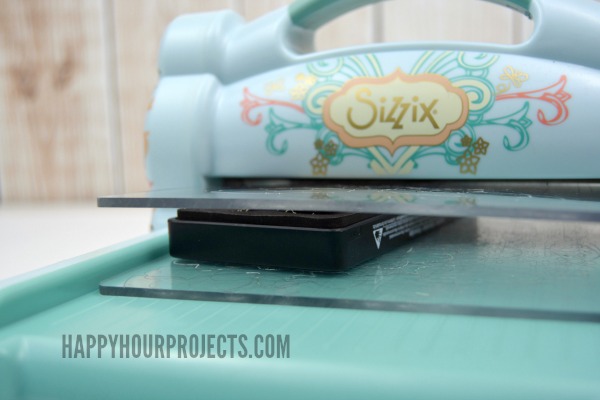
First things first: sandwich your die,  with your leather scrap on top of the bracelet blank, between your cutting pads.  Roll it through your Big Shot to die-cut a clean leather blank that’s sliced neatly into three connected strands.

Riveted Leather Bracelet at www.happyhourprojects.com

This die is called the magic bracelet because you can also make the magic braid with it!  But for today’s project, we’re just going for a flat, multi-strand look.  There are pre-punched holes on each side for you to attach your chain in a later step.

Riveted Leather Bracelet at www.happyhourprojects.com

Now, decide on the placement of your crystal rivets, and punch holes where you want to place them.  I added 13 crystals, staggered over all 3 strands.  To punch the holes, lay the bracelet blank flat on your steel bench block, and place the punch where you want the hole to go.  Tap the top of the punch with your hammer a few times until it cuts fully through the leather, leaving a hole.  Repeat until you have the right number of holes.

Riveted Leather Bracelet at www.happyhourprojects.com

Now, snap the rivets onto the bracelet through the holes.  The crystal side pokes through the leather, and the backs snap onto the rivets.  Now, the snap is just a temporary placement – next, you will need to use the rivet-setting tool with your bracelet on a rubber bench block.  The rubber helps absorb some of the impact so that the crystals don’t crack.  Tap the end of the rivet setter a few times with your hammer until the rivets are compacted, and permanently secure.

Riveted Leather Bracelet at www.happyhourprojects.com

When you’ve attached all your rivets, you’ll need to finish off your bracelet with a bit of chain.  You will need to add a large jump ring on one side, and the chain on the other side.  For most chain, you can twist the links open and use them.  If your chain won’t open, you can simply use additional jump rings.  Twist the open with your jewelry pliers and close them securely through the hole in your leather blank.

Riveted Leather Bracelet at www.happyhourprojects.com

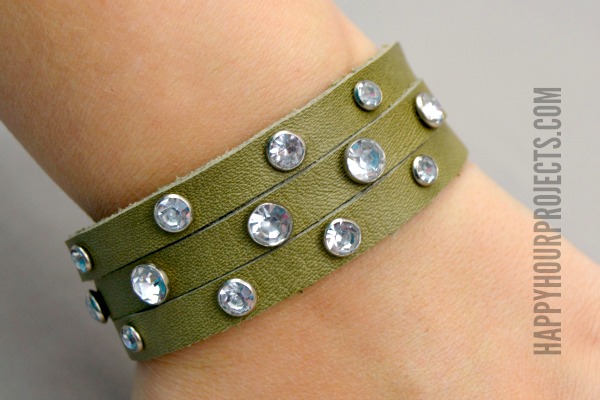
And with that, you’ve got an edgy new accessory!  Changing the color of the leather and they style and placement if the rivets will give you a totally different result, so you can use this Sizzix die to make many different looks.

Do you make a lot of your own accessories already, or are you just getting into DIY jewelry?

szus_designteam_badgeadrianne signature


Filed Under: Bracelets, Fashion, Jewelry, Metal Stamping, Paper Crafts, Tutorials Tagged With: accessories, bracelet, die cut, leather, metal, riveted, rivets, Sizzix

copyright policy and terms of use

I love it when you love my work! All tutorials and photos published at Happy Hour Projects are copyrighted. If you would like to feature my tutorial on your website or share it on your social media you may use one photo to feature, as long as you provide a link back to the original post.

If you feature a photo, it may not be accompanied by the project tutorial or recipe, whether in my own words as it originally appears or paraphrased by you. This also includes personal sharing on social media and Pinterest. Publishing multiple photos from a project, or including instructions with an accompanying photo are not permitted and you will be asked to remove them.

I love to share my projects, and my tutorials, recipes, and e-books are ALL free for your personal use. However, photos and ideas that are published to this site are my protected intellectual property. You may print them at home, but please do not copy or distribute them. I also allow all designs to be made and sold at fundraisers, craft fairs, etc. If you are selling a piece made from one or more of my free tutorials in your online shop, I require that you use your own, original photography, and include a link back to my website to credit me as the designer.

I hope you enjoy what you read here, and please be fair when you share!

Reader Interactions

Comments

  1. Double says

    12/16/2015 at 8:38 am

    Hi,This is Double from Null Industrail Co.,Ltd which offer wallet and leather products more than 10 years .
    1.We can make any wallets as your requirements
    2. 2000+ Styles in stock , no MOQ ;
    3.Price range is $2-$4
    4. OEM style /leather/size/color/logo/lining/package ect

    Please get back to me if you are interested in .
    Best Regards,
    Double Tong
    Guangzhou Null Industrial Co.,Limited
    Skype:sales21@nullwallet.com
    Whatsapp:+86 18802091805
    Office Tel:86-020-86655668 , 86-020-86655448
    Website:nullwallet.com
    Alibaba Online Shop: null.en.alibaba.com

    Reply
  2. pop tools Brisbane says

    02/20/2015 at 12:41 am

    Some riveting tools can also be used in handicrafts and other related stuffs. Very useful indeed.

    Reply
  3. genevive says

    02/17/2015 at 1:18 am

    yes! there is nothing a Bigshot cannot do.. been with me for 6 years. we’re BFFs eversince :)

    Reply
  4. Bethany says

    02/09/2015 at 10:24 pm

    This is such a pretty project! I just loved the rhinestone rivets!

    Reply
  5. Alexandra says

    02/09/2015 at 6:32 pm

    This bracelet is so neat! I need to get one of those cutting machines – they seem to cut through anything!

    Reply

Trackbacks

  1. Braccialetti in pelle fai da te – PortaleHobby says:
    09/11/2021 at 5:03 pm

    […] personalizzare con rivetti di ogni tipo per renderlo perfetto per voi. Il tutorial originale è di Happy Hour Projects che realizza la base con l'aiuto di una fustellatrice per poi aggiungere rivetti e ganci per la […]

    Reply
  2. CraftCrave | DigiFree | CraftCrave says:
    02/10/2015 at 12:20 am

    […] DIY Riveted Leather Bracelet – 1 freebie(s)? […]

    Reply

Leave a Reply Cancel reply

Your email address will not be published. Required fields are marked *

Primary Sidebar

Hello, and welcome! I'm Adrianne, an artist, author, designer, and blogger in mid Michigan. I work from home, chase my two kids, and this once-city-girl is learning how to care for chickens and adjusting to life out in the country. I have a compulsion for daily creativity... sometimes it's jewelry-making, paper crafting, metal stamping, mixing and baking, or giving new life to recycled items. But with 2 young kids, time is short! My goal here at Happy Hour Projects is to share projects and tips that you can do in an hour or less. The ideas you find here are designed to add a little creativity in your day, no matter how much (or how little) time you have!

BUY MY BOOKS!

Copyright © 2023 Happy Hour Projects on the Brunch Pro Theme