• Skip to primary navigation
  • Skip to main content
  • Skip to primary sidebar

  • home
  • about adrianne
  • buy the books
    • DIY T-Shirt Crafts (2015)
    • DIY Stamped Metal Jewelry (2016)
    • Rock Painting for Beginners (2019)
  • videos
  • crafts
    • diy beauty projects
    • kids’ crafts
    • paper craft projects
    • polymer clay
    • sewing projects
  • jewelry
    • bracelet projects
    • earring projects
    • necklace projects
    • jewelry tools & supplies
  • metal stamping
    • beginners’ tutorial
    • video tutorial
    • project ideas
    • metal stamping supplies
  • recipes
    • cocktail recipes
    • appetizers
    • main and side dishes
    • sweets and treats
  • by season
    • birthdays
    • new year
    • valentine’s day
    • st. patrick’s day
    • easter and spring
    • mother’s day
    • patriotic
    • fall
    • halloween
    • christmas
    • thanksgiving
  • privacy

Happy Hour Projects logo

09/05/2018

DIY Solar System Bracelet

Hey friends! I have something really fun to share if you’re into science, space, or general geek related accessories. (I say geek accessories quite proudly, by the way.) A version of a solar system bracelet was showing up in my social media feed recently (it tells you what kinds of things I Google, ahem) and I just LOVED it. Of course my philosophy is that I don’t buy, I DIY, so I picked my own stones and created this simple stretchy bracelet. What’s nice about making it myself is that I have plenty of supplies leftover to make additional bracelets, so my kids and I turned it into a little home lesson on the planets and they’ve got their own bracelets to remind them!

DIY Solar System bracelet at happyhourprojects.com | This DIY features gemstone beads and pewter elements on a simple stretch cord. A fun DIY and a great science lesson too! #science #space #DIY #jewelry

I got all my stone beads from today’s post sponsor, Happy Mango Beads, which is – by far – one of the best sources for natural and unique beads online that I have found. I’ll leave links to what I chose below, and if you find that an item is out of stock, then you can choose any beads that fall into that size and color category.

Supplies needed to make a DIY solar system bracelet:

  • 5 inches of 6mm round black onyx base beads
  • 13-14 – 2mm metal spacer beads
  • 1 – Star charm, 4mm jump ring, and spacer bail (optional)
  • 1 – 2-3mm round moonstone bead (Mercury)
  • 1 – 3-4mm round carnelian agate bead (Venus)
  • 1 – 4-5mm sound sodalite bead (Earth)
  • 1 – 2-3mm round garnet bead (Mars)
  • 1 – 10mm round tiger eye bead (Jupiter)
  • 1 – 8mm round peach agate bead (Saturn)
  • 1 – 6mm round blue agate bead (Uranus)
  • 1 – 6mm round lapis lazuli bead (Neptune)
  • 1 – 2-3mm round moonstone bead (Pluto)
  • 1 – 8mm jump ring (any gauge)
  • .5mm stretch cord
  • Jewelry glue or super glue

DIY Solar System bracelet at happyhourprojects.com | This DIY features gemstone beads and pewter elements on a simple stretch cord. A fun DIY and a great science lesson too! #science #space #DIY #jewelry

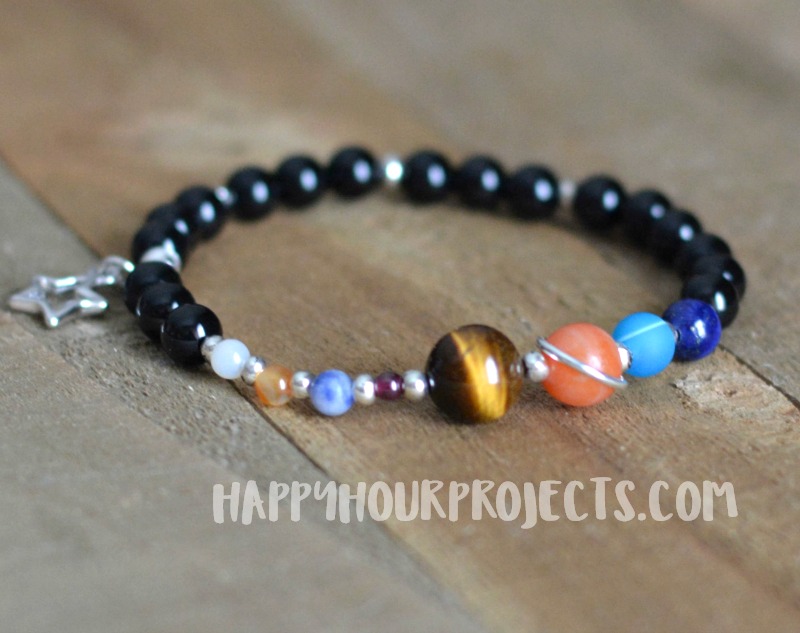
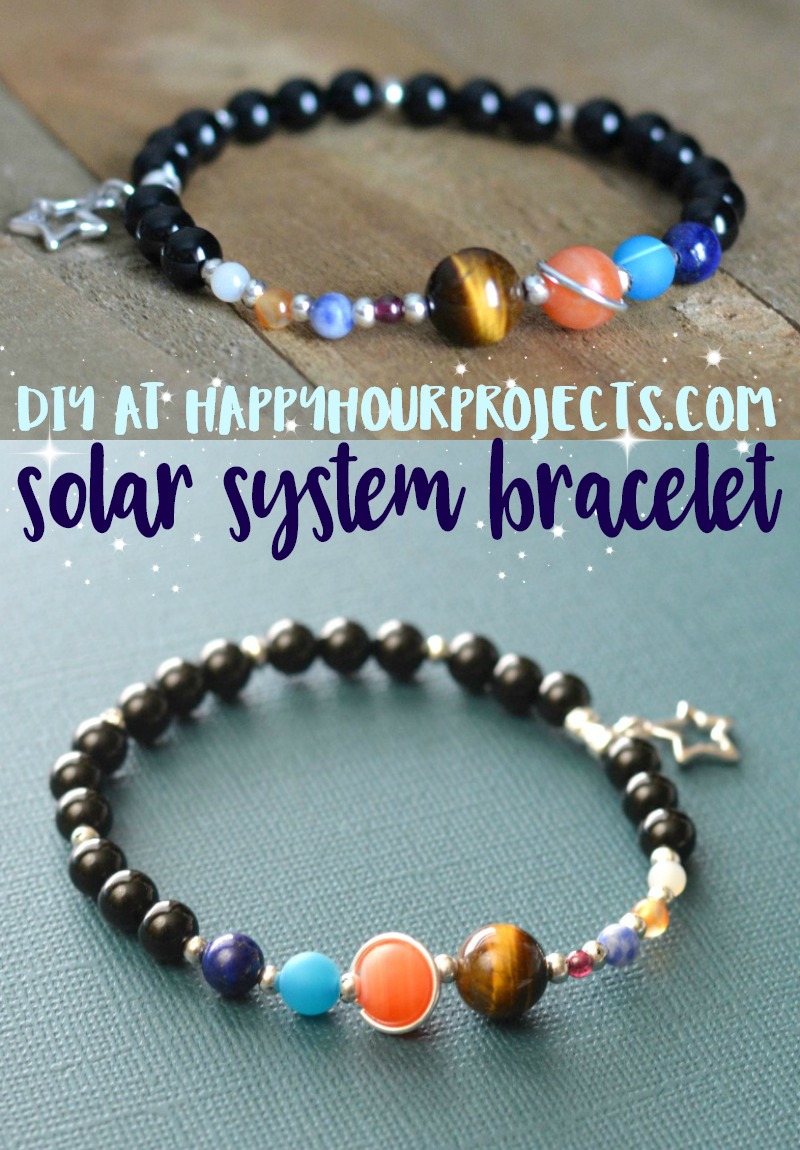
While the beads are of course not exactly to scale (Jupiter alone would never fit on your wrist), the difference in sizes of the beads still helps to illustrate that some planets are much larger or smaller in relation to each other.  Mercury was a little large for my liking (as it’s the smallest planet) but it still shows that the innermost planets are significantly smaller than the outer planets in our solar system.

DIY Solar System bracelet at happyhourprojects.com | This DIY features gemstone beads and pewter elements on a simple stretch cord. A fun DIY and a great science lesson too! #science #space #DIY #jewelry

To make Saturn’s rings, I glued a jump ring around the bead.  You can find open ring beads, but I wasn’t able to find one I liked in the right size – and using the jump ring takes the guesswork out of ordering.  Just stretch the ring around the bead as best you can, double check to make sure it isn’t covering the bead hole, and add a drop of super glue onto the ring.  It will settle in along the groove and ensure that Saturn’s rings stay where they belong!  Allow it to dry before stringing your beads – this should only take a few minutes.  If you’re making this piece with your kids or a group, you can take this time to talk about the names of the planets or anything you know about space, or take a few minutes to Google it and learn!

DIY Solar System bracelet at happyhourprojects.com | This DIY features gemstone beads and pewter elements on a simple stretch cord. A fun DIY and a great science lesson too! #science #space #DIY #jewelry

Cut a 12-inch length of stretch cord, and string the planets on in order.  I used spacer beads to separate them, although this is of course not to scale, scientifically!  It’s just for aesthetics, lol.  Just to remind you, the order of planets is:

Mercury
Venus
Earth
Mars
Jupiter
Saturn
Uranus
Neptune

You can also add the dwarf planet Pluto, and if you’re feeling really cutting edge, they’re discussing a second dwarf planet outside of Pluto’s orbit named Eris!  Another fun thing to Google and learn about.

Fill the rest of your bracelet with black beads (I’m using onyx, but snowflake obsidian would be fun to represent all the other stars in the universe).  For my adult-sized wrist, I made a length of 7 3/4 inches.  School aged kids’ wrists can be as small as 5 inches (or smaller, depending of course on their age and size) so the best best for kids’ sizing is to measure their wrists when you begin the project.

DIY Solar System bracelet at happyhourprojects.com | This DIY features gemstone beads and pewter elements on a simple stretch cord. A fun DIY and a great science lesson too! #science #space #DIY #jewelry

I added a spacer bead every few beads – swapping out one of the spacers for a small bail so that I could attach a star shaped charm.  (And no, stars aren’t really star shaped, as my first grader is fond of reminding me.  It’s artistic license, and it’s totally optional!)  You can finish off the bracelet with a square knot – a basic double knot.  Finishing it next to a spacer bead is great because the bead can help to hide the knot.  Add a dot of glue to help keep the knot secure, and trim the excess strings away.

DIY Solar System bracelet at happyhourprojects.com | This DIY features gemstone beads and pewter elements on a simple stretch cord. A fun DIY and a great science lesson too! #science #space #DIY #jewelry

If you do choose to add a charm (don’t forget, an initial, a heart, a moon, or anything you’re into are all great choices) you can use a pair of chain nose pliers to attach it to the bail with a small jump ring.

DIY Solar System bracelet at happyhourprojects.com | This DIY features gemstone beads and pewter elements on a simple stretch cord. A fun DIY and a great science lesson too! #science #space #DIY #jewelry

I really like using the stone beads for this bracelet, keeping “nature” in my DIY solar system bracelet.  It’s a fun conversation piece, and I have to admit – even I learned about how big each planet is, what it looks like, and some other space fun facts in my research!


DIY Solar System bracelet at happyhourprojects.com | This DIY features gemstone beads and pewter elements on a simple stretch cord. A fun DIY and a great science lesson too! #science #space #DIY #jewelry

I hope you enjoyed this geek gift idea, and I’ll be back again soon to share some other fast and fun DIY projects!

Adrianne Surian

Filed Under: Bracelets, Fashion, Jewelry, Tutorials Tagged With: accessories, beads, bracelet, charms, fashion, geek gifts, gifts, Happy Mango Beads, jewelry, science, solar system, stone

copyright policy and terms of use

I love it when you love my work! All tutorials and photos published at Happy Hour Projects are copyrighted. If you would like to feature my tutorial on your website or share it on your social media you may use one photo to feature, as long as you provide a link back to the original post.

If you feature a photo, it may not be accompanied by the project tutorial or recipe, whether in my own words as it originally appears or paraphrased by you. This also includes personal sharing on social media and Pinterest. Publishing multiple photos from a project, or including instructions with an accompanying photo are not permitted and you will be asked to remove them.

I love to share my projects, and my tutorials, recipes, and e-books are ALL free for your personal use. However, photos and ideas that are published to this site are my protected intellectual property. You may print them at home, but please do not copy or distribute them. I also allow all designs to be made and sold at fundraisers, craft fairs, etc. If you are selling a piece made from one or more of my free tutorials in your online shop, I require that you use your own, original photography, and include a link back to my website to credit me as the designer.

I hope you enjoy what you read here, and please be fair when you share!

Reader Interactions

Comments

  1. Thais says

    08/21/2019 at 10:38 am

    Wow this bracelet is beautiful. Thank you for the inspiration.

    Reply
  2. thejewelcreation says

    08/21/2018 at 5:49 am

    Loved this idea! thanks for sharing :)

    Reply
  3. kanchipuram sarees says

    08/16/2018 at 2:59 am

    nice post

    Reply
  4. golu dolls says

    08/16/2018 at 2:58 am

    looking good

    Reply
  5. The Furnshop says

    06/13/2018 at 7:03 am

    This is really an interesting idea for making a DIY solar system bracelet. This is looking pretty. Thanks a lot for sharing this tutorial.

    Reply
  6. Barb Smith says

    06/09/2018 at 7:40 pm

    What a fantastic idea! Just right for the kids at summer crafts fairs <3

    Reply
  7. Juli // Once Upon a Cheerio says

    06/04/2018 at 1:14 am

    OMG This is way too cool. My 3-year-old knows and LOVES all the planets! She would love this!

    Reply
  8. Kristin says

    03/31/2018 at 2:31 pm

    Hey there! I just wanted to say that I LOVE this project! My bracelet turned out awesome!!

    Thanks!

    Reply
  9. Instagram Search says

    03/24/2018 at 3:28 am

    Love your work Adrianne

    Reply
  10. Hazel Whiteford says

    03/01/2018 at 5:21 am

    Love your work Adrianne and especially this one as I too love all things space! Keep them coming :)

    Reply
  11. EL says

    02/13/2018 at 3:44 pm

    Genius, love it! (esp. the little Saturn ring <3 ) Thanks!
    El x

    Reply
  12. yify says

    02/07/2018 at 2:18 am

    What’s up it’s me, I am also visiting this site daily, this website is in fact pleasant and the viewers are in fact sharing good thoughts

    Reply

Trackbacks

  1. 20 Preschool Activities on Solar System Project Ideas - OhMyClassroom.com says:
    04/13/2023 at 1:51 pm

    […] Source: happyhourprojects.com […]

    Reply

Leave a Reply Cancel reply

Your email address will not be published. Required fields are marked *

Primary Sidebar

Hello, and welcome! I'm Adrianne, an artist, author, designer, and blogger in mid Michigan. I work from home, chase my two kids, and this once-city-girl is learning how to care for chickens and adjusting to life out in the country. I have a compulsion for daily creativity... sometimes it's jewelry-making, paper crafting, metal stamping, mixing and baking, or giving new life to recycled items. But with 2 young kids, time is short! My goal here at Happy Hour Projects is to share projects and tips that you can do in an hour or less. The ideas you find here are designed to add a little creativity in your day, no matter how much (or how little) time you have!

BUY MY BOOKS!

Copyright © 2023 Happy Hour Projects on the Brunch Pro Theme