• Skip to primary navigation
  • Skip to main content
  • Skip to primary sidebar

  • home
  • about adrianne
  • buy the books
    • DIY T-Shirt Crafts (2015)
    • DIY Stamped Metal Jewelry (2016)
    • Rock Painting for Beginners (2019)
  • videos
  • crafts
    • diy beauty projects
    • kids’ crafts
    • paper craft projects
    • polymer clay
    • sewing projects
  • jewelry
    • bracelet projects
    • earring projects
    • necklace projects
    • jewelry tools & supplies
  • metal stamping
    • beginners’ tutorial
    • video tutorial
    • project ideas
    • metal stamping supplies
  • recipes
    • cocktail recipes
    • appetizers
    • main and side dishes
    • sweets and treats
  • by season
    • birthdays
    • new year
    • valentine’s day
    • st. patrick’s day
    • easter and spring
    • mother’s day
    • patriotic
    • fall
    • halloween
    • christmas
    • thanksgiving
  • privacy

Happy Hour Projects logo

04/16/2014

Duck Tape® Bead Bracelet

This is a Sponsored post written by me on behalf of Duck Brand. All opinions are 100% mine.

Yep, that’s right, Duck Tape® BEADS!  You may have read earlier this year when I re-visited the classic craft, paper beads.  I made about a gazillion of them when I was a kid.  They are simple and inexpensive, but the drawback is… they can be a bit messy.  So when Duck Tape® sent me these adorable new smaller tapes, my first thought was, “these could definitely become jewelry”.  You know me, right?  If it can be turned into an accessory, I’m probably going to do it!  So with just scissors, straws, and ribbon, I whipped up this bracelet made from Duck Tape® beads in under an hour.

How To Make Duck Tape Beads at www.happyhourprojects.com

Between the smaller-sized tapes and the new glitter colors, I had plenty of spring colors and sparkle to choose from.

How To Make Duck Tape Beads at www.happyhourprojects.com

What you will need to make Duck Tape® beads:

  • Duck Tape®!  I loved the small sizes, but you can easily trim larger tapes down for this project.  The glitter tapes were full-sized tapes.
  • Scissors
  • Clear plastic drinking straws
  • You will also want a way to turn your beads into finished jewelry, so I used three 24″ lengths of ribbon.  You can make any kind of jewelry creation you like with your finished beads, though!

How To Make Duck Tape Beads at www.happyhourprojects.com

For this project, I used pink and silver Ducklings, and hot pink and silver glitter Duck Tape®.  First, I’ll show you the process using the smaller tapes.

Cut a length of tape between 6-8 inches.  The longer you make it, the puffier your finished bead will be.  Experiment with sizes until you find your favorite look!

Then, cut it diagonally from corner to corner.  I stick them to the table while I work. :P

How To Make Duck Tape Beads at www.happyhourprojects.com

Next, roll your beads.  Stick the large end of the triangle to the clear straw.  Then, roll it up, trying to keep your tape centered.  Duck Tape® will stretch a little so that makes it relatively easy!

How To Make Duck Tape Beads at www.happyhourprojects.com

For wider tapes (like the glitter tapes), you will want to cut then in half (or even thirds) lengthwise, first.  Then cut them diagonally (as shown below.)  But you can keep on rolling until you have as many as you need for your project!  40 or so was plenty for me.

When you’ve rolled enough, just cut your straw between beads.

How To Make Duck Tape Beads at www.happyhourprojects.com

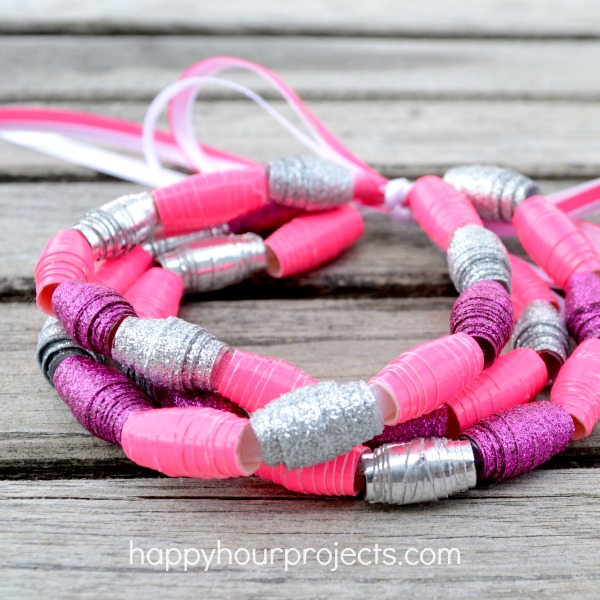
Look how fabulous your beads are!  A quick note about the glitter beads – they stick great while you are working, but I found that with some wear on the bracelet, the little ends eventually popped up.  The glitter sticks great on the tape, but because it’s a porous surface, sticking more tape on top of it doesn’t hold as tough as the smooth tapes did, so you may want a tiny dot of glue to help secure it.  This photo is without any glue at all:

How To Make Duck Tape Beads at www.happyhourprojects.com

You can see, everything it holding great.  If you’re planning a paper craft or home decor item that won’t be handled frequently, you’ll be pleased with the hold.  But for those of you who make accessories, you know that a bracelet withstands a fair amount of abuse even on a good day.  I will say, the smooth tapes were absolutely perfect.

Now, at this point, I turned mine into a simple ribbon bracelet.  I strung three strands onto 24″ ribbons.  I used about 7.25 inches of beads.  A quarter inch give or take isn’t a big deal – try it against your wrist to gauge the length you need.  At each end, I tied an overhand knot.

To keep your ribbon from fraying, you can heat the ends to melt them slightly.  You can do this over a candle or with a lighter (just do NOT light it on fire, haha).  This is an optional step, but it helps preserve your ribbon for longer-term wear.

How To Make Duck Tape Beads at www.happyhourprojects.com

Then, tie it onto your (or your friend’s!) wrist!  It’s a great conversation-starter: “You made that with Duck Tape®?!”

How To Make Duck Tape Beads at www.happyhourprojects.com

You can find Duck Tape here, and be sure to follow Duck Tape® on Pinterest, on Facebook, and on Twitter for all kinds of crafty inspiration.

So what kinds of spring crafts are you making this year?  Decor?  Accessories? Anything with Duck Tape®?

Filed Under: Bracelets, Fashion, Jewelry, Paper Crafts, Sponsored, Tutorials Tagged With: accessories, beads, bracelet, Duck Tape

copyright policy and terms of use

I love it when you love my work! All tutorials and photos published at Happy Hour Projects are copyrighted. If you would like to feature my tutorial on your website or share it on your social media you may use one photo to feature, as long as you provide a link back to the original post.

If you feature a photo, it may not be accompanied by the project tutorial or recipe, whether in my own words as it originally appears or paraphrased by you. This also includes personal sharing on social media and Pinterest. Publishing multiple photos from a project, or including instructions with an accompanying photo are not permitted and you will be asked to remove them.

I love to share my projects, and my tutorials, recipes, and e-books are ALL free for your personal use. However, photos and ideas that are published to this site are my protected intellectual property. You may print them at home, but please do not copy or distribute them. I also allow all designs to be made and sold at fundraisers, craft fairs, etc. If you are selling a piece made from one or more of my free tutorials in your online shop, I require that you use your own, original photography, and include a link back to my website to credit me as the designer.

I hope you enjoy what you read here, and please be fair when you share!

Reader Interactions

Comments

  1. Marilyn says

    04/24/2014 at 3:38 pm

    Adrianne, I absolutely LOVE these beads! The glittery Duck Tape add just enough glam too! :)

    Reply
  2. Tara says

    04/17/2014 at 2:29 am

    Adorable! I love the glitter tapes! They might be my favourite Duck Tape so far!

    Reply
  3. Crystal says

    04/16/2014 at 10:24 pm

    Super cute!! Love it!!

    Reply

Trackbacks

  1. Ultimate Gift Guide: Jewelry Ideas | One Artsy Mama says:
    10/06/2014 at 6:02 am

    […] Memory Wire Bracelets 42. Perler Bead Earrings 43. Duck Tape Bead Bracelet 44. Elephant Bracelet 45. Textured Clay […]

    Reply
  2. 25+ Duct Tape Crafts | The Divine Miss Mommy | Atlanta Georgia Mom Blogger | Travel Blogger says:
    06/26/2014 at 12:17 am

    […] Duck Tape Beaded Bracelet 2. DIY Binoculars 3. Duct Tape Flower Pen 4. Duck Tape Feather Earrings 5. DIY Purse 6. Duct Tape […]

    Reply
  3. 25 Free Duct Tape Crafts - The Spring Mount 6 Pack says:
    06/24/2014 at 11:54 am

    […] 5. Duct Tape Drums 6. Duck Tape Flower Pens 7. Storage Cubes 8. Treat Bag 9. Pocket Notebook 10. Beaded Bracelet 11. Cardboard Polka Dot Pig 12. Custom (Sturdy) Gift Bags 13. iPad Sleeve 14. Floral Clutch Purse […]

    Reply

Leave a Reply Cancel reply

Your email address will not be published. Required fields are marked *

Primary Sidebar

Hello, and welcome! I'm Adrianne, an artist, author, designer, and blogger in mid Michigan. I work from home, chase my two kids, and this once-city-girl is learning how to care for chickens and adjusting to life out in the country. I have a compulsion for daily creativity... sometimes it's jewelry-making, paper crafting, metal stamping, mixing and baking, or giving new life to recycled items. But with 2 young kids, time is short! My goal here at Happy Hour Projects is to share projects and tips that you can do in an hour or less. The ideas you find here are designed to add a little creativity in your day, no matter how much (or how little) time you have!

BUY MY BOOKS!

Copyright © 2023 Happy Hour Projects on the Brunch Pro Theme