• Skip to primary navigation
  • Skip to main content
  • Skip to primary sidebar

  • home
  • about adrianne
  • buy the books
    • DIY T-Shirt Crafts (2015)
    • DIY Stamped Metal Jewelry (2016)
    • Rock Painting for Beginners (2019)
  • videos
  • crafts
    • diy beauty projects
    • kids’ crafts
    • paper craft projects
    • polymer clay
    • sewing projects
  • jewelry
    • bracelet projects
    • earring projects
    • necklace projects
    • jewelry tools & supplies
  • metal stamping
    • beginners’ tutorial
    • video tutorial
    • project ideas
    • metal stamping supplies
  • recipes
    • cocktail recipes
    • appetizers
    • main and side dishes
    • sweets and treats
  • by season
    • birthdays
    • new year
    • valentine’s day
    • st. patrick’s day
    • easter and spring
    • mother’s day
    • patriotic
    • fall
    • halloween
    • christmas
    • thanksgiving
  • privacy

Happy Hour Projects logo

01/13/2014

Using Jewelry Connectors To Make Easy Earrings

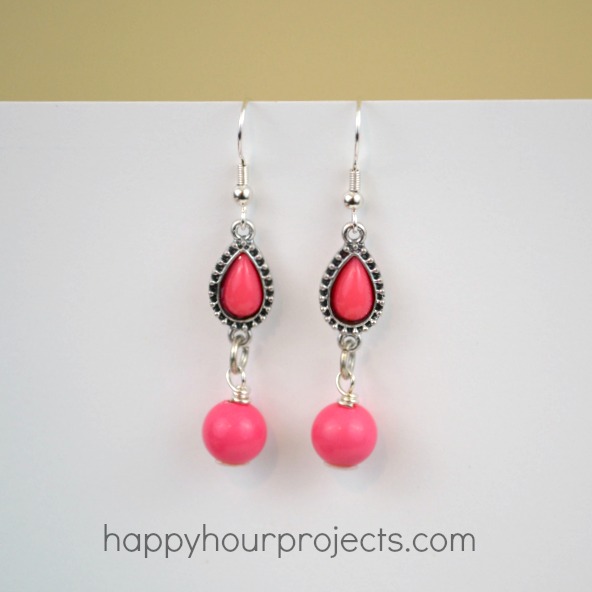
I recently spotted a set of jewelry connectors on the Consumer Crafts website that I just loved.  Connectors are an easy way to make your own jewelry – as the name suggests, you just connect them to other components, and you have instant jewelry.  This was a bonus because it’s a full matched set – I could add my own touches, and have really inexpensive coordinated pieces in just a few minutes.   Today I’m going to show you how to make these easy earrings, and come back tomorrow if you’d like to see the matching necklace!

Using Connectors to Make Easy Earrings at www.happyhourprojects.com

I will leave the links to the products I used in today’s project, just because they are pretty specific if you’re hoping to re-create this exact look.  I’m not being compensated in any way for this post or if you click on or buy these products – but because you readers usually ask where I got my specific supplies, I’m going to link out to the different components in case!

What you will need:

Using Connectors to Make Easy Earrings at www.happyhourprojects.com

  • Connectors that you love.  I found mine at Consumer Crafts for $2.97 for the set (score!)
  • Earring Wires
  • Jewelry Head Pins
  • Wire cutters
  • Round-nosed pliers
  • Jump Rings
  • Coordinated beads (these are 10mm)
  • Optional: sequins or small beads

These earrings are made of a charm (that I made) and a connector (that was pre-made).  So first things first: make the charm.

Using Connectors to Make Easy Earrings at www.happyhourprojects.com

The hole in my beads was on the large side and I was afraid that the pin head wouldn’t be big enough to hold it in place.  So what I do in these cases is add a clear (or sparkly) sequin to the head pin first, and then thread the bead on.  This is the same principle as using a washer with a screw when you make a household repair – it just ensures that it won’t slip later.

Next, use your round nosed pliers to make a round loop in the head pin just above the bead – just wrap the wire around.  Then, wrap the excess “tail” of wire around the pin below the loop to close it off.  Nip off any excess with your wire cutters.

Next, You just have to connect everything together!  Attach the charm you just made to the bottom of your connector with a jump ring, and the top of the connector to an earring wire.

Using Connectors to Make Easy Earrings at www.happyhourprojects.com

Now, just make another to match!

Using Connectors to Make Easy Earrings at www.happyhourprojects.com

Come back tomorrow if you’d like to see how to make the matching necklace!

Adrianne Signature

Filed Under: Earrings, Fashion, Jewelry, Tutorials Tagged With: 10-minute project, beads, charms, connectors, earrings, wire wrapping

copyright policy and terms of use

I love it when you love my work! All tutorials and photos published at Happy Hour Projects are copyrighted. If you would like to feature my tutorial on your website or share it on your social media you may use one photo to feature, as long as you provide a link back to the original post.

If you feature a photo, it may not be accompanied by the project tutorial or recipe, whether in my own words as it originally appears or paraphrased by you. This also includes personal sharing on social media and Pinterest. Publishing multiple photos from a project, or including instructions with an accompanying photo are not permitted and you will be asked to remove them.

I love to share my projects, and my tutorials, recipes, and e-books are ALL free for your personal use. However, photos and ideas that are published to this site are my protected intellectual property. You may print them at home, but please do not copy or distribute them. I also allow all designs to be made and sold at fundraisers, craft fairs, etc. If you are selling a piece made from one or more of my free tutorials in your online shop, I require that you use your own, original photography, and include a link back to my website to credit me as the designer.

I hope you enjoy what you read here, and please be fair when you share!

Reader Interactions

Comments

  1. Barbara says

    01/14/2014 at 12:12 pm

    Love the use of sequins as bead caps. Do they hold up pretty well? Very clever!

    Reply
    • Adrianne says

      01/14/2014 at 3:00 pm

      For earrings and necklaces, yes, they work very well! If you are making charms for a bracelet, I would opt for a bead, since bracelets get banged around a lot more. :)

      Reply
      • Barbara says

        01/14/2014 at 3:19 pm

        Now I’m gonna go look at sequins! Thanks!

        Reply
  2. Cheryl loves danglie earings says

    01/14/2014 at 11:20 am

    Wow! I absolutely LOVE these. I have never, ever made any earrings as I’ve found it intimidating. There is so much to understand and supplies needed. But wow, this has inspired me! I’ve even copied this post to my ‘save really great stuff’ folder. So I’m going to make the attempt and I don’t even care if I fail. It’s time to go out on the proverbial limb. So off I go…….

    Reply
    • Adrianne says

      01/14/2014 at 11:51 am

      I’m so glad to hear it, Cheryl! Let me know how it goes!

      Reply
  3. Shelly says

    01/13/2014 at 11:31 pm

    What a fun and quick idea!! You can make your jewelry 15 min before you go out! Thanks for the idea!

    Reply
  4. Jessi says

    01/13/2014 at 5:53 pm

    Love those! They’re so pretty, and they look simple enough to do! Pinning for sure!

    Reply
  5. yvonne says

    01/13/2014 at 4:21 pm

    Very pretty and looks so easy.

    Reply
  6. Marilyn says

    01/13/2014 at 3:09 pm

    What a great tutorial and I LOVE these earrings…..very victorian!

    Reply
  7. Abby says

    01/13/2014 at 8:07 am

    Love these! The pink would be so perfect with a Valentine’s outfit! Thanks for sharing, Adrianne!

    ~Abby =)

    Reply

Trackbacks

  1. Happy Hour Projects | Pearltrees says:
    05/17/2017 at 1:25 pm

    […] – Happy Hour Projects. Friday Finds: 10 Blogs That Rock Paint Projects – Happy Hour Projects. Using Jewelry Connectors To Make Easy Earrings – Happy Hour Projects. Leather Infinity Bracelet – Happy Hour […]

    Reply
  2. Using Jewelry Connectors to Make an Easy Necklace says:
    01/14/2014 at 6:00 am

    […] showed you yesterday how to make an easy pair of earrings using jewelry connectors and jump rings, with a charm you make yourself.  Well, today I’m going to show you the rest […]

    Reply

Leave a Reply Cancel reply

Your email address will not be published. Required fields are marked *

Primary Sidebar

Hello, and welcome! I'm Adrianne, an artist, author, designer, and blogger in mid Michigan. I work from home, chase my two kids, and this once-city-girl is learning how to care for chickens and adjusting to life out in the country. I have a compulsion for daily creativity... sometimes it's jewelry-making, paper crafting, metal stamping, mixing and baking, or giving new life to recycled items. But with 2 young kids, time is short! My goal here at Happy Hour Projects is to share projects and tips that you can do in an hour or less. The ideas you find here are designed to add a little creativity in your day, no matter how much (or how little) time you have!

BUY MY BOOKS!

Copyright © 2026 Happy Hour Projects on the Brunch Pro Theme