• Skip to primary navigation
  • Skip to main content
  • Skip to primary sidebar

  • home
  • about adrianne
  • buy the books
    • DIY T-Shirt Crafts (2015)
    • DIY Stamped Metal Jewelry (2016)
    • Rock Painting for Beginners (2019)
  • videos
  • crafts
    • diy beauty projects
    • kids’ crafts
    • paper craft projects
    • polymer clay
    • sewing projects
  • jewelry
    • bracelet projects
    • earring projects
    • necklace projects
    • jewelry tools & supplies
  • metal stamping
    • beginners’ tutorial
    • video tutorial
    • project ideas
    • metal stamping supplies
  • recipes
    • cocktail recipes
    • appetizers
    • main and side dishes
    • sweets and treats
  • by season
    • birthdays
    • new year
    • valentine’s day
    • st. patrick’s day
    • easter and spring
    • mother’s day
    • patriotic
    • fall
    • halloween
    • christmas
    • thanksgiving
  • privacy

Happy Hour Projects logo

11/07/2014

Easy Beaded Dangle Earrings

I love easy.  Obviously – with my one-hour-or-less theme around here (and even better, the 10-minute project category)!  Today’s project is one of the quick ones – this simple design will let you make beads of all kinds into charms for earrings, bracelets, pendants – anything you can dream up.  Because it only takes 2 beads, you can choose something extra-special, too.  I’ve been hanging onto these old Arabic prayer beads that I got from Happy Mango Beads a while back, and they were perfect for this project.

Easy Beaded Dangle Earrings with Prayer Beads at www.happyhourprojects.com

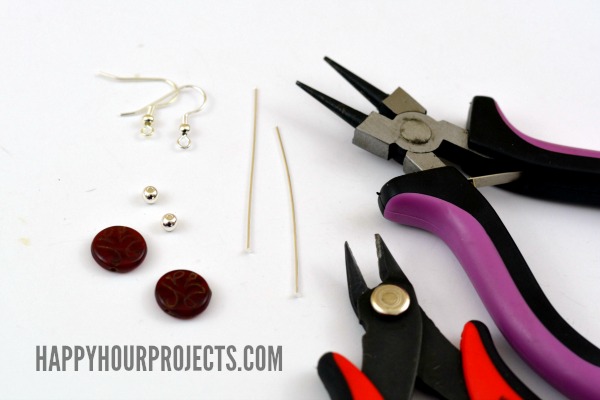
Here’s what you’ll need to make easy beaded earrings for yourself:

  • 2 – 2-inch head pins (if you’re using larger beads, choose 3-inch pins)
  • 2 beads you love
  • 2 metal spacer beads (or coordinated beads, or bead caps)
  • 2 earring wires
  • 2 – 4mm jump rings
  • Round-nosed pliers
  • Wire cutters

Easy Beaded Dangle Earrings with Prayer Beads at www.happyhourprojects.com

To create your earring charms, you will thread the beads onto the head pin.  If the hole is very large on your main bead, you may need a spacer bead underneath, too, to help it stay on (the same way a washer works when you’re building).  This photo illustrates:

Easy Beaded Dangle Earrings with Prayer Beads at www.happyhourprojects.com

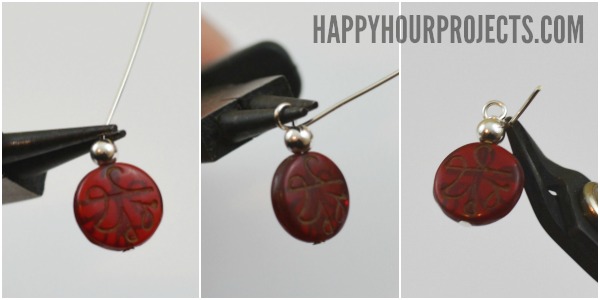
First, tip the pin over one side of your pliers slightly (you can see I angled right).  Then, wrap it up and over the top of the opposite side of your pliers (you can see I wrapped left).  Finally, take that tail and wrap it around the bottom of the loop you just formed.  1-2 wraps is enough to hold, but if you have extra space, you’ll want to keep wrapping to fill the whole gap between the loop and your spacer bead.  Nip off the excess with your wire cutters.

If you would prefer to see this technique in action, I’ve also got a video tutorial that shows how to make jewelry charms. That post shows you how to make a charm bracelet, but the technique is the same no matter what style of bead you use, and what project you add it to.

Easy Beaded Dangle Earrings with Prayer Beads at www.happyhourprojects.com

Repeat the process to make two matching charms.  Finally, assemble your newly-made charms onto your earring wires.  Just twist the jump rings open with your pliers, and close them back up after connecting the two loops.  And that’s it!

Easy Beaded Dangle Earrings with Prayer Beads at www.happyhourprojects.com

I just love the red for this time of year, and the prayer beads make them particularly special – I love beads that are a part of history. Best of all, they make a great, quick Christmas gift for the ladies on your list – use whatever color and style suits them best!  The same technique can be adapted to any number of designs and styles.

Happy beading!

adrianne signature

Filed Under: Earrings, Fashion, Featured, Jewelry, Tutorials Tagged With: 10-minute project, accessories, beads, charms, earrings, easy, fashion, gift, red

copyright policy and terms of use

I love it when you love my work! All tutorials and photos published at Happy Hour Projects are copyrighted. If you would like to feature my tutorial on your website or share it on your social media you may use one photo to feature, as long as you provide a link back to the original post.

If you feature a photo, it may not be accompanied by the project tutorial or recipe, whether in my own words as it originally appears or paraphrased by you. This also includes personal sharing on social media and Pinterest. Publishing multiple photos from a project, or including instructions with an accompanying photo are not permitted and you will be asked to remove them.

I love to share my projects, and my tutorials, recipes, and e-books are ALL free for your personal use. However, photos and ideas that are published to this site are my protected intellectual property. You may print them at home, but please do not copy or distribute them. I also allow all designs to be made and sold at fundraisers, craft fairs, etc. If you are selling a piece made from one or more of my free tutorials in your online shop, I require that you use your own, original photography, and include a link back to my website to credit me as the designer.

I hope you enjoy what you read here, and please be fair when you share!

Reader Interactions

Comments

  1. Phyllis says

    03/10/2015 at 5:47 pm

    Hello – I love your project explanations -thank you. I am a bit of a beginner with jewlery projects and wonder what type of head pins to use for these earrings. There seems to be so many choices other than just length.
    Thank you

    Reply
    • Adrianne says

      03/10/2015 at 6:00 pm

      Thanks!

      I like the flat head pins, like these: http://www.amazon.com/gp/product/B00AE25ABS/ref=as_li_tl?ie=UTF8&camp=1789&creative=390957&creativeASIN=B00AE25ABS&linkCode=as2&tag=haphoupro-20&linkId=VWA2L2565FFAGNCQ

      You can also use the ball head pins: http://www.amazon.com/gp/product/B009LIOHXI/ref=as_li_tl?ie=UTF8&camp=1789&creative=390957&creativeASIN=B009LIOHXI&linkCode=as2&tag=haphoupro-20&linkId=PVKKEW5CBUJVUNAY

      Reply
  2. Mary An Preckol says

    02/10/2015 at 1:34 pm

    Perfect for my 90 yr old mom for valentines and birthday. Plus a teddy bear and sh

    Reply
  3. Ellen says

    02/10/2015 at 2:46 am

    These are so cute. I have a small note book full of my own designs for earrings, necklaces, bracelets,, etc but yours are a snap to put together in 15 to 25 minutes. Thank you.

    Reply

Trackbacks

  1. Happy Hour Projects | Pearltrees says:
    05/17/2017 at 12:48 pm

    […] Pendant – Happy Hour Projects. Leaf-Imprinted Polymer Clay Jewelry Dish – Happy Hour Projects. Easy Beaded Dangle Earrings – Happy Hour Projects. One-Minute Interchangeable Beaded Frame Earrings – Happy Hour Projects. One-Minute Interchangeable […]

    Reply
  2. CraftCrave | DigiFree | CraftCrave says:
    11/07/2014 at 7:27 pm

    […] Easy Beaded Dangle Earrings – 1 freebie(s)? […]

    Reply

Leave a Reply Cancel reply

Your email address will not be published. Required fields are marked *

Primary Sidebar

Hello, and welcome! I'm Adrianne, an artist, author, designer, and blogger in mid Michigan. I work from home, chase my two kids, and this once-city-girl is learning how to care for chickens and adjusting to life out in the country. I have a compulsion for daily creativity... sometimes it's jewelry-making, paper crafting, metal stamping, mixing and baking, or giving new life to recycled items. But with 2 young kids, time is short! My goal here at Happy Hour Projects is to share projects and tips that you can do in an hour or less. The ideas you find here are designed to add a little creativity in your day, no matter how much (or how little) time you have!

BUY MY BOOKS!

Copyright © 2023 Happy Hour Projects on the Brunch Pro Theme