
Confession time: my son is 7 months old and I’m just NOW making him something. For some reason, it was easier making girly things for my daughter. Then again, I didn’t have any other kids to watch back then. But it’s well past time I start making him a few special items! So earlier this week, I re-acquainted myself with my beloved sewing machine (man, I have missed sewing!) and made up this simple minky taggie blanket in just under an hour. If you’re just starting out with sewing and have wondered how to make a baby blanket, I’ve got a great easy project today.
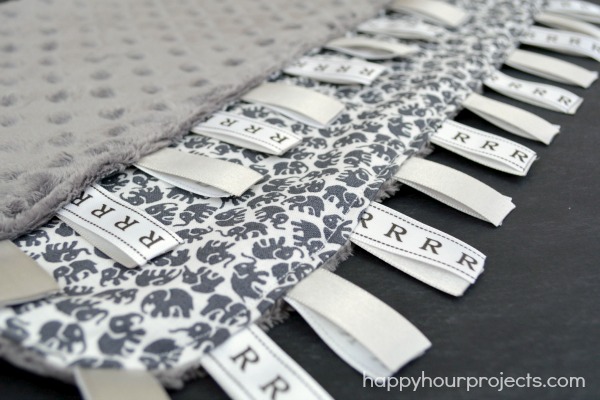
One side is soft minky, the other side is a cute elephant print. And on two ends are ribbon tags for as much fascination as his attention span can handle (which is surprisingly a LOT – the total opposite of how my daughter was).
This project was part of a monthly theme challenge I participate in along with some of the great bloggers. April’s theme is “baby” – and after you read about how to make this beginners’ blanket, scroll down to the bottom of the post for more baby-themed projects!
Now, this is a basic baby blanket with a few extra touches. I’ll show you how I made mine (you won’t even need a pattern!) and I’ll point out ways you can customize it for yourself, too. You can make yours bigger, or without tags, or even with different material – it’s a very versatile project!
What you will need:
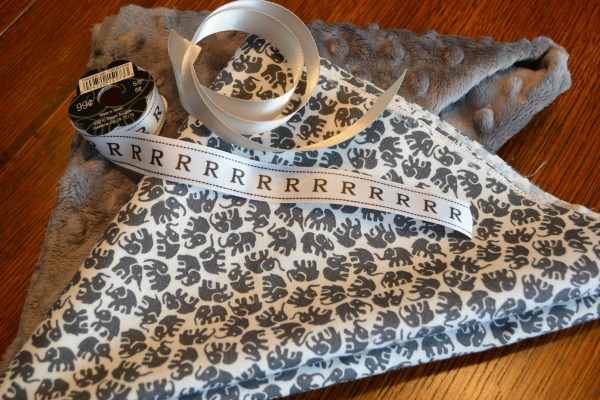
- 18″ squares of minky and a coordinating cotton fabric. Instead of minky, you can also use flannel (though it won’t be as fluffy or soft). At the fabric counter, as for half a yard of each. The widths will be wider than 18 inches, so you will be able to make more than one with this fabric that you buy (hello, future baby shower gifts).
- Coordinating thread. You would not believe how easy it is to forget to buy thread, and get home to discover nothing you have will match. ;)
- A couple 9-foot (or longer) spools of ribbon. The width is up to you! These are about 3/4 inch wide. I used two colors of ribbon, and because one side was printed, I doubled each tag. If you’re using a double-sided ribbon, you don’t need to double it (and of course you can also do more if you prefer – this is your project, make it your own!)
- Pins, Scissors, (optional) Rotary Cutter – really, your basic sewing supplies. I’m gearing this tutorial toward beginning sewists who have basic knowledge of sewing a straight line. ;) All machines are different and I cannot teach you how to use yours – but, if you know how to operate it, I’ll help you with the rest of it!
- A candle. I know this sounds weird, but you will see why below.
First, I’m going to start with your trip to buy fabric, because if you’re new, this can be confusing or even intimidating. Because this project takes less than one yard, do yourself a favor and check the remnant bin before you browse for bolts. You may find something adorable at a discount – when there is less than one yard of fabric left, it’s hard to keep on the bolt. So stores often package them up and pop them in a remnant bin.
Another thing to check if you’re on a budget is the selection of fat quarters. You won’t likely get a discount on a fat quarter (typically a pre-cut piece of fabric 18″ x 22″) but you can buy only what you need for this project that way, which can save you money on the rest of the length you won’t be using and keeps you from having to store leftover fabric.
Finally, substituting flannel for the minky will also save money. I’ve made these from flannel and they are thinner, though they still turn out cute!
Now: On to the actual sewing!

Cut your fabric to 18 inch squares (if you haven’t already). This is just a guideline. If you bought a fat quarter, cutting 4 inches off isn’t absolutely necessary. 18″ just makes a nice security blanket size.
Cut 4-inch lengths of ribbon. I cut 24 of them in each color of ribbon – 12 (double) tags for two sides.
If you would like to round your corners (like I did) – it’s actually easier to sew! Plus it’s a nice finished touch as well. I honestly just trace around a mug or bowl to get my rounded edge – and cut off the excess.

Now, you want to prevent your ribbons from fraying. Over a candle, hold the edge of the ribbon near (but not touching) the open flame. This will gently melt the edge and you never have to worry about your ribbons unraveling. I know some people double their ribbons but because this is a baby blanket/toy, I’m not comfortable with the loops that little hands or fingers could get stuck in. Chances are there won’t be an issue, but making the tags single-ply means there’s no risk of that at all.
Now, pin your tags to your cotton layer. The tags should be pinned against the right side (the patterned side) of the fabric, and point toward the center of your blanket. I know this seems counter-intuitive, but we will actually be stitching the blanket inside out, and turning it when we’re finished. Just trust me, it works. :) I only put tags on two sides of the blanket, because all the tags are the most time-consuming part, and 24 sets of them are plenty to entertain my son anyway!
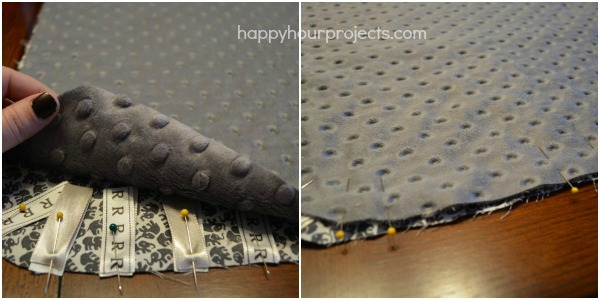
Now, layer the minky. Place it soft-side down against the right side of your patterned cotton. The two layers that you ultimately want to face out should now be facing each other, with all the tags tucked into your blanket sandwich. You should be looking at what will eventually be the inside of the blanket. Now, pin all the way around the blanket, leaving a hole for turning it right-side-out at the end. This hole should be about 3-4 inches wide – wide enough that you’ll be able to reach your hand in there later. I deliberately leave pins off this hole so that I don’t forget and accidentally sew the entire thing shut. The hole is easiest to work with if it’s NOT on one of the corners. Leave it along any side – preferably a non-tag side, if you’re leaving any sides without tags.
Now, to sew!
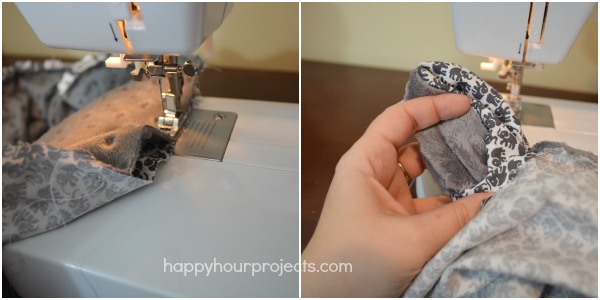
Start sewing a half inch, right next to your hole. It’s easier to sew on the cotton side than the minky side, but it doesn’t actually make a difference. My minky ended up slightly smaller so I sewed on that side to make sure I didn’t miss any fabric and create any gaps. Then, put your machine into reverse, and stitch back over it. Now, sew forward again. This locks your stitches so it doesn’t pull apart when you turn it later. I’m not very strict about my seam allowance – use whatever width you’re comfortable with as long as it’s at least as wide at the presser foot, and you keep it consistent.
Go all the way around, until you get to the other side of your hole. I remove my pins as I go. You can wait until the end if you prefer. Do the same as when you started, run a line in reverse for about 1/2 inch and then go forward again.
Now, clip your threads and check for pins. This is for a baby; it pays to double-check. You’ll notice I can’t remove the pins that are stitched inside my blanket – and that’s okay for now. But anything you can remove, do it now.
Ready? Let’s turn it. Reach into the hole, and grab the opposite end of the blanket. Pull it out through the hole, ultimately turning it right-side out. Press your fingers into the corners to pop them out completely.
Smooth the whole thing out so that it’s even. If we were using all cotton, it’s a smart idea to iron it flat at this stage, but that won’t really help with minky. Now, find your hole, because we’re going to close it.

Tuck the edges of the fabric in to match the seams you have sewed, and pin the hole shut with several, closely-spaced pins.
Now, sew over them. Again – it’s easier to sew on the cotton side! I sew very close to the edge, but again, you can choose the spacing you’re comfortable with as long as you stay consistent (this is called top-stitching). Once you have sewn all the way around, remove any pins that you may have left (like I had) and you are DONE!

I really enjoyed getting back in front of my sewing machine, and I can’t wait to work on an actual quilt for my son (like what I made for my daughter). I’m hoping to have more time for it again soon!!
Check out the other great projects that #MyFavoriteBloggers have made for our baby-themed project collection!
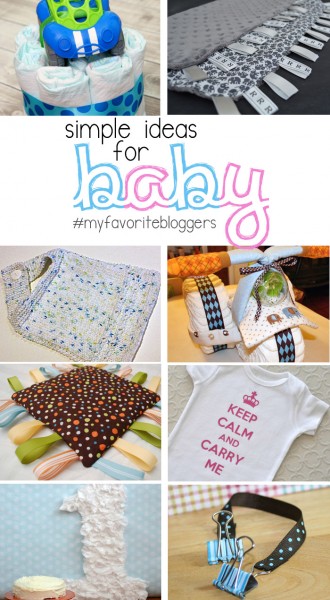
Diaper Cake Gift Card Holder from Happy Go Lucky // Easy Minky Tag Blanket from Happy Hour Projects // Knitted Baby Bib from 4 You With Love // Diaper Trike from One Dog Woof // DIY Tag Toy from One Artsy Mama // Keep Calm Baby Onesie from Suburble // First Birthday Photo Prop from It Happens in a Blink // Simple Bib Clips from Capital B

Great tutorial. I will make this blanket to give my friend.
Do the layers separate, or did you see a line diagonally to keep them together?
I love this idea for donating blankets to my local animal shelter. Perfect for cats or small dogs. I skip the ribbon embellishment. I think they’d wash well with high quality fabrics. Thanks for the inspiration.
This turned out so cute. I like that you kept the tags separated, so as not to catch little ones fingers or toes. I have to make one of these for my granddaughter.
Thanks for the inspiration,
Suzanne
Pieced Pastimes
Wonderful idea, just one more reason I wish I could sew like my Mom.
I love the blanket!! The material you chose is beautiful! Love the ribbon too!!
*Giggle* Um, more than one kid…baby’s 7 months old…silly, OF COURSE you’re just getting around to it! With our first, there were pictures taken all the time, the baby food was all homemade and organic, and everything was perfect all the time. Baby #2…uh, not so much…it’s exponentially tougher to accomplish stuff, and THAT’S when all of the eager helpers who were volunteering to help New Mom magically disappear- RIGHT when they’d really be the most help! LOL
That’s a great blanket- and I commend you for being able to do ANYTHING while caring for a baby plus one or more!
– Heather R., the Real Leopardstripes
Adrianne, what a great tutorial for a fun taggie blanket. Minky is so soft and cozy..definitely a great pick for this project!
I LOVE this, Adrianne! I so wanted to make a taggie blanket for my girls, but I didn’t ever get around to it. You make it look easy. Maybe I’ll try it as a gift for a preggo friend I have now!
Pinning!