• Skip to primary navigation
  • Skip to main content
  • Skip to primary sidebar

  • home
  • about adrianne
  • buy the books
    • DIY T-Shirt Crafts (2015)
    • DIY Stamped Metal Jewelry (2016)
    • Rock Painting for Beginners (2019)
  • videos
  • crafts
    • diy beauty projects
    • kids’ crafts
    • paper craft projects
    • polymer clay
    • sewing projects
  • jewelry
    • bracelet projects
    • earring projects
    • necklace projects
    • jewelry tools & supplies
  • metal stamping
    • beginners’ tutorial
    • video tutorial
    • project ideas
    • metal stamping supplies
  • recipes
    • cocktail recipes
    • appetizers
    • main and side dishes
    • sweets and treats
  • by season
    • birthdays
    • new year
    • valentine’s day
    • st. patrick’s day
    • easter and spring
    • mother’s day
    • patriotic
    • fall
    • halloween
    • christmas
    • thanksgiving
  • privacy

Happy Hour Projects logo

11/07/2013

Easy Two-Tone Memory Wire Bracelet

Today’s easy bangle bracelet was inspired by one of my favorite jewelry bloggers, NorthShore Days.  Natalie makes beautiful jewelry, and posted a particularly fabulous bracelet on Facebook.  I used different beads for a different look (she goes for beachy, I go for bling, haha) but I used her basic layered idea to create this piece.  (Which is okay, because I’m pretty sure she’s making up some of the cascading dangle earrings I posted on Tuesday.)  Oh – but I digress!  Back to the point: this memory wire bracelet is a great beginner project – it doesn’t take much in the way of supplies or special skills.  You just need to find some beads that inspire you and fit your style – and I can point you in the right direction when you are choosing your elements in today’s post.

Easy Two-Tone Memory Wire Bracelet at www.happyhourprojects.com

What you will need:

Easy Two-Tone Memory Wire Bracelet at www.happyhourprojects.com

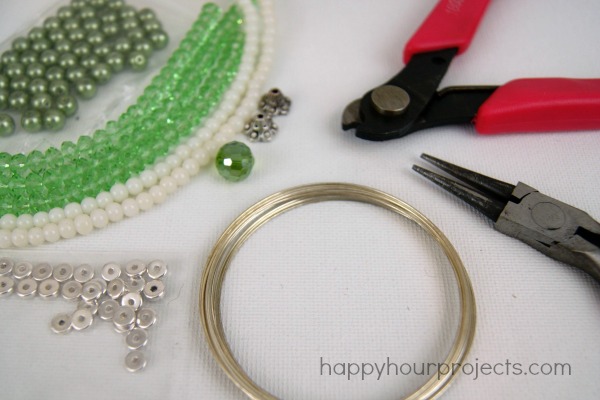
  • Memory Wire (I used about 6 coils)
  • Round nosed Pliers
  • Wire Cutters (or if you plan to work a lot with memory wire, invest in memory wire shears, they are awesome!)
  • Two colors of beads in various finishes, shapes, or even sizes
  • Metal spacers
  • A larger focal bead you love
  • End caps to “frame” your focal bead

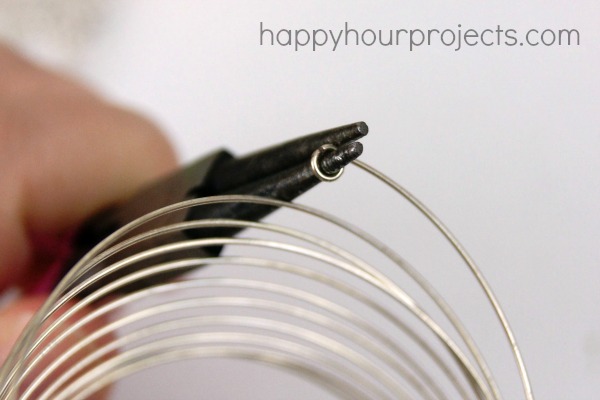
First, use your round pliers to form a small ring at one end of your wire.  Memory wire is hardener to retain its shape, so you may have to muscle it a little.

Easy Two-Tone Memory Wire Bracelet at www.happyhourprojects.com

Then, trim off several coils (as I mentioned, I used about 6) and begin threading your beads.

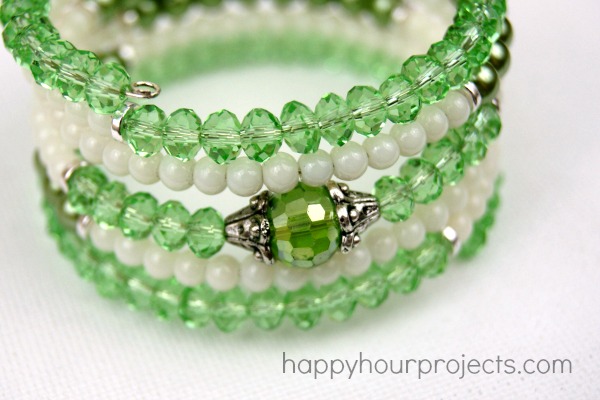
I had really no pattern or motive when I added my beads on.  I did quite a few sparkly green rondelle beads, then added a metal spacer, and added about half a row of round white beads.  I added another spacer and put on a few green pearls.  Then I switched back to white, them more green pearls, more white, then just a few more green rondelles.  Each time you switch colors, you can “divide” it with a spacer like these heishi spacers.

Easy Two-Tone Memory Wire Bracelet at www.happyhourprojects.com

When it was time to add my focal bead, I added an end cap to either side of it to help it to stand out.  Then, I looked back at the beads I had added, and re-created the pattern in reverse, so that the top of the bracelet would look very similar to the bottom, even if I didn’t follow any special pattern in making it.

The end result was a stacked two-tone look.  Memory wire retains its shape, and will stretch a little to fit your wrist.

Easy Two-Tone Memory Wire Bracelet at www.happyhourprojects.com

What do you think?  These are a simple enough bracelet you can make some up as stocking stuffers or gifts for your girlfriends, or even have a craft night with friends!  I’d love to see your version if you make one!

Easy Two-Tone Memory Wire Bracelet at www.happyhourprojects.com

Adrianne Signature


Filed Under: Bracelets, Fashion, Jewelry, Tutorials Tagged With: bangle, beads, bracelet, easy, memory wire

copyright policy and terms of use

I love it when you love my work! All tutorials and photos published at Happy Hour Projects are copyrighted. If you would like to feature my tutorial on your website or share it on your social media you may use one photo to feature, as long as you provide a link back to the original post.

If you feature a photo, it may not be accompanied by the project tutorial or recipe, whether in my own words as it originally appears or paraphrased by you. This also includes personal sharing on social media and Pinterest. Publishing multiple photos from a project, or including instructions with an accompanying photo are not permitted and you will be asked to remove them.

I love to share my projects, and my tutorials, recipes, and e-books are ALL free for your personal use. However, photos and ideas that are published to this site are my protected intellectual property. You may print them at home, but please do not copy or distribute them. I also allow all designs to be made and sold at fundraisers, craft fairs, etc. If you are selling a piece made from one or more of my free tutorials in your online shop, I require that you use your own, original photography, and include a link back to my website to credit me as the designer.

I hope you enjoy what you read here, and please be fair when you share!

Reader Interactions

Comments

  1. Lisa Tice says

    03/10/2022 at 5:29 pm

    What gauge wire did you use for this? This one is beautiful

    Reply
    • Marie Keough says

      03/16/2022 at 4:17 pm

      Don’t concern yourself about the gauge! It’s just called, “Memory Wire”! :)

      Reply
  2. Lorraine says

    09/16/2019 at 10:58 pm

    This is beautiful . I needed something to make for my sisters and they will love them.

    Reply
    • Mary says

      09/12/2022 at 8:57 pm

      I love this the colors are beautiful!!

      Reply
  3. ILEANA AUCAR says

    10/18/2017 at 2:34 pm

    It looks amazing I will try to make it tonight

    Thank you,

    Ileana
    Miami, FL.

    Reply
  4. ILEANA AUCAR says

    10/18/2017 at 2:31 pm

    thank you so much ,,, I will try it tonight … looks amazing ! :)

    Reply
  5. Sheila Wilkins says

    03/09/2016 at 4:20 pm

    Hi Adrianne,
    Thank you for another fantasticly stunning design. You introduced memory wire to me about 6 months ago and I haven’t looked back.
    I am booked in for my very first Craft Fayre on Saturday March 12th as a stall-holder. Guess what ????????? your memory wire tutorial made a dozen different wraps and will hold centre stage.
    Thank you so much.
    Lots of love
    Sheila
    in Rothwell, Northants, England.

    Reply
  6. Debra says

    01/28/2016 at 6:07 pm

    Love it, very easy. Thanks.

    Reply
  7. Deborah McLaughlin says

    11/08/2013 at 8:15 am

    Absolutely gorgeous! I was inspired by Natalie to make memory wire bracelets a while ago and follow her blogs avidly…as well as yours!! You have made me want to reach for my wire and beads!! Thanks!! :-)

    Reply
  8. LuAnn Braley says

    11/07/2013 at 11:49 pm

    that is beautiful!

    Reply
  9. Crystal says

    11/07/2013 at 10:29 pm

    I love all your jewelry that you make!!! This is beautiful!! Thanks for the tutorial!!

    Reply
  10. Jeannie says

    11/07/2013 at 7:56 pm

    This green and white bracelet turned out really beautiful. Im getting some supplies together tomorrow and Sunday afternoon will be the beginning of what I expect will be a love afair with memory wire and beads!

    Reply
  11. Bethany says

    11/07/2013 at 7:32 pm

    I’ve never used memory wire, but I just may have to try because this bracelet is fabulous! :)

    Reply
  12. Teresa Ann says

    11/07/2013 at 8:29 am

    Very pretty! Thanks for the tutorial. I have everything I need to make a memory wire bracelet or two, I just haven’t tried it yet. This post could be the inspiration I need.

    Reply
  13. Natalie says

    11/07/2013 at 7:20 am

    Wow girl that turned out gorgeous.. I love the “bling” haha. Thank you so so much for the awesome shout out. I love memory wire bracelets. xxx Nat

    Reply

Trackbacks

  1. Cool DIY Bracelets says:
    03/06/2016 at 7:40 pm

    […] Happy Hour Projects […]

    Reply
  2. 22 Cool Bracelets To Make For Yourself and For Your Friends! – DIYs.com says:
    02/26/2016 at 4:35 am

    […] Happy Hour Projects made this easy, two-tone memory wire bracelet that we couldn’t help but feature on this “cool” list of bracelets to make at home. […]

    Reply
  3. Two-Tone Memory Wire Bracelet says:
    05/03/2014 at 11:59 am

    […] Two-Tone Memory Wire Bracelet […]

    Reply

Leave a Reply Cancel reply

Your email address will not be published. Required fields are marked *

Primary Sidebar

Hello, and welcome! I'm Adrianne, an artist, author, designer, and blogger in mid Michigan. I work from home, chase my two kids, and this once-city-girl is learning how to care for chickens and adjusting to life out in the country. I have a compulsion for daily creativity... sometimes it's jewelry-making, paper crafting, metal stamping, mixing and baking, or giving new life to recycled items. But with 2 young kids, time is short! My goal here at Happy Hour Projects is to share projects and tips that you can do in an hour or less. The ideas you find here are designed to add a little creativity in your day, no matter how much (or how little) time you have!

BUY MY BOOKS!

Copyright © 2026 Happy Hour Projects on the Brunch Pro Theme