
This project has some soaking and drying time in-between steps, but each step is really easy. Just be warned, this was a project on my kitchen table for couple nights, as I worked on it a few minutes at a time.
What you’ll need:
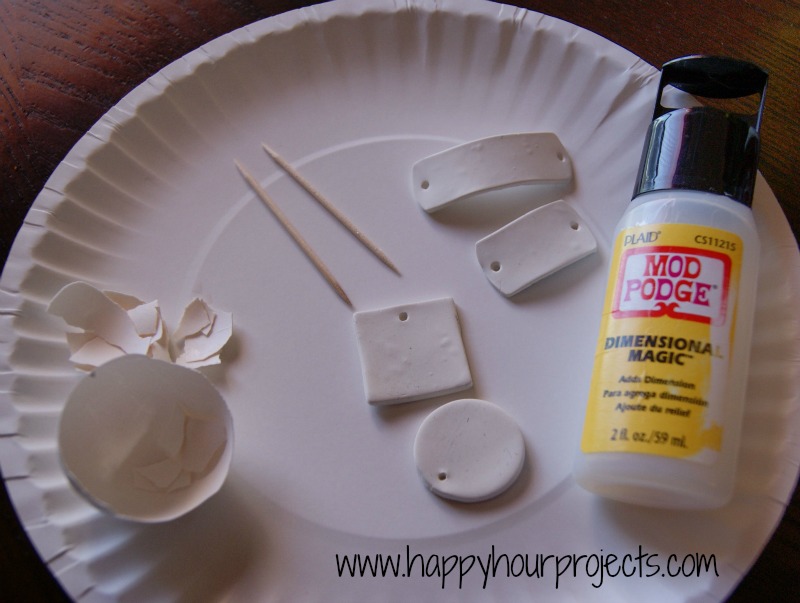
Polymer clay, roller, cutters, etc. to make your base
Egg shell – one egg covered three bases, just to give you an idea
Dimensional Glaze (like Mod Podge Dimensional Magic or Glossy Accents)
Alcohol Ink(s)
Toothpicks
First, soak your eggshells in hot water. I soaked mine for an hour. If your eggs are really fresh, it will take longer. But this will make it much easier to remove the membrane from the inside of the shell. You don’t want to leave it attached or you run the risk of your jewelry getting funky over time. Yuck. If you try it and it’s not peeling off in a sheet, soak it a while longer. I left mine to soak the whole time I was making and baking my bases and it was fine.

To make your bases, roll the clay out to 1/4″ and cut it into the shape(s) you want. Now is a good time to use a toothpick to make a hole for your pendant or bracelet link. You’ll want to follow the package directions for baking time; every brand is different. If you haven’t worked with polymer clay before and need some more specifics, I have several projects tagged with polymer clay. You can check those out for more info.
One tip I will give you – if you’re making a bracelet blank like this, I find it’s easiest to bake it flat, then shape it when it first comes out of the oven. Once it has cooled enough to pick up but it’s still warm, I bend it slightly and blow on it the rest of the way. It retains that slight bend.
Once those are cooled and your egg shells are cleaned and dried, you can move on to adding the shells to the base.
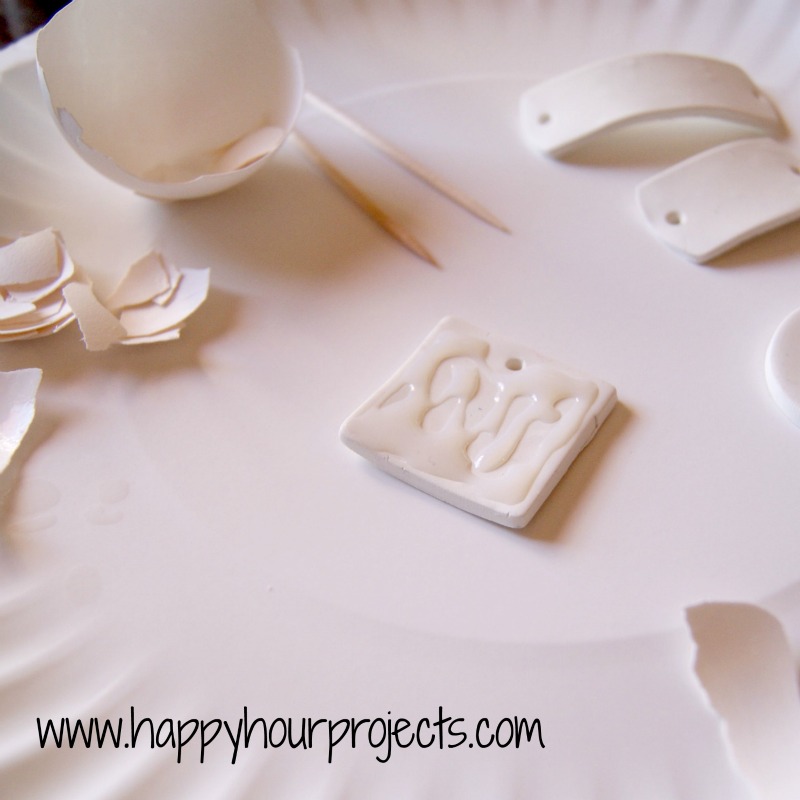
I tried a couple ways to glue these on, and here’s what I found to be easiest. Add a layer of dimensional glaze to your base. You can just squeeze some on, and spread it around with a toothpick to get all the way out to the edges.
Then, crush up some eggshell. Sprinkle it into the base to get started, and then use your toothpick to move the pieces around to your liking.
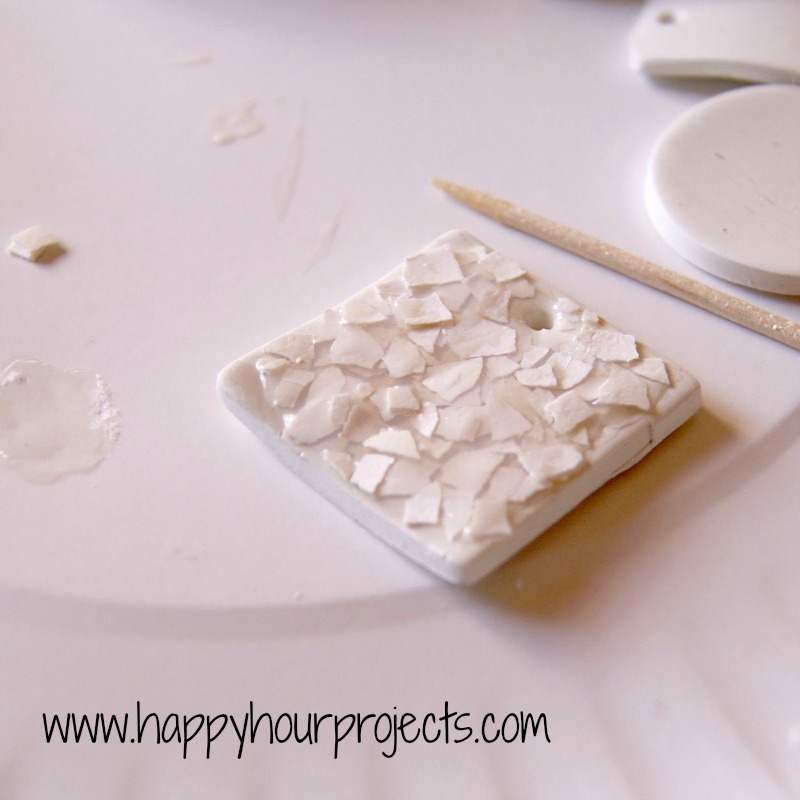
Dimensional glaze doesn’t dry as quickly as glue, so you have more time to work and arrange them the way you like. You can pick up additional pieces to fit onto your base by wetting the end of your toothpick with a little bit of glaze, and pick up the right size/shape of pieces with the sticky tip. Try to keep the glaze from getting into the hole you made in your clay.
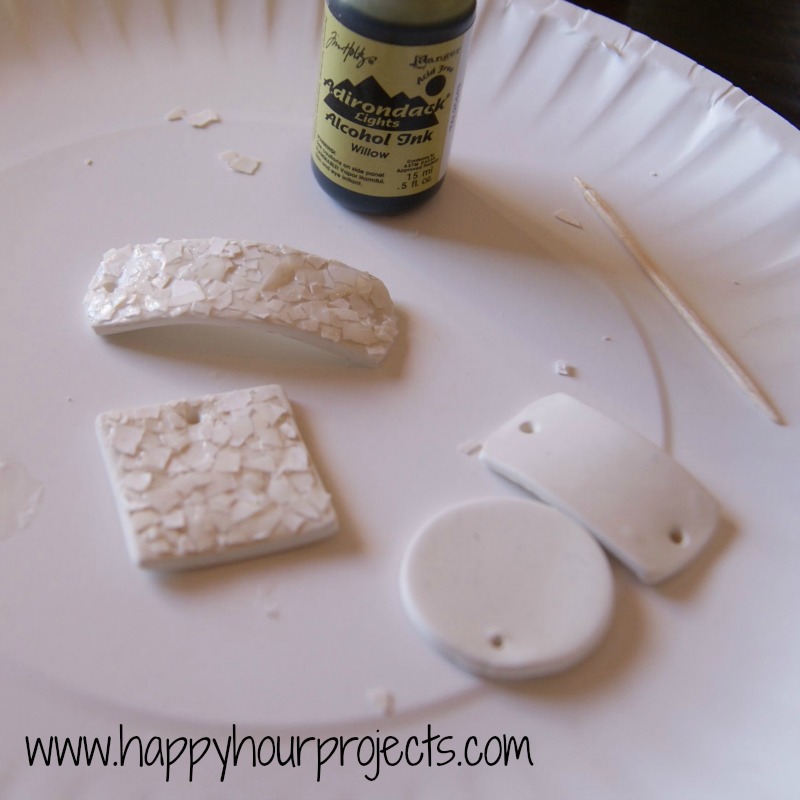
Once you have them all arranged to your liking, let it dry for a few hours (or overnight). Then, sand down any rough edges (and clean out the hole if you managed to get glaze in there). I used my Dremel on low for this, it works perfectly.
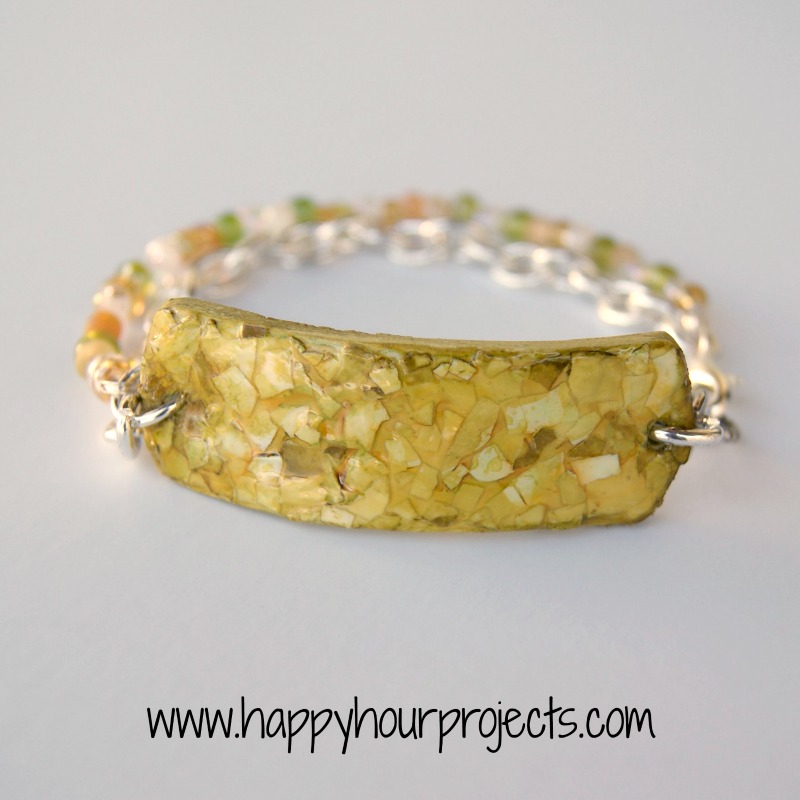
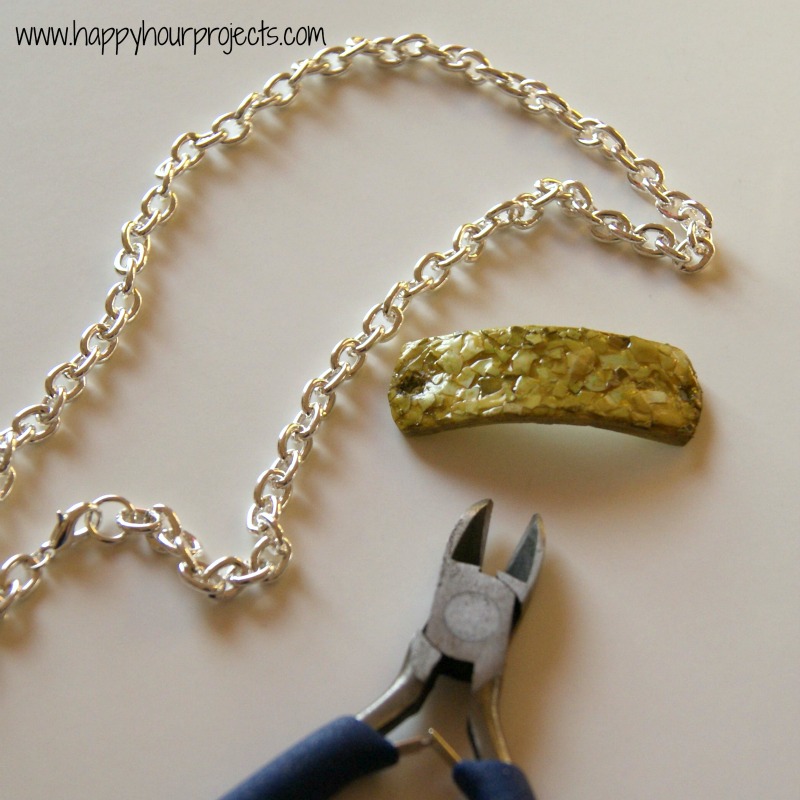
Now, add a few drops of alcohol ink to the shell-top you’ve created. You can use a paintbrush for a more subtle, even look, or if you drip it on it will settle into the cracks for more contrast. Start out with just a few drops – it can get dark in a hurry. The color I used here is called Willow.
That will dry pretty quickly. Be sure to ink the edges of your piece as well. I also did the back. Once that’s dry, I gave the whole thing another coat of glaze to make it smooth instead of bumpy. Again, try to avoid getting glaze in the holes. That needs to dry for a few more hours.

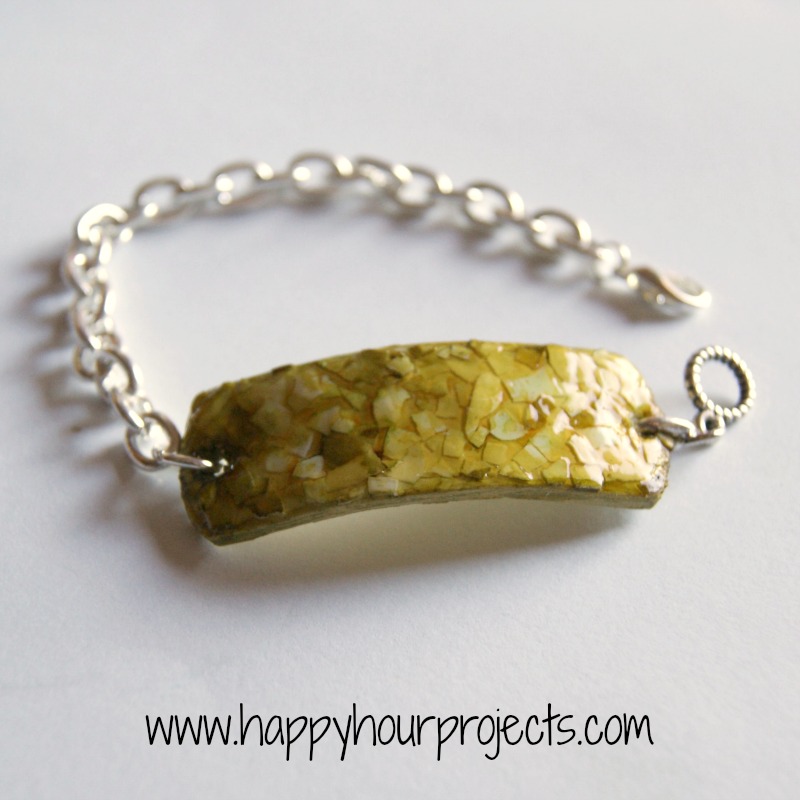
Once I was happy with the finish of my pieces, I got to work turning them into jewelry – the bracelet, anyway. I want to play with the pendant another day and think up a way to use that – so you will see this project again in the near future if you read my jewelry posts.
But back to the bracelet – I cut up a necklace chain to make my bracelet. You could use a bracelet chain here too, I just had a nice chunky chain I wanted to use that was 18″ and a bracelet chain would have required a trip to the store, so surgery it was. ;) You may need to use some jump rings to attach it, it all just depends on what you’re working with.
Once I got the chain cut down to fit, I thought it needed a little something more…
So I also added a multi-colored strand of seed beads in colors that coordinated. Which kept ending up in the background every time I photographed, apparently. Sorry. :)

It all sounds like a lot of steps, but I put this together ten minutes or so at a time over the course of 2 days. And I totally LOVE how it turned out – different than anything I’ve seen out there lately, and I got to play with all the techniques I love anyway. :)
So, what do you think? Are you going to save your next egg shell now?
I link up to these great parties! 
It looks absolutely amazing. I’m glad I found this tutorial, it will be so much fun to try this new, different and brilliant technique. You are very talented and so beautiful; thanks for sharing.
I learned this technique on aileen’s craft show in California about 40 years ago. I’ve always loved it. I’ve also done it on cardboard boxes that you get in the craft store. Heart shaped, square, and oval boxes with lids. You paint the box, and do the eggshells on the tops. They comes out so cute.
My first thought when I saw this project was easter eggs. Ever tried this using egg shells that have been dyed already? If so, do you then seal it with a clear product?
I’ve used eggshells on pendants before but never with clay and I colored with the transparent glazes so cool to see a new way very great idea
Hi Adrianne Ilove what you do All of it is woderfullllll
Thank You for taking your valuable time, to SHARE your ideas & creations to help me & others! This is another Beautiful & Creative project
I love your bracelet, Adrianne. Thanks for the shout out!
This is the coolest and most creative bracelet I’ve ever seen! Going to try and make it this weekend. I especially love the texture you made with eggs – it really looks like it’s made with rocks or marbles. Well done.
To get really neat, consistent holes in polymer clay pieces, use a cocktail straw/stirrer. I got a box of 500 at the grocery store for a dollar or so!
I LOVE THE DESIGNS YOU USED FOR THE EGGSHELL FOCUS PIECES. I HAD A TEACHER IN 3RD GRADE WHOM INTRODUCED ME INTO THE ARTISTIC QUALITIES OF AND EGG SHELL. LOL. I ALSO MADE MY OWN BEADS, PENDANT PIECES FROM POLYMER CLAYS. SO, THIS WILL BE OLD SCHOOL IN MANY WAYS. I WOULD LOVE TO KNOW WHERE YOU PURCHASED THE ALCOHOL INK???? I HAVE NEVER HEARD OF IT. I USED TO DO A LOT OF CALLIGRAPHY BUT NEVER ENCOUNTERED THIS TYPE OF INK. ANY HELP YOU CAN GIVE ME ON LOCATING THIS INK, I WOULD BE FOREVER GRATEFUL.
ALSO WONDERING, COULD YOU USE LIQUID POLYMER CLAY FOR THE GLAZE YOU PUT DOWN BEFORE THE EGG SHELLS???? OF COURSE YOU WOULD HAVE TO BAKE THE PIECE ONCE AGAIN BUT????
wow such an awesome idea….this really makes me want to try it out!…thanks for sharing! mod podge crafts are sooo fun!
so cool! Thanks for sharing! I pinned it so I can try it later!
I love this idea. Very nice and great color. Thanks for sharing.
Wow, it turned out fabulous! I can't believe you used actual egg shells, how fun. :-)
Thanks for sharing at The Fun In Functional!
This is so beautiful! I love how it turned out! Thanks so much for sharing at Mom On Timeout!
Visiting from Kathe With an E~ Wow…..this is SO unique! Thx for sharing this project. I am going to share this idea with my daughter :)
Egg shells?! You are a genius girl. I never in a million years would have thought of that. Fabulous! Thanks so much for joining us at the Keep Calm & Link Up Party! See you again soon for the next one!
This is so clever! I love how this turned out, and I could see using this technique on larger surfaces, too. Although it would take a lot of eggs!
WOW, this turned out amazing!
Oh this is so beautiful and creative! I've never seen anything like it. Please, please! link it up with me at Wow Us Wednesday!
Sweet! Soopa kool! I've got everything but the alcohal inks…..cannot wait to try it out!
Sweet! Soopa kool! I've got everything but the alcohal inks…..cannot wait to try it out!
Wow – and I just use my egg shells in the composter.
I made deviled eggs last night and the egg shells are still sitting in a bowl on my counter because I was going to toss them in the garden. Not any more!!! This is absolutely gorgeous!
This is gorgeous! I had no idea you could make pretty things with eggshells!
You are so talented! I recently found your blog and love it. This piece is unique, simple, and elegant. Thank you for sharing your ideas, can't wait to see what's next.
I love the way this looks! So interesting and unique. I would have never thought to use egg shells!