• Skip to primary navigation
  • Skip to main content
  • Skip to primary sidebar

  • home
  • about adrianne
  • buy the books
    • DIY T-Shirt Crafts (2015)
    • DIY Stamped Metal Jewelry (2016)
    • Rock Painting for Beginners (2019)
  • videos
  • crafts
    • diy beauty projects
    • kids’ crafts
    • paper craft projects
    • polymer clay
    • sewing projects
  • jewelry
    • bracelet projects
    • earring projects
    • necklace projects
    • jewelry tools & supplies
  • metal stamping
    • beginners’ tutorial
    • video tutorial
    • project ideas
    • metal stamping supplies
  • recipes
    • cocktail recipes
    • appetizers
    • main and side dishes
    • sweets and treats
  • by season
    • birthdays
    • new year
    • valentine’s day
    • st. patrick’s day
    • easter and spring
    • mother’s day
    • patriotic
    • fall
    • halloween
    • christmas
    • thanksgiving
  • privacy

Happy Hour Projects logo

11/05/2014

Embossed Beaded Bracelet

It’s no secret that I love working with metal, and trying different effects.  Today I tried my hand at using alcohol ink to color my metal blank for this bracelet.  I have some other ways I’d like to try it, but for a first try, I’m really encouraged and I’d like to play with the technique a bit more!  For today’s project, I used a plain rectangular aluminum blank, texturized it with my Sizzix machine, and added color with ink.  It sure does add a lot of personality to what began as a plain blank!

Embossed Beaded Bracelet at www.happyhourprojects.com

This will be more of a mini-tutorial today, because when I’m experimenting, I don’t take as many photos, and sometimes I decide I wish I’d finished a piece a different way.  So I’ll share the detail on the main points for those of you who get inspired by an idea and wish to make it your own, but if you’re more of a step-by-step kind of person, this one may be a little harder to follow.  I will promise you this, though: when I finally get the look I love, I will share every last detail. ;)

My supply list for this bracelet was the following items – many of which are optional, or have easy alternatives.

  • 2-inch rectangular aluminum blank
  • Adirondack alcohol ink (the shade is called red pepper), a paintbrush, paper towel, and a polishing pad
  • My Sizzix Big Shot and a DecoEtch die (that’s an affiliate link)
  • 3.7mm Tierracast eyelets and the setting tool, a 3/32 hole punch, my bench block and hammer
  • 7-strand (.5mm) beading wire and wire cutters
  • 2mm crimp beads and a crimping tool
  • 6/0 seed beads and 4x6mm metal spacers
  • A magnetic clasp (which I would not use again, I’d opt for a lobster clasp just as a matter of personal preference)
  • Bracelet bending pliers

First things first – I texturized my blank.  I LOVE that my Sizzix works on metals.  This die is in the Vintaj line and is specifically approved for etching metal.  I have not tried other metal with my other dies.  Yet.  ;)  I just arranged my blank on the die, sandwiched it between the cutting plates, and rolled it through on my cutting platform set to tab #1.

Embossed Beaded Bracelet at www.happyhourprojects.com

Awesome.  I think it turned out fantastic.  You could use it just like this.

Embossed Beaded Bracelet at www.happyhourprojects.com

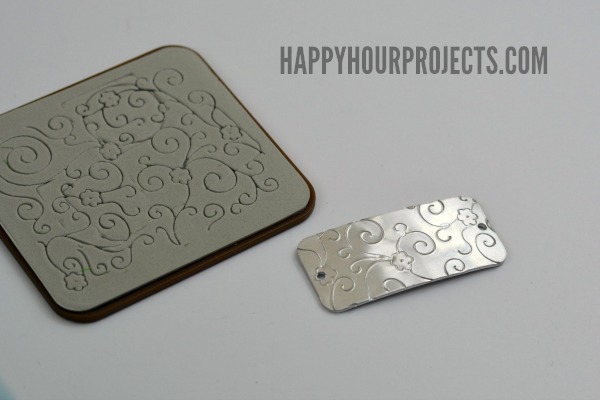
But I wanted to see what would happen if I inked it.  It took me a few tried to get a look I liked, but I just brushed it on, and wiped off the excess, leaving it heavier along the edges.  I also used a polish pad in the center to remove just a little more ink.

Embossed Beaded Bracelet at www.happyhourprojects.com

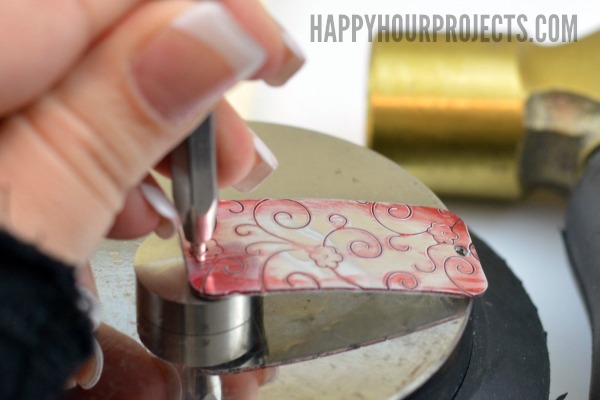
The next step is optional, but I love finishing the holes in my metal blanks with eyelets.  So I made the holes slightly bigger and added eyelets.  (If you want to know more about how to do that, you can read my post on adding eyelets to necklaces).

Embossed Beaded Bracelet at www.happyhourprojects.com

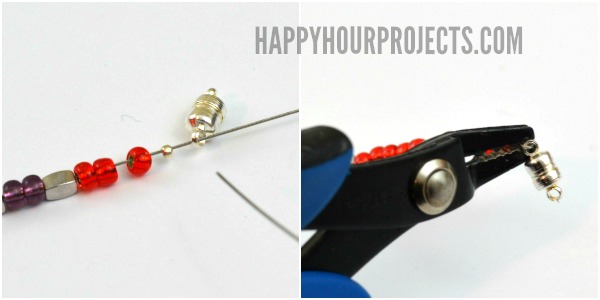
Once I finished up the blank, it was time to add beads!  I used 2mm crimp beads to attach my wires, and then beaded a simple pattern.  I needed to add 2.5 inches of beads to each side of my 2-inch blank to come up with a length of 7 inches.  Adding my clasp added an additional 1/4 inch or so, and a typical women’s bracelet should be between 7 – 7.5 inches.

Embossed Beaded Bracelet at www.happyhourprojects.com

Then I finished off the ends with the magnetic clasp, which my daughter always things that means it’s for her, haha.  The magnetic ones are about the only kind she can operate by her 3-year-old self. ;)

Embossed Beaded Bracelet at www.happyhourprojects.com

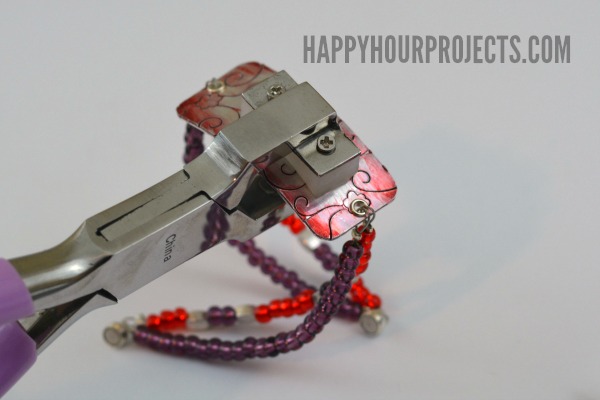
Finally, I used my bracelet bending pliers to curve the blank slightly, so that it rests better along the wrist.

Embossed Beaded Bracelet at www.happyhourprojects.com

All in all, I do like how it turned out.  I think I might use more chain next time… or maybe all chain?  And I think a darker, oxidized blank would yield a prettier finish.  But I’m really excited that my little experiment did work, I’ve just got to hone the look a bit.  Maybe stamp a message next time, too.  As much as I like it, it still looks a little plain to me.

Embossed Beaded Bracelet at www.happyhourprojects.com

What would you add?  Crystal rhinestones?  Different colors?  Charms?  Happy beading!

adrianne signature

Filed Under: Bracelets, Fashion, Featured, Jewelry, Metal Stamping, Tutorials Tagged With: accessories, alcohol ink, beaded, beads, bracelet, embossed, eyelets, fashion, floral, flower, jewelry, purple, red, Sizzix

copyright policy and terms of use

I love it when you love my work! All tutorials and photos published at Happy Hour Projects are copyrighted. If you would like to feature my tutorial on your website or share it on your social media you may use one photo to feature, as long as you provide a link back to the original post.

If you feature a photo, it may not be accompanied by the project tutorial or recipe, whether in my own words as it originally appears or paraphrased by you. This also includes personal sharing on social media and Pinterest. Publishing multiple photos from a project, or including instructions with an accompanying photo are not permitted and you will be asked to remove them.

I love to share my projects, and my tutorials, recipes, and e-books are ALL free for your personal use. However, photos and ideas that are published to this site are my protected intellectual property. You may print them at home, but please do not copy or distribute them. I also allow all designs to be made and sold at fundraisers, craft fairs, etc. If you are selling a piece made from one or more of my free tutorials in your online shop, I require that you use your own, original photography, and include a link back to my website to credit me as the designer.

I hope you enjoy what you read here, and please be fair when you share!

Reader Interactions

Comments

  1. Margaret Bryant says

    11/16/2018 at 1:46 am

    Wonderful!

    Reply
  2. Sonya Neal says

    11/05/2014 at 6:11 pm

    Oh my goodness!! I am in LOVE!!!

    Reply
  3. Melanie says

    11/05/2014 at 9:19 am

    How awesome all the uses for a Sizzix!

    Reply

Trackbacks

  1. CraftCrave | DigiFree | CraftCrave says:
    11/05/2014 at 7:23 pm

    […] Embossed Beaded Bracelet – 1 freebie(s)? […]

    Reply

Leave a Reply Cancel reply

Your email address will not be published. Required fields are marked *

Primary Sidebar

Hello, and welcome! I'm Adrianne, an artist, author, designer, and blogger in mid Michigan. I work from home, chase my two kids, and this once-city-girl is learning how to care for chickens and adjusting to life out in the country. I have a compulsion for daily creativity... sometimes it's jewelry-making, paper crafting, metal stamping, mixing and baking, or giving new life to recycled items. But with 2 young kids, time is short! My goal here at Happy Hour Projects is to share projects and tips that you can do in an hour or less. The ideas you find here are designed to add a little creativity in your day, no matter how much (or how little) time you have!

BUY MY BOOKS!

Copyright © 2023 Happy Hour Projects on the Brunch Pro Theme