
I have one more piece of commentary before I get to the real topic of today’s post – and that is voting starts today over at One Artsy Mama! The round two theme is Mod Podge and voting should be up later this morning – it runs through Tuesday at noon EST. So pop over and check out the projects, make your votes (and remember to vote that you click the word “vote” above the thumbnail!) There are 15 entries vying for the top ten. I wish I could tell you which one is mine, but you’ll get the big reveal on Wednesday. ;)
Now, ready for today’s project? I found another addiction, I think… I tried my hand at glass etching, and it was so easy, I can’t believe I didn’t try it sooner. I have all kinds of ideas now!
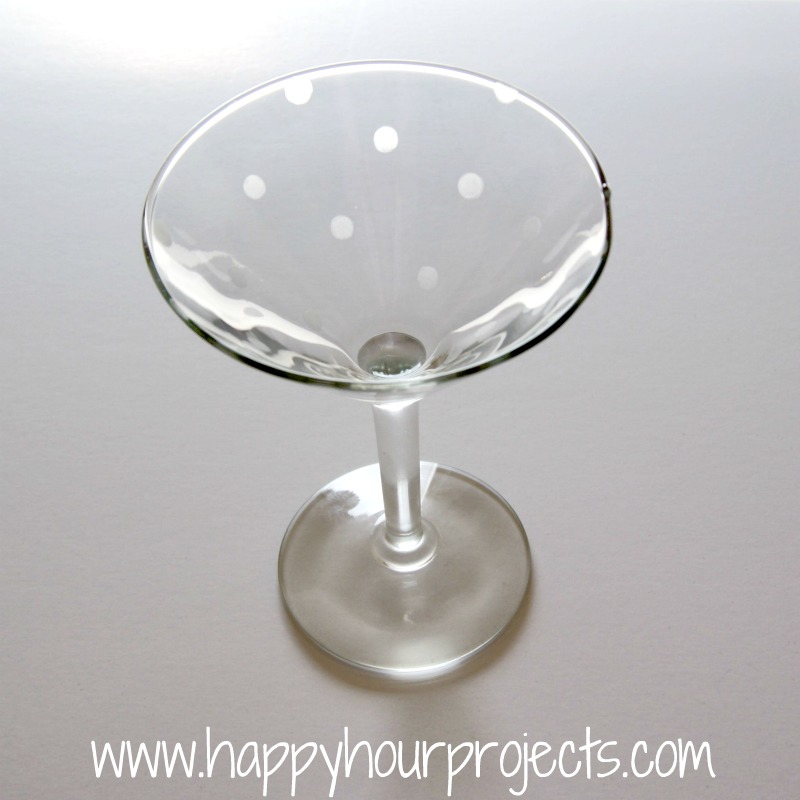
I picked up some Armor Etch at Michael’s to make this. It’s a little pricey at $12.99 a bottle (use your 40% off coupon!) but it will last for many, many projects, and I was able to shop at the dollar store for the rest of my supplies. Yes, this great little martini glass was just a buck!
All you need for glass etching is:
- Your etching medium (I mentioned Armor Etch, there may be other brands out there?)
- A stencil (I made my own out of contact paper, but those lucky Silhouette and owners have infinite options, here)
- Your glass piece
- A paintbrush or sponge
- gloves – these are optional, but you may want to play it safe since you’ll be using chemicals
Now, as much as I have mentioned that I really want a Silhouette machine… the cost is always the hangup. It’s on my birthday list (as it was my Christmas list, Valentine list, and Mother’s Day list…) But I have good news for those of you without a machine – making a stencil for glass etching is actually very easy. Let me show you how I made mine!
First, I decided on polka dots. I knew this would be an all-over design, so I made a template for my glass out if paper, to see what size my stencil needed to be.

Then, I cut it off and traced it out on some contact paper – you know, the stuff you use to line shelves and drawers. My dollar store even carries it, so you can get a whole roll of vinyl to make your own little stencils for $1 by going this route.
I decided where I wanted my dots spaced (I traced a little grid out, but you could freehand it instead if you want) and I used a regular hole punch to make my dots – nothing fancy! If you want another kind of design, you don’t even need an all-over stencil. You could use any shape craft punch out of a square of contact paper and just stick it on where you want the stencil, or cut your own shape with a utility knife. Armor Etch is pretty thick – it stays where you put it, pretty much.

Anyway, then I stuck my new stencil onto my glass. And you will have to forgive that it’s airplanes… it’s what the dollar store had for contact paper. I could have bought white for $4 at the regular store… but I decided I didn’t mind making you suffer through this sight to save money: :)

It’s just proof that it doesn’t need to be fancy to be functional. :P
Then, I just dabbed my Armor Etch on with a paintbrush. I did go over the thinner spots after I took this photo – you do want a thick layer. Do be careful – wear gloves or be sure not to get any on your skin.

Now, the bottle says to leave it for one minute, but I found that wasn’t quite enough – I had better luck with five minutes. You may want to experiment and see what works best for you! Anyway, then all you do is rinse it off! I have to be honest, I didn’t use gloves for the rinsing, and I didn’t experience any skin irritation, but it may be different if you have sensitive skin.

I had this whole project done, start to cleanup, in 30 minutes (most of which time was spent creating my stencil). So this is a pretty quick thing to do, and it’s a great way to personalize an inexpensive piece of glass. Seriously, the most difficult part is trying to photograph it so you can tell how the etching turned out. :)

Now, to put my cute new glass to use… cheers!

I link up to these great parties!
~ Adrianne
I’d like to etch a monogram on the INSIDE of a martini glass . (more visible). Do you see any problems with this idea?
I don’t. You’ll of course want to wash the glass well before using it anyway – but unlike glass paints, etching doesn’t add anything to your glass, it eats it away. It’s still just glass, only tiny bits have been dissolved and removed. Etching would be about the only safe option I can thing of for the inside of a glass.
Those are so fun and adorable!!! I Love to do glass etching! It is addicting! Thanks so much for sharing this as well at Thursday's Temptation.
Jill
Those turned out amazing! I would love for you to link the up at “I Made This”, going on now at Grits & Giggles! http://www.gritsandgiggles.blogspot.com/2012/05/i-made-this-7.html
This is great, super easy, just right. I've come by from Show and Share #42
SUPER CUTE! I just tried using etching creme for the first time over the weekend. I see many more projects in the future!
What a lovely project, Adrianne!
Easy, includes polka dots, it's a martiny glass (to have a martini from :)) – a perfect project for me!
Cheers
Ah, this brings back memories. My Poppi and I did a whole bunch of etched Irish coffee glasses when I was younger, using kits that included rose stencils and some other shapes. I think it's time to look into this as a project!
What a fun effect!
I don't know if there's anything newer out there, but back in my craft store days, Armor Etch was the best stuff to use. It does take longer to work than the instructions say, but I've always had good results with it.
Funny you should post this, I'm about to embark on a glass etching project too. :)
This looks awesome! So many possibilities!
Your glass turned out so cute! I love the poke-a-dots! I have wanted to try this too! These would make such great (inexpensive) gifts! I'll have to find a 40% coupon and get some etching gel.
This looks so easy and the finished product is so cute I now want to try it :)
It was easy! I am hooked, I want to etch everything now, LOL!
that is just too cute, and I have always been intimidated by this, and you make it look easy!
Love it! Now I definitely need to try glass etching one day soon…
Jenny
http://www.simcoestreet.blogspot.com
Super cute. Our local thrift store always has glassware for 25 cents (I know!!) so this would be a super cheap experiment. I'll put the etching gel on my list.