• Skip to primary navigation
  • Skip to main content
  • Skip to primary sidebar

  • home
  • about adrianne
  • buy the books
    • DIY T-Shirt Crafts (2015)
    • DIY Stamped Metal Jewelry (2016)
    • Rock Painting for Beginners (2019)
  • videos
  • crafts
    • diy beauty projects
    • kids’ crafts
    • paper craft projects
    • polymer clay
    • sewing projects
  • jewelry
    • bracelet projects
    • earring projects
    • necklace projects
    • jewelry tools & supplies
  • metal stamping
    • beginners’ tutorial
    • video tutorial
    • project ideas
    • metal stamping supplies
  • recipes
    • cocktail recipes
    • appetizers
    • main and side dishes
    • sweets and treats
  • by season
    • birthdays
    • new year
    • valentine’s day
    • st. patrick’s day
    • easter and spring
    • mother’s day
    • patriotic
    • fall
    • halloween
    • christmas
    • thanksgiving
  • privacy

Happy Hour Projects logo

06/26/2012

Fingerprint Charm Bracelet

Since I’ve had the chance to take a look around the Project Pinterest top 12, I’ve been really inspired to make some of these projects.  Today, I’m going to show you how I adapted the Fingerprint Charm Necklace that Meredith from Wait Til Your Father Gets Home entered.  It’s such a beautiful keepsake and you should really go check out the full tutorial – she included an adorable gift box with hers.

Of course, if you know me at all, you know I didn’t make a necklace, but rather, a bracelet. :)

You will need:

  • Polymer Clay – it’s hard to tell in the photos, but I used silver Sculpey Clay
  • Small heart shaped cutter
  • A needle or paperclip for forming holes in your clay
  • A non-food-use rolling pin
  • Wax paper or parchment paper
  • Baking sheet
  • A chain link bracelet
  • Jump rings and optional charms – I used a freshwater pearl

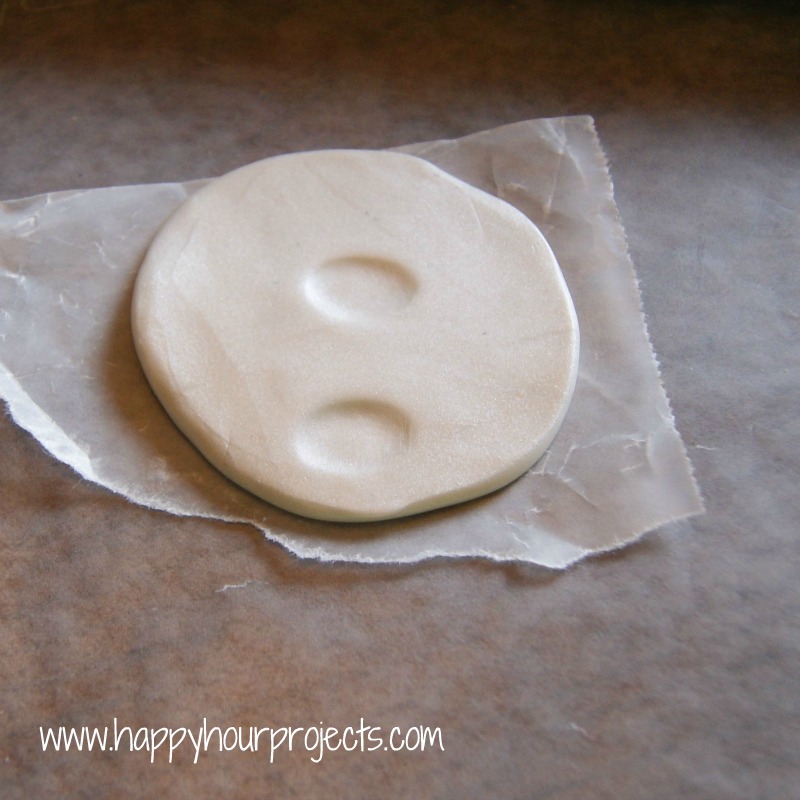
I broke off one section of clay, and rolled it on wax paper with a rolling pin I use for clay until it’s about 1/4″ thick.

Then, I put it in front of Raya and encouraged her to put a thumbprint in it.  This took a long time.  A very, very long time.  This is 30 minutes into the project.

No thumbprints yet.

But finally, I was able to show her and get a few good ones.  Mild use of force may have been employed.  Not enough to bring tears, just indignant protest.  (Don’t worry, it was short-lived.  Once she figured it out, she loved the clay!  I will have to give some homemade play-dough a try!)

It’s hard to see with the shadow that the cutter makes, but I lined up the cutter so that her thumbprint filled one side of the heart, and then I cut it out.  You can see what I mean looking at the heart at the top.

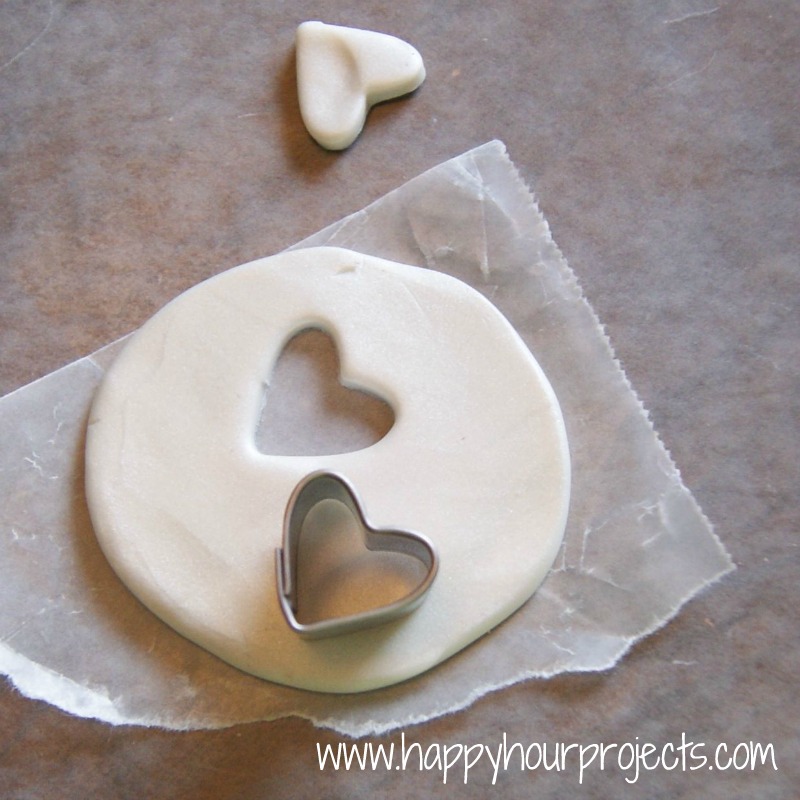
Then, I put my pinky print along the other side of the heart.  So each heart had both our prints.  I’m saving one to give to her when she gets a little older.

Once she did a few, I could hardly keep her out of the clay.  I went ahead and made up several out of other prints she left, so that I could pick the very best ones.  Them, I used a needle to poke a hole in each one.

Each brand of clay has a little different baking instructions, so do whatever your brand tells you.  But I baked mine on parchment paper until they were done.

To help protect the charm and to give it some shine, I added a coat of Sculpey Gloss to it.  Then, I put a jump ring through the heart, and made pearl charm.  I don’t have photos of how to make the charm, but I did explain how to make a charm using a jewelry pin with a head at my Book Page Necklace post, so check that out if you need to see it explained.

Then I just added my clay heart and pearl to the end of my bracelet, and I have a sweet mother and daughter keepsake!

What sorts of inspired projects have you been working on lately?

I link up to these great parties!
~ Adrianne

Filed Under: Bracelets, Jewelry, Polymer Clay, Tutorials Tagged With: charms

copyright policy and terms of use

I love it when you love my work! All tutorials and photos published at Happy Hour Projects are copyrighted. If you would like to feature my tutorial on your website or share it on your social media you may use one photo to feature, as long as you provide a link back to the original post.

If you feature a photo, it may not be accompanied by the project tutorial or recipe, whether in my own words as it originally appears or paraphrased by you. This also includes personal sharing on social media and Pinterest. Publishing multiple photos from a project, or including instructions with an accompanying photo are not permitted and you will be asked to remove them.

I love to share my projects, and my tutorials, recipes, and e-books are ALL free for your personal use. However, photos and ideas that are published to this site are my protected intellectual property. You may print them at home, but please do not copy or distribute them. I also allow all designs to be made and sold at fundraisers, craft fairs, etc. If you are selling a piece made from one or more of my free tutorials in your online shop, I require that you use your own, original photography, and include a link back to my website to credit me as the designer.

I hope you enjoy what you read here, and please be fair when you share!

Reader Interactions

Comments

  1. Carri says

    06/29/2012 at 3:17 am

    So sweet I love this…. I see another “pin” coming….lol

    Thank you for linking up to the ALL STARS BLOCK PARTY!!!

    Carri
    simplydonewright.blogspot.com

    Reply
  2. Jess says

    06/28/2012 at 6:05 pm

    This is darling! I love it!

    Reply
  3. Danni Baird says

    06/28/2012 at 2:04 pm

    You make the best stuff! What a great idea and a great gift to give your child when she's older….and maybe less stubborn!!

    Reply
  4. Heather says

    06/28/2012 at 12:48 pm

    Hi Adrienne – I love this idea! Perfect for any young mom to do for their little ones. I'm so glad you shared this on the All Star Block Party. I'm also sharing it on my Facebook page!!

    Reply
  5. Full Circle Creations says

    06/28/2012 at 2:23 am

    So very sweet. Thanks for sharing at the All Star Block Party.

    Holly

    Reply
  6. Kara at Petals to Picots says

    06/27/2012 at 2:55 am

    Love it! You must have the best jewelry collection, Adrianne!

    Reply
  7. Candace Jedrowicz says

    06/27/2012 at 2:54 am

    How elegant! I've been working on a new crown. I love making crowns!

    Reply
  8. Emily Meyers says

    06/27/2012 at 12:24 am

    Hey lady!! I just found your cute blog via the hop and added myself to your followers! Also I’d love to have you check out a fabulous OSCAR DE LA RENTA giveaway I’m having right now!!
    Hope to see you there! And thanks so much!
    Xo, Emily

    http://emilymmeyers.blogspot.com/2012/06/oscar-de-la-renta-giveaway.html

    Reply
  9. Daisy TrendyMomReviews says

    06/26/2012 at 11:38 pm

    Cute idea!

    daisy @ http://trendymomreviews.blogspot.com

    Reply
  10. Tulip TrueAim says

    06/26/2012 at 3:25 pm

    That is beautiful. Something to remember how little and precious our children are. I would be honored if you would share this with my readers at my Link Party! I am a new follower. http://www.trueaimeducation.com/2012/06/moms-library.html

    Reply
  11. Annie says

    06/26/2012 at 3:18 pm

    I love that you made heart shapes! So lovely!

    Reply
  12. Kadie says

    06/26/2012 at 1:19 pm

    I LOVE how “in to it” Raya is!! Ha,ha The charms are adorable! I love the idea of putting both prints in them. Great job.

    Reply
  13. Melanie says

    06/26/2012 at 12:23 pm

    Very cute! I love her face in that pic…

    Reply
  14. Terry says

    06/26/2012 at 11:37 am

    Your charms look so pretty. I have tried to make some salt dough charms and they were a huge fail. I'll definitely try the clay instead. Love, love, love the photo of Raya. ha ha ha

    Reply
  15. Paula Parrish says

    06/26/2012 at 11:14 am

    Hello Adrianne,
    My eleven year old daughter and I love making polymer clay charms. The clay is super fun to work with, we found a lot of great tutorial videos on youTube. I love the idea of the keepsake fingerprint hearts. Thanks for sharing. ;o)
    Smiles, Paula

    Reply

Trackbacks

  1. Godparent Gifts Guide: Gift Ideas for Loving Godmothers and Godfathers - Dodo Burd says:
    11/15/2022 at 11:04 am

    […] BUY FROM AMAZON.COM […]

    Reply
  2. 19 Awesome Gifts for Loving Godparents - Dodo Burd says:
    07/22/2018 at 9:00 pm

    […] Fingerprint Charm Bracelet […]

    Reply
  3. 19 Awesome Gifts for Loving Godparents | Dodo Burd says:
    11/12/2014 at 4:20 pm

    […] Fingerprint Charm Bracelet […]

    Reply
  4. Bulk Wholesale Stuffed Animals Blog says:
    10/06/2013 at 8:48 pm

    Custom Mother Of Pearl Photo Charm Necklace

    […] ts delicious, and adding a bit of creative fun to your day. Thanks so much for s […]

    Reply
  5. Custom Mother Pearl Photo Charm says:
    11/18/2012 at 9:45 am

    […] that makes Belly Charms so special is that you can fully customize your order. So, not only . Fingerprint Charm Bracelet To help protect the charm and to give it some shine, I added a coat of Sculpey Gloss to it. Then, I […]

    Reply

Leave a Reply Cancel reply

Your email address will not be published. Required fields are marked *

Primary Sidebar

Hello, and welcome! I'm Adrianne, an artist, author, designer, and blogger in mid Michigan. I work from home, chase my two kids, and this once-city-girl is learning how to care for chickens and adjusting to life out in the country. I have a compulsion for daily creativity... sometimes it's jewelry-making, paper crafting, metal stamping, mixing and baking, or giving new life to recycled items. But with 2 young kids, time is short! My goal here at Happy Hour Projects is to share projects and tips that you can do in an hour or less. The ideas you find here are designed to add a little creativity in your day, no matter how much (or how little) time you have!

BUY MY BOOKS!

Copyright © 2023 Happy Hour Projects on the Brunch Pro Theme