• Skip to primary navigation
  • Skip to main content
  • Skip to primary sidebar

  • home
  • about adrianne
  • buy the books
    • DIY T-Shirt Crafts (2015)
    • DIY Stamped Metal Jewelry (2016)
    • Rock Painting for Beginners (2019)
  • videos
  • crafts
    • diy beauty projects
    • kids’ crafts
    • paper craft projects
    • polymer clay
    • sewing projects
  • jewelry
    • bracelet projects
    • earring projects
    • necklace projects
    • jewelry tools & supplies
  • metal stamping
    • beginners’ tutorial
    • video tutorial
    • project ideas
    • metal stamping supplies
  • recipes
    • cocktail recipes
    • appetizers
    • main and side dishes
    • sweets and treats
  • by season
    • birthdays
    • new year
    • valentine’s day
    • st. patrick’s day
    • easter and spring
    • mother’s day
    • patriotic
    • fall
    • halloween
    • christmas
    • thanksgiving
  • privacy

Happy Hour Projects logo

12/09/2013

Simple Foam Stacker Christmas Tree

Today’s project is a fun and easy decor piece that your kids can even help you with.  Supplies for this one are pretty inexpensive – I actually picked up almost everything for this project at my dollar store!  It stacks simple geometric shapes (I’m lazy, I used squares – though circles or triangle would both be great looks!) in progressive sizes for a modern-style Christmas Tree.  Let me show you how!
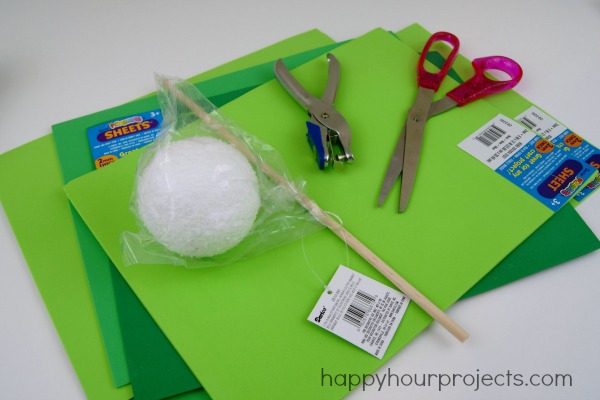
Simple Foam Stacker Christmas Tree at www.happyhourprojects.com

What you will need:

  • 1/4 inch diameter wood dowel (you can use another size, this was just well- suited to my hole punch, and the wood pony bead I used)
  • 4-5 sheets of craft foam (felt would also work!) in various coordinated colors
  • Styrofoam base – like this foam snowball
  • Hole Punch
  • Scissors
  • Round topper – like this wooden pony bead.  Any kind of wood or foam cap would work.
  • Optional – hot glue gun to secure it all!
  • Optional – decorative base, like this candle holder plate

Simple Foam Stacker Christmas Tree at www.happyhourprojects.com

Assembly is really easy!  First, prepare your foam base.  For me, that consisted of cutting the foam snowball almost in half, leaving a level surface.  I inserted my dowel rod in straight.

Next, cut shapes in progressively smaller sizes.  I made mine square, because those cut up the quickest – but feel free to experiment!  Circles or triangles would give you a totally different look.  The largest squares are about 4 inches at the bottom, and 1/2 inch at the top.  Cut some additional 1/2 in che squares to place between your large squares as spacers.  Then, just stack them onto your dowel.  You can use a hole punch on the smaller squares to make stacking easy.

Simple Foam Stacker Christmas Tree at www.happyhourprojects.com

Offset the shapes as you go, allowing all your layers and colors to show.  This will give your tree a more rounded appearance.  When you get to the top, add a cap or topper.  Mine is a simple wooden pony bead with a 1/4 inch hole.  You may find it helpful to hot glue it on, and also to hot glue the dowel into place inside the foam base.

And it’s as simple as that!!  I placed mine on a flat candle holder just to make it look slightly more decorative.  It’s a fun little decor piece to set on a mantel or shelf!  I also have plenty of dowels and some foam leftover for future projects, and I only spent $4 in supplies.

Simple Foam Stacker Christmas Tree at www.happyhourprojects.com

What kind of Christmas decor are you making this year?

Adrianne Signature

Filed Under: Christmas, Kid Crafts, Paper Crafts, Seasonal, Tutorials Tagged With: Christmas, decor, home decor, trees

copyright policy and terms of use

I love it when you love my work! All tutorials and photos published at Happy Hour Projects are copyrighted. If you would like to feature my tutorial on your website or share it on your social media you may use one photo to feature, as long as you provide a link back to the original post.

If you feature a photo, it may not be accompanied by the project tutorial or recipe, whether in my own words as it originally appears or paraphrased by you. This also includes personal sharing on social media and Pinterest. Publishing multiple photos from a project, or including instructions with an accompanying photo are not permitted and you will be asked to remove them.

I love to share my projects, and my tutorials, recipes, and e-books are ALL free for your personal use. However, photos and ideas that are published to this site are my protected intellectual property. You may print them at home, but please do not copy or distribute them. I also allow all designs to be made and sold at fundraisers, craft fairs, etc. If you are selling a piece made from one or more of my free tutorials in your online shop, I require that you use your own, original photography, and include a link back to my website to credit me as the designer.

I hope you enjoy what you read here, and please be fair when you share!

Reader Interactions

Comments

  1. EPDM Rubber Foam says

    03/28/2014 at 4:13 am

    It looks really so wonderful. I would like to say a big thanks for this post because I have to help my son in his project to make a Christmas tree and I was so nervous but now I am relaxed after getting your blog even I bookmarked your site also. Thank you so much..

    Reply
  2. Marilyn says

    01/04/2014 at 10:58 am

    What a simple yet beautiful way

    Reply
    • Marilyn says

      01/04/2014 at 11:00 am

      Oops, I hit comment too soon….Beautiful way to make a cute tree decoration!

      Reply
  3. Tapper says

    12/21/2013 at 7:21 pm

    Mygoodness! What a smart project. Thanks for posting!

    Reply
  4. Christie M says

    12/12/2013 at 9:40 pm

    This is adorable- you come up with the greatest ideas!

    Reply
  5. onel says

    12/10/2013 at 6:31 pm

    Cute project! And it’s so simple too :)

    Reply
  6. calindgirl says

    12/10/2013 at 5:18 pm

    This is such a cool project. Should be fun for the kids.

    Reply
  7. Crystal says

    12/09/2013 at 10:38 pm

    What a great idea!! Easy craft for kids too!!

    Reply
  8. Shannah says

    12/09/2013 at 9:27 pm

    This is such a cute craft idea to do with the kids!

    Reply
  9. meg says

    12/09/2013 at 6:02 pm

    What a super easy (and Cute) project!!!

    Reply
  10. Julie says

    12/09/2013 at 1:05 pm

    This is lovely, great for Children to make. They could glitter glue all over it too (well that’s what would have happened in our house anyway!)

    Reply
  11. Kara says

    12/09/2013 at 10:47 am

    This is adorable! What a great idea!

    Reply

Trackbacks

  1. 20 Unique Christmas Tree Ideas: DIY Holiday Trees - Mom Foodie says:
    11/03/2016 at 12:09 pm

    […] Simple Foam Stacker Christmas Tree from happyhourprojects.com […]

    Reply
  2. Christmas Dollar Tree Ideas for Saving Money - Pioneer Settler | Homesteading | Self Reliance | Recipes says:
    11/30/2015 at 9:05 pm

    […] image via Happy Hour Projects […]

    Reply
  3. 25 Kid Friendly Christmas Activities - Bread Booze Bacon says:
    09/29/2015 at 10:56 am

    […] Paper Plate Christmas Trees | Foam Stacker Christmas Tree […]

    Reply
  4. 25 Kid-Friendly Christmas Activities - White Lights on Wednesday says:
    12/21/2013 at 5:01 am

    […] Foam Stacker Christmas Tree from Happy Hour Projects […]

    Reply

Leave a Reply Cancel reply

Your email address will not be published. Required fields are marked *

Primary Sidebar

Hello, and welcome! I'm Adrianne, an artist, author, designer, and blogger in mid Michigan. I work from home, chase my two kids, and this once-city-girl is learning how to care for chickens and adjusting to life out in the country. I have a compulsion for daily creativity... sometimes it's jewelry-making, paper crafting, metal stamping, mixing and baking, or giving new life to recycled items. But with 2 young kids, time is short! My goal here at Happy Hour Projects is to share projects and tips that you can do in an hour or less. The ideas you find here are designed to add a little creativity in your day, no matter how much (or how little) time you have!

BUY MY BOOKS!

Copyright © 2023 Happy Hour Projects on the Brunch Pro Theme