• Skip to primary navigation
  • Skip to main content
  • Skip to primary sidebar

  • home
  • about adrianne
  • buy the books
    • DIY T-Shirt Crafts (2015)
    • DIY Stamped Metal Jewelry (2016)
    • Rock Painting for Beginners (2019)
  • videos
  • crafts
    • diy beauty projects
    • kids’ crafts
    • paper craft projects
    • polymer clay
    • sewing projects
  • jewelry
    • bracelet projects
    • earring projects
    • necklace projects
    • jewelry tools & supplies
  • metal stamping
    • beginners’ tutorial
    • video tutorial
    • project ideas
    • metal stamping supplies
  • recipes
    • cocktail recipes
    • appetizers
    • main and side dishes
    • sweets and treats
  • by season
    • birthdays
    • new year
    • valentine’s day
    • st. patrick’s day
    • easter and spring
    • mother’s day
    • patriotic
    • fall
    • halloween
    • christmas
    • thanksgiving
  • privacy

Happy Hour Projects logo

10/13/2011

Fortune Cookie Love Note

I am not romantic.  Like, at all, really.  Not that my husband is the big romantic type or anything, but I really have to try to do something sweet.  Usually I count it as sweet enough that I did his laundry and wiped out the sink. :P

See, I’m already being un-sweet in my love note post. *sigh* So I’m just going to suck it up and admit that I made something nice.

I made something nice. 

Really, it’s a very simple gesture – nothing elaborate or really gushy, because I just can’t go from zero to googly-eyed.  But in the interest of baby steps, I made my husband a dinner date invitation for this weekend.  We have been talking about going to our favorite Japanese restaurant “sometime soon”, but it hasn’t happened yet.  Don’t get me wrong, we do get out plenty, but we bring Raya with us and we end up at a chain restaurant.  I love our family time.  But, we need some us-time too.

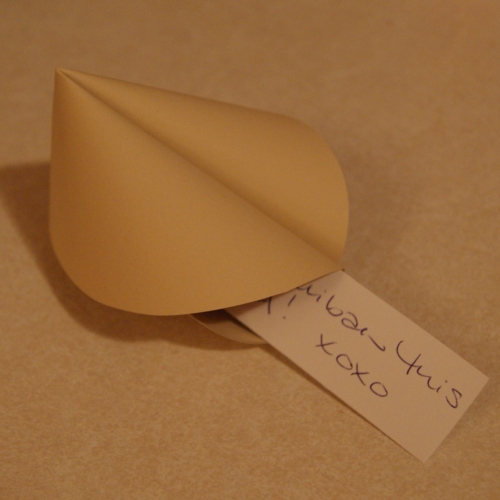
So in keeping with the theme, I made a paper fortune cookie and made the fortune part the invitation.

Pin It
Paper Fortune Cookie

Time: 5 minutes

Supplies:

  • Beige/tan/brown and white paper
  • Scissors
  • Double-sided tape (or glue)

I wanted it to be oversized and noticeable, so I traced a bowl and made a large-ish circle, maybe like 6″ in diameter.  A “real” fortune cookie is more like 3 1/2″ or so.  I cut about a 4″ strip of white paper for my fortune. 

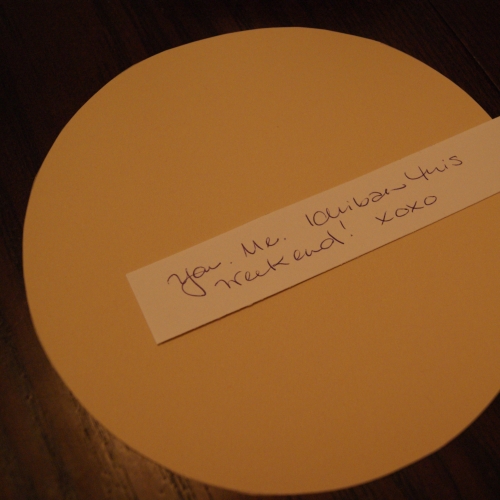
As you can see, my message is still not terribly romantic.  I did add some x’s and o’s.  Maybe that helped.

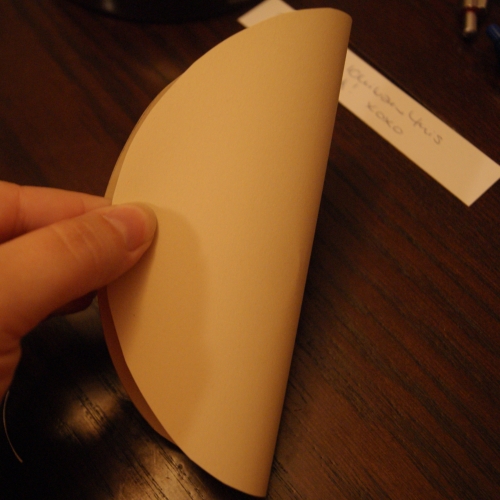
Anyway, to fold your paper cookie, fold it in half but don’t crease it.

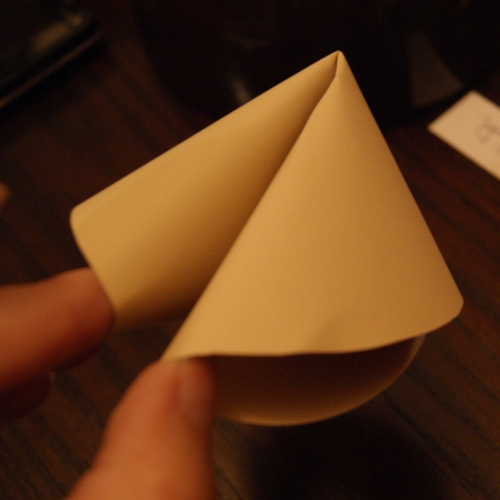
Then, press the center inward.  This is easier said than done, because your paper will begin to crease.  That’s ok, just try to keep it centered.  Like so:

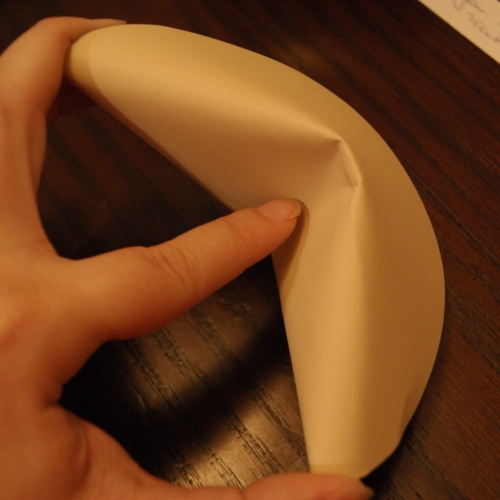
Now bring the ends together so that it looks like a cookie.  It’s hard to explain, which is why you get a visual:

I used double-sided scrapbooking adhesive to stick the two inner folds together. You could also use glue or another adhesive and just pin it together with a clothespin until it was dry. 

Then, I tucked the fortune into one side of it so that it was showing and left it where my husband would see it when he got home.

As soon as he got home, he woke me up and the first thing he said was, “I’ll call the babysitter tomorrow.”  So I think it worked. :)

If Asian food isn’t your thing, you could always make a note that says, “I’m fortunate to have you” or really any other sort of message you like.  You could also put together a little gift box from a takeout box if the occasion called for it!  I know mine is really simple, but hey – I was only going for something a little better than sending my husband a text that says, “I want Hibachi!” :)

See you at 5:00 for Freestyle Friday!!

I link to these fabulous parties!

Filed Under: Paper Crafts, Tutorials

copyright policy and terms of use

I love it when you love my work! All tutorials and photos published at Happy Hour Projects are copyrighted. If you would like to feature my tutorial on your website or share it on your social media you may use one photo to feature, as long as you provide a link back to the original post.

If you feature a photo, it may not be accompanied by the project tutorial or recipe, whether in my own words as it originally appears or paraphrased by you. This also includes personal sharing on social media and Pinterest. Publishing multiple photos from a project, or including instructions with an accompanying photo are not permitted and you will be asked to remove them.

I love to share my projects, and my tutorials, recipes, and e-books are ALL free for your personal use. However, photos and ideas that are published to this site are my protected intellectual property. You may print them at home, but please do not copy or distribute them. I also allow all designs to be made and sold at fundraisers, craft fairs, etc. If you are selling a piece made from one or more of my free tutorials in your online shop, I require that you use your own, original photography, and include a link back to my website to credit me as the designer.

I hope you enjoy what you read here, and please be fair when you share!

Reader Interactions

Comments

  1. Jennifer says

    10/26/2011 at 4:27 am

    What a clever, awesome idea!
    Thanks again for partying with us at Show & Share!

    Reply
  2. LrSchwtz says

    10/25/2011 at 11:16 pm

    I couldn't find your email, I just wanted to let you know that your Fortune Cookie Love Notes are being featured this week at Laugh, Love, & Craft's Share the Wealth Wednesday Link Party! Thanks for sharing your great ideas with us!

    Reply
  3. Jami says

    10/23/2011 at 1:48 pm

    Hi Adrianne! Your love notes are so fun! So glad you linked up to the Tuesday To Do Party!
    Smiles!
    Jami
    http://www.blackberryvine.blogspot.com

    Reply
  4. Emily says

    10/19/2011 at 11:32 am

    This is a great idea! The Texan is a super romantic, and I'm not – he'd love this!

    Thanks so much for linking this up with my {new} Whip it up Wednesday handmade party, too!

    Best,
    Emily from Nap Time Is My Time

    Reply
  5. Heather says

    10/18/2011 at 3:00 pm

    What a fun idea! My kids would love this :)

    Reply
  6. Jenny says

    10/17/2011 at 12:24 am

    What a great idea!! I have to pin this for Valentine's Day!! Thanks for linking up to Latest and Greatest Friday!

    Reply
  7. Jenny says

    10/13/2011 at 10:36 pm

    This is sooooo cute, Adrianne! I love it. Link it up (if you haven't already)!

    XO

    Reply
  8. Whole Child Creative Curriculum says

    10/13/2011 at 7:58 pm

    I love this! It's so cute and simple…I'll definitely be using it soon! I love being on the receiving end of the romance, but could definitely step up the giving end a little. ;) Thanks for sharing!

    Carla @ Whole Child Creative Curriculum

    Reply
  9. KrzyKron says

    10/13/2011 at 5:33 pm

    Very cute idea!

    Reply
  10. Kelly says

    10/13/2011 at 3:00 pm

    how stinking clever are you!!!! so sweet and I am sure your husband loved it…

    Reply
  11. Anna says

    10/13/2011 at 2:19 pm

    Cute idea!

    Reply
  12. Carol-Anne (Use the Good Dishes!) says

    10/13/2011 at 12:33 pm

    Love that idea! I'm not very romantic either, but my husband is, so I do try….

    Enjoy the dinner!

    Reply

Leave a Reply Cancel reply

Your email address will not be published. Required fields are marked *

Primary Sidebar

Hello, and welcome! I'm Adrianne, an artist, author, designer, and blogger in mid Michigan. I work from home, chase my two kids, and this once-city-girl is learning how to care for chickens and adjusting to life out in the country. I have a compulsion for daily creativity... sometimes it's jewelry-making, paper crafting, metal stamping, mixing and baking, or giving new life to recycled items. But with 2 young kids, time is short! My goal here at Happy Hour Projects is to share projects and tips that you can do in an hour or less. The ideas you find here are designed to add a little creativity in your day, no matter how much (or how little) time you have!

BUY MY BOOKS!

Copyright © 2023 Happy Hour Projects on the Brunch Pro Theme