
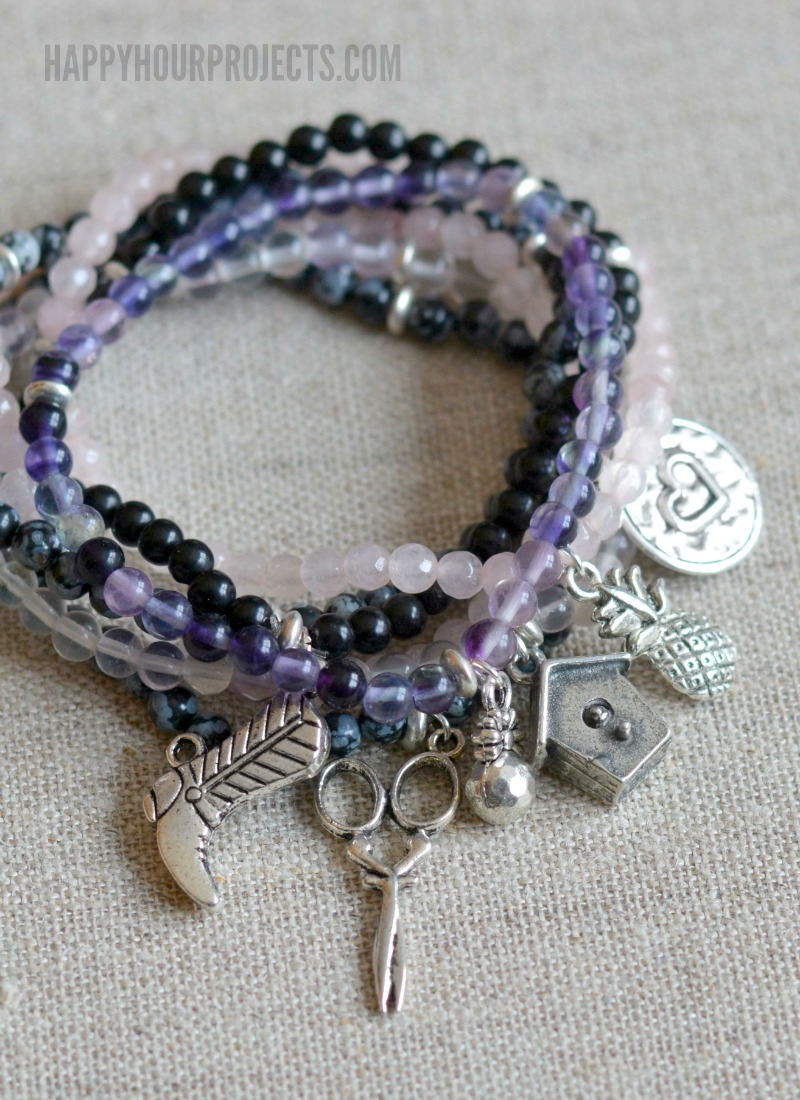
Hey friends! I had some fun with these easy DIY bracelets, combining stone beads and pewter charms to mix and match. These are beginner-friendly and don’t require much in the way of supplies, so that makes it a great project for craft night or a rainy day!
I got my supplies at today’s post sponsor, Happy Mango Beads. They have a huge selection of reasonably priced charms, and when mixed with your favorite colors of stone or glass beads, there’s no limit to how you can customize your own bracelets. Wear them alone, or stack them up to make a statement! There are links in the supply list below if you love what you see and want to do some shopping!

Supplies needed for each of these Easy DIY Bracelets:
- 4mm round gemstone beads (7 – 7.5 inches). I am using purple fluorite, rose quartz, black onyx, and snowflake obsidian today.
- 4mm-5mm pewter spacer beads (3)
- Pewter charms. I picked a fun selection of a pineapple, cowboy boot, pair of scissors, birdhouse, heart, and faceted ball charms.
- 3mm-4mm jump ring (1)
- .5mm stretch cord (12 inches)
- Scissors
- Chain nose pliers
- Super glue (optional but helpful for durability)

Cut a 12-inch length of stretch cord to begin. Your final bracelet will be about 7.25 inches, but the excess will make sure you don’t lose beads as you go and that you have plenty of room to tie your knot at the end.
The pattern I used for these bracelets was 14 stone beads, then one spacer bead, repeated three times. Get creative, though! Any pattern you like is a good pattern.
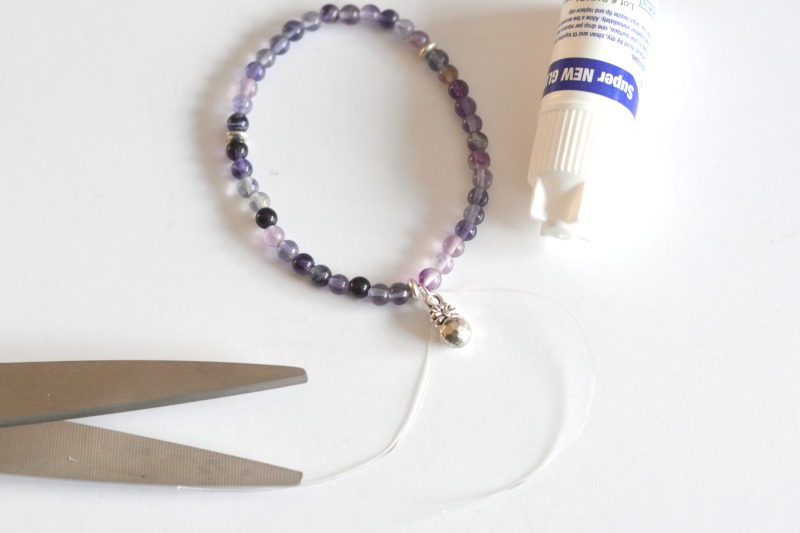
Attach the charm to a 4mm jump ring. When you reach the end of your beaded length, string the charm on through the jump ring. This will allow it to move more freely on your wrist and not get in your way.
Tie a square knot (double knot) to finish the bracelet. The best place to do this is near a spacer bead, as they have larger holes and can help to hide the knot.

Try not to get the stretch cord too loose or too tight when you tie it. You don’t want slack in the bracelet, but you want it to stretch well, so try not to put any tension on the cord. Add a drop of superglue to the knot and allow it to dry (this should only take a minute or two). Then, trim the excess cord away.
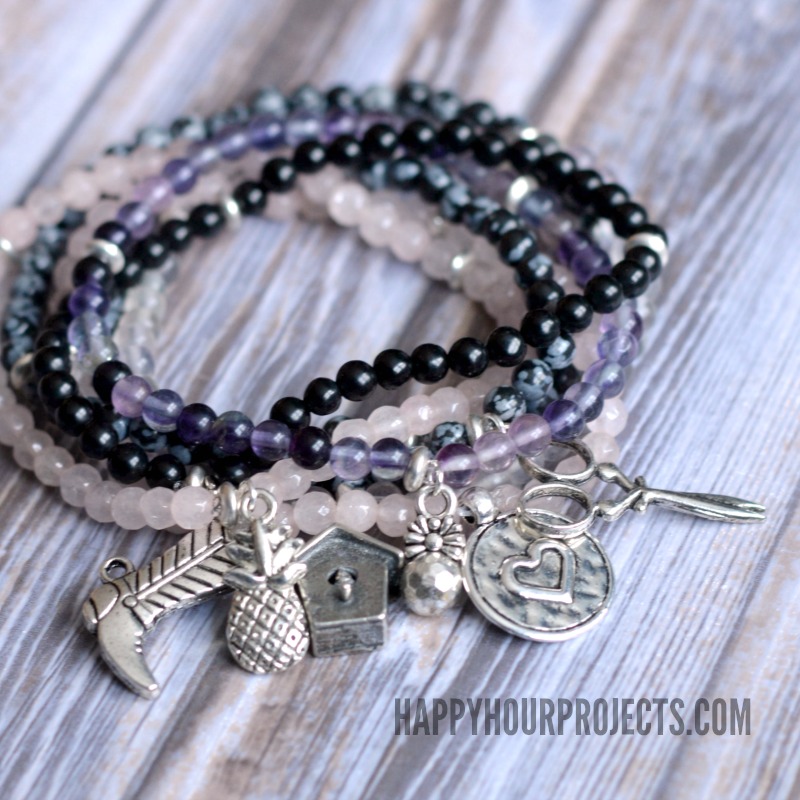
Next – make more! A 15-inch strand of stone beads will make 2 bracelets, so you can share with a friend, or start working on a whole set!
I hope you enjoyed these easy DIY bracelets today, and I’ll be back again soon with more fun inspiration! See you soon ~

of my very favorite jewelry-making
Good luck with your business and thanks for all the hours you spend providing information for the masses. This jeweler appreciates it very much!
It’s easy to see the effort put into making everything coherent and polished.
I like the idea of using the jump ring to attach the charm. I hadn’t thought of that, but it makes perfect sense to allow the charm to move freely. I’ll definitely try that on my next bracelet project. Thanks for the tip!
I love the idea of using different stone beads to create unique patterns. I’ve been looking for a way to use some rose quartz I have lying around, and combining it with pewter charms sounds like a great way to make it more personal. I might try a bird charm!
These gemstone and pewter charm DIY bracelets are so stylish perfect for creating unique and personalized accessories
These gemstone and pewter charm DIY bracelets look lovely and easy to make. I love the mix of natural stones with simple charms—it creates such a timeless and stylish piece. Great project for handmade jewelry fans.
Amazing post! So insightful and well-written. Learned a lot from this. Keep up the great work
The step-by-step instructions make the process approachable, even for those new to jewelry making.
I am quite impressed with your project. The product is very nice, easy to make and simple.
I think this is an informative post and it is very useful and knowledgeable
I’d like to express my gratitude for this fantastic read!! Everything about it appeals to me. I’ve got you bookmarking your site so you can keep up with what you’re doing.
Sometimes it’s good to play games like this to relieve tension, but if you do it too often and disregard other duties, it’s not a good idea.
There are no words to describe how much I appreciate all the time and insightful information you have given me. Your reliability as an inspiration is greatly appreciated.
I’d like to mention that this game is not only fantastic but also quite enjoyable. There is no need to download anything or join up in order to begin playing this board game on this platform, so if you find yourself bored in your spare time, you can come to this platform and start playing it.
I have to say, this is a great blog. I love to read posts like this that are both informative and entertaining
Amazingly creative, I love making handmade items to give to the people I love. Thank you for giving me new ideas.
So beautiful gemstone!
Thank you, Adrianne, for your wonderful instructions. I have learned so much from you over the years. Thank you, thank you for all your effort.
This is an “OMG, why didn’t I think of that” moment. These are super easy and very pretty. Thank you sharing with us.
Gracias, por esa clase paso a paso. Ya tengo unos materiales. Mando foto.
nice
nice post
looking good
Amazing ideas. I love this. Everything looks very beautiful. Thanks for sharing.
It is so much of use to get the credit card number here.
Hello Adrianne,
Thank you for your beautiful website. It is so full of useful information and inspiration! I’ve been making jewelry for years and am always looking for new ideas and developing new skills to keep up with fashion trends. I’ve just purchased your stamping book on Amazon and can’t wait for it to arrive and begins some new projects. Your site is a gold mine.
Having just opened an Etsy shop and it takes so much energy and dedication to just get it off the ground so I can’t begin to imagine how much time you put into your work. And, with kids! Your’e amazing.
Good luck with your business and thanks for all the hours you spend providing information for the masses. This jeweler appreciates it very much!
Jamie Carroll