
I recently presented this cute and simple cocoa recipe over at Imprintalish as part of her Kickoff to Christmas Sweets Day! In case you missed it, I’ll give you the how-to – it’s so easy!
If you’re anything like me, there are a lot of people you’d like to thank at Christmastime. Edibles are always a big hit, and handmade gifts show that you put thought and effort in for that person. This year, I have worked hard to include handmade touches to my gifts, and people have been very appreciative.
Fortunately – people don’t have to know how crazy easy this gift is! You can whip one of these up in ten minutes or less if you have your supplies on-hand.
Recipe for an 8 oz jar:
- 1/4 c. powdered dry nonfat milk
- 1/4 c. powdered coffee creamer
- 1/4 c. granulated sugar
- 2 Tbsp. baking cocoa
- chocolate chips (mini chips work best, but use what you have)
- marshmallows
I didn’t measure how much I used in marshmallows and chocolate chips – just a small handful of each to make it look nice. The recipe itself is fabulous without them, they just make for nice presentation!
Keep all your ingredients separate, and I will give you some tips below when it comes to layering them!
Hobby Lobby runs half off specials of their glassware regularly, so that is where I got this hermetic jar from. I just love the glass top and metal latch. But any 8 oz. jar will work. Check your dollar store, or use Ball jars! Please forgive the prep pictures – there’s rarely much daylight left when I finally have time to work. :)
First of all, I stir my cocoa and coffee creamer together. Because it’s cocoa, I want more chocolatey-looking ingredients to show. By mixing the two, you will have fuller cocoa layers.
Now, in a clean jar, put all your sugar in. It doesn’t have to be exactly level, but you do want to make sure it’s a visible layer all the way around the jar, so go ahead and shake it a little to settle it.
Next I add about half of the cocoa/creamer blend, and tap the jar so it’s more or less level. Then I pour in about half of the dry milk.
When it comes time to add the chips next, I arrange them around the outside of the jar. You don’t need to use much for the recipe, but the point is that you want to see them from the outside of the jar:
Then, I add the remainder or the dry milk. At this point, you want to tap the jar fairly well so that it packs down as much as it can, because the dry milk is grainy. You’ll be adding the remaining cocoa on top of that, and you want it to hold up the cocoa layer as best it can.
Add the last of your cocoa mix, and pack in a bunch of marshmallows. The marshmallows keep the ingredients in place, so go ahead and squeeze in as many as you need to fill the jar completely.
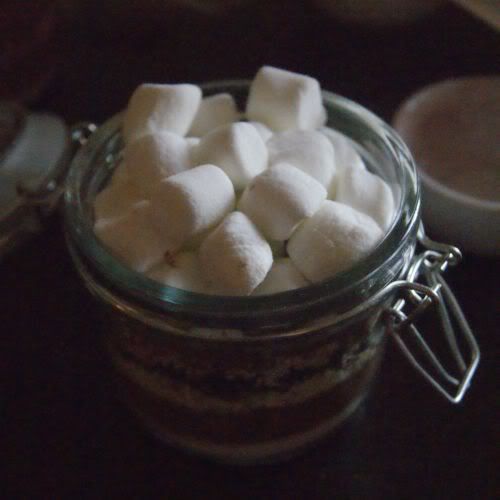
Close off your jar and add a festive touch. I go for the minimalist approach with snowflake stickers from my scrapbooking stash and a bow. But depending on what sort of jar you use, the possibilities are really endless!
You should include a note for mixing instructions: This recipe for one jar makes two mugs of cocoa. Just add the contents to 16 oz. of hot water. Share and enjoy!
Perfectly giftable by itself, or as an addition to a Christmas cookie sampler! Yum!
~ Adrianne
We would like to invite you to list your business (happyhourprojects.com) with allcbdstores.com, the world’s first CBD business directory with a global reach. Some of the reasons to list with us includes: lifetime listings, receive leads from potential clients via lead contact forms and receive a powerful backlink from an authority site.
I love gifts-in-a-jar. I actually pinned yours last week and made my own with crushed candy canes. Thanks for linking to Fabulous Friday.
would love it if you could share this on my link party Serenity Saturday at http://www.serenityyou.blogspot.com
Natasha xx
Yum!! Great idea! I would love it if you would share with my readers! I am running a 25 Days of Handmade Christmas series. For info: http://embracingmessy.blogspot.com/2011/12/25-days-of-homemade-christmas-day-1.html or just email at embracingmessy@gmail.com if you're interested!
Super cute, I would never have thought to stuff the marshmallows in there to hold everything in place.
Such a great idea, I know I would love getting this as a gift.
I hope you will stop by my blog next week I am hosting a Holiday Treats week with linky all week long.
It looks so yummy! And super easy too. Thanks for sharing, I just pinned it.
Rachel
adventuresofadiymom.blogspot.com
I love ingredients in a jar! Makes it more special. Thanks for sharing!
Here from A Glimpse Inside.
I am always looking for new neighbor gift ideas. Thanks for sharing this. It looks amazing. I would love it if you could link this up to our linky party going on right now.
http://junkintheirtrunk.blogspot.com/2011/12/link-it-up-wednesday-6.html
what a fun gift I've love you to add it to my what we wore and made party over at http://raegunwear.blogspot.com
Hi! Visiting from the Inspired Collection :) This looks easy and would make such a great gift! Thanks for sharing!
http://www.thegrantlife.com
Oh yummy yummy yummy! I'd love to get one of these as a gift! Did you link up with Creative Me Monday yet?
http://www.thesoutherninstitute.com/2011/12/creative-me-monday.html?utm_source=BP_recent
Hope to see you there!
Very cute….
Love the presentation – especially that snowflake on top. Nice idea.
Love it! I agree with Katie – perfect for teachers, neighbors, etc.!
I love this idea! Perfect for teachers or neighbors!!!