
If you have visited my Etsy shop, then you will recognize today’s project. For you DIY-ers, I’m going to show you how to make your own!

I actually stopped listing these. It was just getting too hard to keep up on! I do love to make them, but custom orders were taking more time than I really had.
Fortunately, they aren’t complicated at all. It’s taking me longer to type up this post than it does to make one! The supplies are kind of specific, but I will leave links below for you to help you locate them. These are affiliate links, which means if you decide to click through and make a purchase, then it helps support my blog at no extra cost to you (and thank you, by the way). You are, of course, welcome to source supplies on your own and buy from whomever you like. I’ve linked to Amazon, but you can also find many supplies on Etsy.
What you will need:

- Map Clipping – this is the State of Illinois
but you can of course choose a meaningful place to you
- Mod Podge
& paintbrush - Craft squeegee
- 25 mm Antique Brass Round Bezel With Glass Cabochon
- Antique Brass Cable Chain
– at least 18 inches, but a long length between 24-36 inches is really pretty for this style pendant
- Lobster Clasp & Jump Ring Set
for shorter chain lengths (over 24 inches, you can skip the clasp and slip it over your head for wear)
- Heavy duty permanent adhesive (like E6000
or Elmer’s ProBond
)
Picking and choosing your map clipping might be the hardest part… but you can typically pick up any state map on Amazon for about $5, or if you’re a AAA member, just request one sent to you free! You can also raid your souvenir stash, because you may have the perfect thing already.
If you print one at home, I’d recommend using cheap photo paper. Regular paper doesn’t hold a crisp image, and and good photo paper tends to smear. The cheap stuff (like the stuff Dollar Tree carries) is perfect for projects with Mod Podge. One word of caution, though – you probably won’t get quite as clear of an image as you would with a real, paper map.
Once you’ve settled on your image, use your glass cab to trace it out and trim it. Then, cover it in a light coat of Mod Podge.
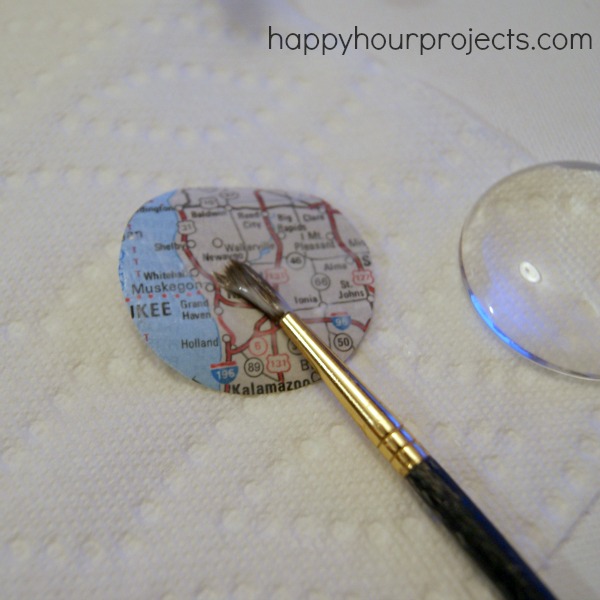
(I know this isn’t Chicago, I was making a couple of pendants!)
Next, put your glass cab on top. Twist it around to coat it well, and eliminate any areas that might not be coated in Mod Podge. Now, you are going to squeegee any excess Mod Podge out. You can use a card (think like a credit card) for this – I have a little squeegee tool I use specifically for Mod Podge projects like this.

Give the backside a coat of Mod Podge to seal it, and let it dry. It should take about 30 minutes to fully dry.
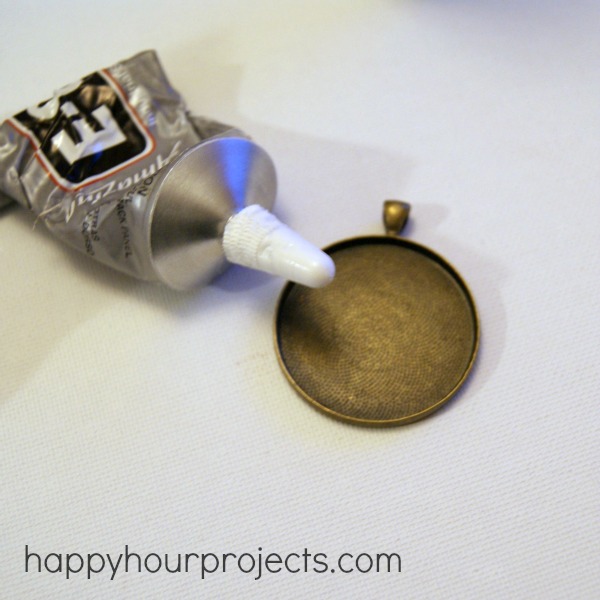
The last step is to adhere the cab to your bezel. I like E6000 for this, but if you use it, you need to know – a little goes a long way. You only need a very thin coat for a permanent mounting. If you get too much, it can bleed through your graphic and look black. I usually just add a dot anywhere but the exact center, and then when I pop the cab in, I twist it all around to get a nice thin coat of glue.
You should give it at least an hour before you try to wear it. I will often just leave it out overnight to cure.

Now you have a great gift – it’s a little piece of home for anyone! I have also made these with book clippings, dictionary definitions, bible verses, clippings from sheet music, photos, phrases – you can personalize these any way you like!

It has been really hard for me to find some one to explain to me how to do this!!! Thanks so much for your tutorial. Maybe you could give me some pointers on my project that I am doing by the seat of my paints! I am doing a key chain in this same way, but I was using vellum paper is that okay to use?
Have you tried fabric, too. If not, what type of supplies to you recommend?
I love this but I want to make earrings smaller than 25 mm. Where would I find supplies for that? Thanks!
Cindy
Excellent post. Keep writing such kind of information on your blog.
Im really impressed by it.
Hello there, You’ve done a great job. I will certainly digg it and personally recommend to my
friends. I am confident they’ll be benefited from this site.
I was wondering if you ever tried to make your own picture on these? If you did, what program can you suggest to use? Word, Powerpoint, ? I don’t have photoshop. Thank you so much for all your information.
Do you know where I can get the bezel and cabochon in a smaller size than 25mm? I want to make these as gifts for my young daughter and her friends. Thanks!
Yes – these are 16 mm: http://amzn.to/1Qxfc3z. Sounds like lots of fun. :)
Hi. Thanks so much for sharing this project. I’ve made a few of them and I’m getting some shiny/darker spots on the image. It’s not the glue because it appears before I adhere it to the blank. I’m assuming its maybe how I’m applying the mod podge? I’ve tried putting more on and also less to see if either of these are the problem. Do you have any ideas? Thanks!
Hm, if you’re getting it before you adhere it, then it’s got to be something with the Mod Podge. It may be that your paper is textured or that you’re not getting an even layer between the paper and the glass. That’s why I find the craft squeegee to be so useful – you can give it a really thick coat of MP to make sure it attaches all over, and then squeeze out any excess (while also pressing down on the paper, helping it to stick better too). I know some people have used other products like diamond glaze to make similar pieces. Since I haven’t used it myself I can’t give you much direction for other products, but you may find another decoupage medium that you like better!
Hi Bonnie!
Your message is old so I don’t know if you’ll get this but I’m having the same problem. I did not try a squeegee though. I was wondering what type of glue you were using (I am using 3D) and if you solved your problem and how?
Thanks! I hope you can get this and thanks so much if you’re able to reply. :)
Kim
That’s really thiinnkg at a high level
Hi! I are often to blog and i really appreciate your content. The content has really peaks my interest. I want to bookmark your internet site and keep checking regarding new info.
I am typically to blogging and i really appreciate your content. The article has really peaks my interest. I am going to bookmark your site and preserve checking for brand new information.
Renata Trajano comentou em 10 de novembro de 2011 às 22:18. Júlia ! uma sugestão para manual da próxima semana , a maquiagem da Fernanda Lima que ela usou no programa Amor e Sexo!
great idea sell your stuff at a massive discount slash your margins and go bust…well done how fucking original you niggers need to stick to street crime. leave business to us Chinese you dumb fucking moolies.
indeed facebook is a cesspool of useless information. My life has been a thousands times less stressful after I deleted mine. Why does this generation still seem to desire to carry on with drama even after high school ends?
Thank you SO MUCH for this tutorial! If I want to slip overhead with a 24-36″ length, what tools would I need to cut the chain and how would I reconnect it, please? Looks like the Amazon link for one big long 6′ chain. I’ve never made jewelry before, so I’m a little unclear on the finishing details. Thanks!!!
You can use wire cutters and a jump ring to make the chain smaller. If you’re going with a 24″ size, that’s about the smallest size you can slip over your head.
Just cut the chain with a pair of wire cutters (it’s helpful if you use jewelry-specific cutters because they’re much smaller, but any small cutters will work) and then twist the ring open. Connect the two pieces of chain together, and twist it closed again. You will likely need a pair of fine-nosed pliers to open and close the ring.
If you’re making a smaller necklace, you’ll attach rings to both ends of the chain, and then on one of the rings, you’ll connect a clasp onto it before twisting it closed.
Here’s a link to a video I put together for beginners, showing how to finish basic chains. https://youtu.be/mEAodxlTwkY That might help with some of the basics!
I recently starting making these using antique maps. I too have been getting dark spot/bubbles etc and anxious to experiment too much on these little treasures. So far I tried a product call Judikins diamond glaze, placed the glaze in the tray and set the cut out and cab into the tray. It saturates the map and creates glue spot and bubbles. Next I tried to just add E600 to the edge of the cab – not adding glue to anything else and it works but you can usually see some of the dry glue and sometimes it seeps to the edge of the map and makes it dark.
Does modge podge seal it? I just assumed that the modge podge would seep through also. The paper and map ink it pretty sturdy. I bought a sample jar of judikins microglaze (said it’s a sealer too) – haven’t used it yet, any experience with that? Any help would be appreciated! I also take antique lace – same issue – wet lace, thoughts there?? Thank you in advance!
Mod Podge is a sealant and it’s what protects your paper from the glue darkening it. I do like MicroGlaze for things with ink that may bleed – for example, if I print on my home printer, I like to use Microglaze before adding a water-based sealant like Mod Podge. But professionally printed maps don’t bleed if they get a little damp, so it’s not necessary.
You can of course experiment with any products that you like, but sealing with Mod Podge and using just a small amount of glue it the method that worked best for me.
I do some resin work and the key to prevent penetration into the paper (map or whatever) is good sealing. It’s a pain but at least you don’t get those dark areas. Paint cut out circles of your map and the edges both front and back and allow to dry before mounting in bezel. You can use Mod P or even Elmer’s Glue. Surely this will work for this problem.
I really like this idea. I love maps and they are are plentiful in my area. I will definite have to try this. Thank you. ?
These are great! We would be making them for a large group. Any idea of prices?
If you’re sharing supplies (like Mod Podge) you should be able to make this project for about $5 each. I linked to the best prices I’ve seen up above from Amazon, but I haven’t shopped Etsy in quite a while – you may find some sets there that are pretty cost-effective. I know when I was shopping Etsy, it only made sense if you were buying sets of 10 or 20 so you may do well there, and it’s worth at least comparison-shopping with Amazon!
Love your blog, can’t find a link to your Etsy …please share! Deb
Hi Deb, I hated selling on Etsy, so I don’t do it anymore. I just focus on the part I actually love – making pieces and sharing how others can make them for themselves! Thank you, though!
This is a fabulous idea! I am making them for my daughter’s graduation party and shadows keep showing up behind the map. This is before I put them on the bezel with the glue. Am I using too much or little mod podge? Any suggestions would be appreciated.
If you’re getting dark spots, it’s the glue. A little goes a REALLY long way! I would try two things: first, give the maps one more coat of Mod Podge to better seal them. Mod Podge dries in about 15 minutes, so an extra coat won’t add much time (especially if you’re making some up assembly-line style). Then, cut WAY back on the amount of glue you’re using. I would use no more than a pea-sized blob on the whole thing.
There’s one more thing you can try if you’re still struggling, and that’s switching glues. It’s been over 2 years since I shared this project, and since then, Elmer’s has come out with a new glue product that I really like for projects like this. It’s called Elmer’s Pro Bond, and I’m finding it in the hardware section of stores rather than the craft section. From what I can tell, it holds every bit as well. It’s a little more messy because it’s a thinner consistency (so be careful when you add it, you can get too much if you squeeze the tube too much) but I haven’t had any issues with dark spots when I’ve made magnets using this same technique.
Hi,
You can get maps at your local State Highway Administration for free. Also if many times at the end of the year if they are getting new maps they recycle the old ones and will give you boxes of them.
I am having a problem with my states’ map bleeding though so test one pendant before you make 10 like I did! The maps bled from the glue on the back of the pendant, not the Mod Podge.,
Thanks for the wonderful idea and instructions!
Thank you for the great tutorial! I’m going to try this! Yours are super cute!
How adorable is this little necklace. And it really caught my eye because I was born in that little dot that says “La Porte” (although I’ve been a California girl longer than I care to admit!).
I love the particular necklace bezel, glass, and chain you choose. I have been looking for the same one but cannot seem to find it. I would love to try making some for gifts. Could you let me know the exact ones you used and size. Thanks you so much for sharing!
Hi Beth,
I’m not going to be much help, I got these locally from a seller working out of her house in my old city – about 3 years ago. I also don’t still have any to measure them, but I believe it was 30mm round? I know there are lots of suppliers on Etsy, though, with a lot of options. Sorry I can’t help more!
You can purchase the glass domes at http://www.sunandmooncraftkits.com at a very reasonable price. 20 for $3.50!
I am so happy to read this article. I have tried making my own photoglass cabochons using Diamond Glaze and always end up with cloudiness and air bubbles. I used ModPodge years and years ago for decoupage. I am going to pick us some of that and try doing this the way you do.
As you can see, I use the photoglass cabochons to decorate badge reels which I ten sell in my online shop. I order the photoglass cabochons, but really want to make my own. Thanks so much for sharing.
I love this! What a great project!
Can you use PVA glue instead of Mod Podge?
Hi! If you use an inkjet printer, you can make these glass pendants using Glamour Seal. Glamour Seal is not water based, so it won’t make your inkjet prints smear. You can find Glamour Seal on this website here: http://www.anniehowes.com
Do you think fabric would work too? Please email me : lilyasherco@gmail.com if you don’t mind! Thanks a million :)
Love the map pendants!
I found this shop on Etsy where you can buy these supplies at good prices
http://www.etsy.com/shop/PrettyCharmed
Thank you for this tute! I want to buy a map necklace for a visiting friend and they are out of my city and have been for quite a while.
I was wondering if you’ve ever tried this with fabric. I would like to make a keepsake for my family out of a shirt that was my grandmothers and thought this would be a neat idea. Would you have to do anything special to fabric before placing it so it wouldn’t bubble?
Thank you so much for this wonderful tutorial. I have bought all of the supplies and I am worried that the image will bleed using the glue and mod podge and also worry about the glass getting cloudy after a couple of weeks. Have you had any of these problems?
The Mod Podge is an excellent sealant, so you don’t have to worry about cloudiness. Now, as far as the graphic bleeding, you do have to be a little bit careful. Professionally printed materials VERY rarely bleed. For example: maps. I have never had a map bleed on me, ever. If you print your own on a home inkjet printer, you will want to test it first to make sure it won’t bleed. Different brands of ink are worse offenders than others – my last printer hardly ever bled, but the new one does more often, and they are both HP’s, just different models. I’ve had excellent luck printing on cheap photo paper, though – not the nice stuff where the ink stays on top of the paper – but Dollar Tree sells some stuff that’s 8 sheets for a buck and it works wonderfully. You can also add a coat of paraffin wax to your graphic if it’s susceptible to bleeding, Judikins makes one called Micro Glaze. But if you are using something like an actual book clipping, map, travel brochure, etc, you shouldn’t have any problems with ink bleed! Hope this helps!
Hi,
I love the idea and I’d like to try it.
What are the dimensions of the necklace bezel and coordinated glass cabochon? Do they have to be the same or must the cabochon be smaller to fit in the bezel?
Thanks.
this is super cute! i was wondering where u got the necklace bezel and coordinated glass cabochon from! Thanks for the diy project!!
I really really really want to make one, but can you please explain what kind of glue E6000 is? I need to find something similar, I don’t think they sell that brand here.
Love this idea! I was wondering if you knew of any stores that sold the pendants and glass in the store? I would love to make these but I would need to be able to buy the supplies in a store.
Adrianne,
I was wondering if you could give me your source for buying the necklace bezel and coordinated glass cabochons in bulk (not huge quantities though)? I make crafts with ladies from the local Senior Center every month as an ongoing “community service” type project. I try to keep the cost as low as possible since most of these ladies are on a fixed income or I will buy the items for them sometimes if I can afford it that month.
Any help you good give me as to where to buy the items or anything else that you would think might be helpful would be very appreciated! Thanks!
Quantities of 10 are usually the smallest that suppliers offer, which sounds like it would work well for what you’re doing. You can expect to pay around $4 a set at that quantity by the time you get the cabs, trays, and chains to match and have them shipped. I get mine from http://www.etsy.com/shop/perfectpendantsplus – I tried a couple other sellers before her and didn’t get good service, so Tami is who I would really recommend!
It’s always a relief when someone with obvious exrsitpee answers. Thanks!
Thanks for shnirag. Always good to find a real expert.
I was actually wondering whether it is possible to utilise the Strings panel/Internationalisation functionailty built into flash without changing the system locale or registry setting.It would be nice to be able to do something like _r1ar.setLocole(“ft̶o;) when the user chooses a particular option.If this is not possible then I could effectively copy the String panel functionality (storing all my strings in xml) and loading the appropriate file. The thing is that I like that fact that you can develop in a single language and have flash manage the other language files.
The one question I didn’t hear asked of Goodling, was: Who told you to do this? This being political tests for career employees. I find it difficult to believe that she would have come up with policy by herself.
Thanks for sharing! How did you cut the map out into such a perfect circle?
I actually trace around the cabochon, then just cut with scissors (it’s not exactly perfect, haha). The domed edge hides any little imperfections in my trimming job. I’m pretty sure you can find circle punches that are 1-1/2 inches to make the job easier if you plan to make a lot, but tracing the cab works for any shape or size you’re working with. Hope that helps!
What a great personalized gift this would make!
I have a question; When adhering the picture to the glass, are you gluing it to the entire surface of the glass or are you only gluing it to the very edges? I am still slightly confused. Will the map be curved to fit the entire surface of the dome or does it lie flat and have space of air between it and the glass?
The back of the glass is flat, so the entire surface gets glued. The doming is only on the top.
Thank you! I was confused on how that worked! I’m planning on making matching ones for my boyfriend and I for his birthday with a picture of us in it. I think that would be awfully cute. (:
Love these!! I really need/want one of my home town. Now it just find a map that has it on it. ha,ha
What a great tutorial! I made some of these and I love them. They will be perfect gifts. Thanks!
I really aptaceirpe free, succinct, reliable data like this.
It’s always a pleasure to hear from someone with expertise.
I appreciate you taking to time to contribute That’s very helpful.
I love love LOVE this!
I just got some supplies from Hobby Lobby last week to make a necklace like this! :D
Thanks for the tutorial!
One question though, what type of glue is Mod Podge? Just a brand of clear PVA glue? I assume the other glue is just high strength super glue.
Hi Toni!
I understand Mod Podge is primarily a US thing… here’s a link to the product if that tells you more: http://www.plaidonline.com/mod-podge-brushstroke-matte-8-oz/92/CS11264/product.htm
I am honestly not sure what a comparable product would be in other countries. If you have anything that’s a standard product for decoupage projects, that should be a good equivalent. There are some DIY-tutorials to make your own Mod Podge. I normally wouldn’t recommend that as a sealant, but because this will end up encased between glass and a bezel, you could probably get away with it. You mainly need to find a way to adhere paper to the backside of glass without any bubbles, and without it peeling away later, so it will need to be thinner than normal craft glue, but strong.
I’ve also heard of people using Diamond Glaze, but when I tried it, I don’t like it as well as Mod Podge. I also don’t know if that’s another US-specific product?
And yes, E6000 is a heavy-duty permanent adhesive. It’s not quick-dry like super glue, but the bond is extremely strong.
I’m sorry I can’t offer any more suggestions for equivalent products, I’m just not familiar enough with anything else to feel comfortable making a recommendation. ;) But hopefully the information I shared will help you find something you can use!
Thanks for the information, I found out the following things whilst buying materials:
Watered down PVA glue can be used in a similar manner to Mod Podge although for this project watering down isn’t strictly necessary. No need to buy Mod Podge just for this project if you already have PVA.
For UK buyers, amazon and other online beading/craft stores (eg. Jasmin Studio Crafts, beadaholique) sell both E6000 (~£5) and Mod Podge. E6000 doesn’t dry to the immediate hard finish of superglue and is slightly more flexible. Definitely worth investing in for beading and jewelry work.
Love it!! Such a cool idea!!
Hi, I stumbled across your blog and I am interested in making these necklaces to raise money for my teaching trip to Ukraine. I want to try it out before I go out and buy a whole bunch of sets. So I was wondering how much you wanted to sell a smaller set? I know I’ll like it because they’re really cute, but I just want to make it on a smaller scale first before I invest a whole bunch of time and money into them. I hope to here from you soon.
Thanks,
Mercedes Thomas
Like how to think of these things? I’ve been following you through RSS since last summer and I’m totally blown away with how creative you are!
I am definitely interested in some smaller amounts from your de-stashing. Please e-mail me and let me know. Thanks so much! crickhollowjules@gmail.com
I’m slow to discover the tech world. Do I just google or Bing Etsy? How would I find your shop on Etsy? I too would like to find the glass cab. I’ve enjoyed this blog a lot. I like the “vibe.” And great job on the tutorial.
Thank you so much for sharing, I love these and they’ll make great gifts!
I love these necklaces – thanks for sharing the tutorial!! I’d love to buy your extra bezels and glass cabs!
Thanks for the nice tutorial!
Love it! Where do you manage to find the glass cab? I’ve looked all over for them at hobby lobby, michaels etc, and can’t ever find them!
Ashley, you can find the glass and the bezel at PhotoJewelryMaking.com. They have lots of other cool supplies for making pendants.
http://www.photojewelrymaking.com/glass-pendant-with-tray.aspx
Adorable! Oh and I’ll take your extras if they aren’t gone already.
So pretty!! What a nice problem to have, not being able to keep up with orders. :)
This is awesome! I want to make one…will have to check out my craft store next time I’m there, for sure. Pinning this beauty!
Adrianne, thanks so much for the tutorial – these are great! I would love to buy your extras if they haven’t already been claimed.
fkmtj(at)comcast(dot)net
Love this idea! Thanks for the tutorial.
AWESOME pics & tutorial, I’ve pinned you to my crafty board. Thanks for sharing this DIY with all of us! :)
Wow, that is super easy! Those are really cute :)
– My linky party is still open until Wednesday at midnight if you’d like to pop over and link up!