
Hey guys! Halloween is right around the corner, and today I’m partnering with FloraCraft Make It: Fun® to share their new FREE Halloween ebook, and to show you a twist I put on one of the projects I found in it! I love Halloween – the crafts are cute, the costumes are fun, there’s bound to be something with caramel in it somewhere… ahhh. Today I’m sharing this creepy Halloween wreath tutorial that you can put your own spin on, too!

I was inspired by an adorable pumpkin wreath I saw in the FloraCraft Make It: Fun® Halloween ebook. You can download the ebook yourself – for free! – by visiting the Make It: Fun® website here, or clicking the icon below.
Now – I wanted our wreath to be a little more creepy and a little less cute. That’s the beauty of DIY! You can always make it your own. I followed the instructions for creating the wreath, and I also found some creepy, tarantula-like spiders in another project from the book. I combined the two ideas to make today’s project, and I’ll show you how I did it! If you love the idea, then be sure to grab the ebook for yourself for more free tutorials, or visit the Make It: Fun® website for more ideas all year round. Here’s what I used:
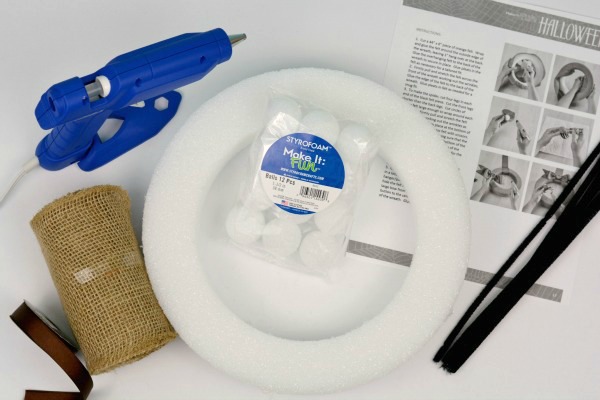
- FloraCraft Make It: Fun® Foam Wreath
- FloraCraft Make It: Fun® Foam Balls, 1-inch and 1.5-inch
- 44 inches of 6-inch wide burlap ribbon (8 inch wide would work even better)
- 12 inches of satin ribbon (for the hanger)
- Low-temp hot glue gun
- Pipe cleaners
- Scissors
- Brown spray paint
- 2015 Halloween ebook for instructions
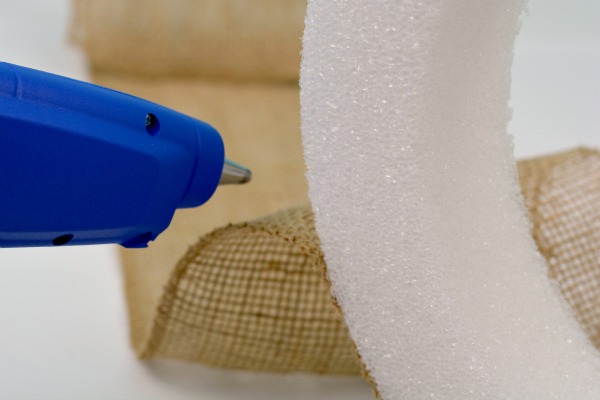
I mentioned above that I used 6-inch wide burlap ribbon. You will need 8-inch wide if you want to cover the backside of the wreath. But because 6-inch ribbon is what I had on-hand without running to the store, I made it work since nobody will see the backside of my wreath anyway. The ebook suggests using felt, which would be even easier to work with, but I was going for a creepy look! So, I began along the edge of the wreath, using hot glue to attach the ribbon.

When it came to wrapping the front of the wreath, the inner diameter is of course smaller that the outer diameter of the wreath form. This means you will need to create pleats very few inches to make your covering fit well (whether you’re using burlap like I am, or felt, or another type of fabric or fiber). You can see here that 6 inches width only covers three sides. If you have the option to get 8-inch wide ribbon or fabric, you can also cover the backside – which would be ideal if you’re hanging it against a window or glass door!
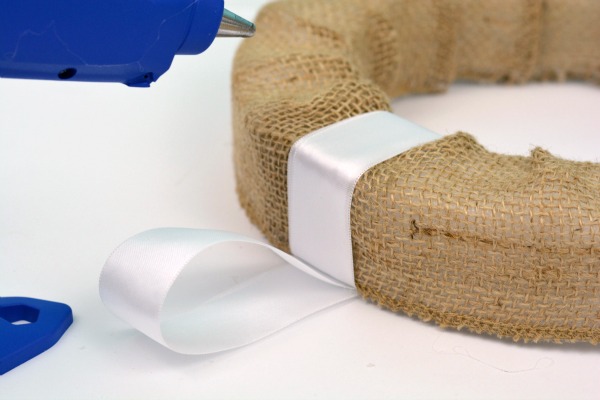
At the “seam” where the ribbon overlaps, I wrapped wide satin ribbon around the wreath, creating a hanger. You can embellish this hanger with a bow or any other decoration, or just leave it plain, like I did.

Once I had my wreath finished, I had to decide on embellishments! The book shows you how to make an ADORABLE little polka-dot spider. But I wanted something a little different, so I flipped through the book until these creepies caught my eye! I cut pipe cleaners for the legs, and pushed the wires through the foam. A simple bend of each leg makes them look like they can really crawl! I made two spiders in 2 different sizes, using a 1.5-inch and a 1-inch FloraCraft Make It: Fun® Foam Ball as the body.

To make them more like real tarantulas, I spray-painted my spiders brown. Take care when you use spray paint on foam – you want light coats. Two light coats were perfect to make these guys look pretty authentic! All that was left was to hot glue them onto my wreath when they were dry!

I had lots of fun with this project! Thanks for checking it out today, and visit the FloraCraft Make It: Fun® website for more great foam crafts! You can also take a look at my FloraCraft Make It: Fun® Foam craft from last Halloween: Frankenstein Foam Head Bowling! Just click the photo below to visit the tutorial!


I suddenly have more ideas to be creative and decorate my house more new.
wow nice post
looking good
like it
nice post
looking good
You can definitely see your skills within the article
you write. The world hopes for even more passionate writers like you who aren’t afraid to mention how they believe.
All the time go after your heart.
This is so cute. Thanks for the tutorial. I was hoping to find a project for this weekend. Thanks so much!!
This is so cute. Thanks for the tutorial. I was looking for a fun idea for a new wreath. I will try this one this weekend. Thanks.
This is awesome. Love this DIY project for Halloween.
Very cute! And it looks easy enough that even I could do it!
I LOVE all things Halloween. Super cute project. I would have never of thought to make spiders that way.
Love it. I wish I was crafty. This looks great. Very impressive.
seeing this again, and now i MUST make it!
What a simple and fun wreath to make! I love the spiders. My kids would love to make them.
I’m not a big wreath person but I think I might have to make one for Halloween. My youngest would probably love adding the spiders!
Love this, and you make it super simple to get this done. Thanks so much for sharing!!
Creepy! But also cute for Halloween. :)
These are adorable! Love your site!
This is a cute wreath! I love that the kiddos can make these little spiders while mom wraps the wreath. Thank you.