
Hey friends! I’m mixing metals in today’s tutorial showing you how to make a hand stamped necklace. I’m keeping the techniques simple today, and show you how layering different metals and adding charms can give even simple designs depth and character. If you’ve read here before, then you guys already know how much I LOVE metal stamping, so I’m happy to have ImpressArt Metal Stamps as today’s post sponsor.

As you can see, it’s just two words and two design stamps, so this is a great project if you are fairly new to stamping! Most of what I’ll be showing you today is simply mixing colors, shapes, and textures for a pretty vertical charm necklace that works well with a casual wardrobe.

So let’s jump right in! I’ll leave links below to the supplies and tools I’m using in today’s post so that you can learn more if you want to.
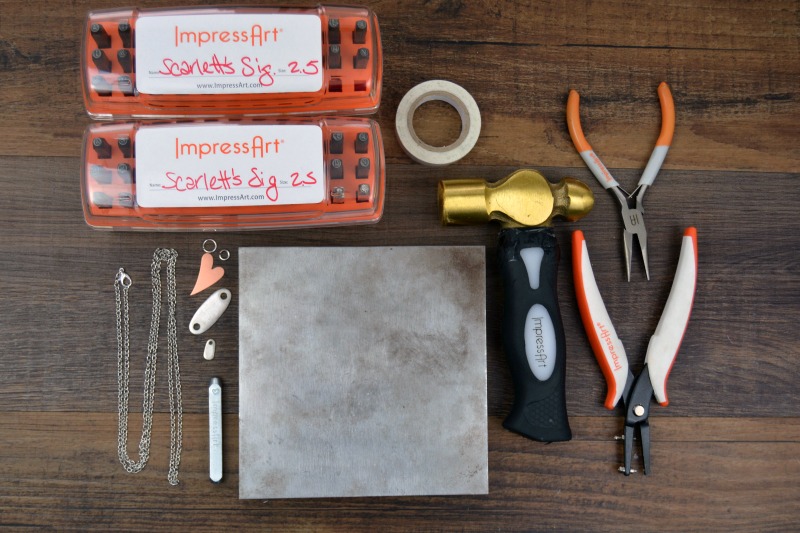
- Steel Bench Block
- 1 lb. Brass Stamping Hammer
- ImpressArt Alpha Stamp Set | Scarlett’s Signature, Uppercase
- 3mm ImpressArt Heart Design Stamp
- 6mm ImpressArt Fire Design Stamp
- ImpressArt SoftStrike 1 – 3/8″ Oval Pewter Blank, 2 holes
- ImpressArt 1 – 1/4″ Copper Swirly Heart Blank
- ImpressArt 1/2″ Oval Pewter Tag
- ImpressArt Stamp Straight Tape
- ImpressArt Stamp Enamel & Paper Towel
- 2 – 9mm jump rings
- 1 – 4mm jump ring
- 1 – 2″ Head Pin
- Small Beads (1 – 2mm and 1 – 4mm Faceted Bead shown here today)
- Hole Punch Pliers
- Chain Nose Pliers
- Round Nose Pliers
- Wire Cutters
- 30″ Necklace Chain
(I realize that list looks long, but it’s really just your basic stamping and jewelry making supplies!)
Now – if you’re wondering why on earth my stamp sets are handwritten and not neatly printed, guess what? ImpressArt is making replacement cases now! So when a) I broke the old plastic case 3 years ago, and b) I’m used to the alphabet being in a certain order, it has been SO NICE to get some of my older stamps into new cases. The ease of use of each stamp having its own hole makes so much difference in keeping those letters right where they belong.

Begin by taping your blank to your steel block. One of the things that I love most about stamp straight tape is that it’s a little bit flexible – so you’ll be able to curve it slightly so that is follows the arc of the heart blank. This way, I know my letters will be aligned well before I even begin.

I spaced my message out by marking each letter’s placement with a pen before beginning. If you’re new to stamping, the tape will help so much, both in planning your piece (measure twice, stamp once! LOL) and also in helping place your letters exactly where you want them. Place the letter evenly on the blank, and gently pull it toward you until you feel the edge of the letter catch on the edge of the tape. Give the top of the stamp a firm tap with your hammer to create each letter!
I also stamped my oval blank with a small heart, where it would show when the two blanks are stacked together, and I stamped a fire design on the tiny 1/2 inch tag. These are areas that you can get more creative, though, changing your message and designs to say whatever is important to you!
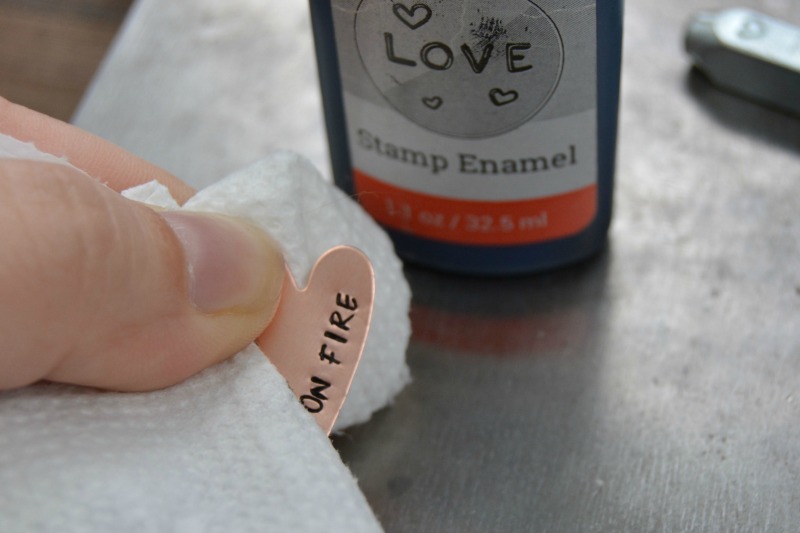
There are a few ways to darken copper, but my favorite because it’s the easiest is to use stamp enamel. Just squirt it directly onto the stamped letters and rub into the impressions with a paper towel or shop cloth. Wait 10 seconds, and wipe the excess away. Once it dries, it’s permanent (so it is important to get any little smudges off right away).

Next, punch a hole in your heart blank on the top left side so that when it hangs, your letters are easier to read.

At this point, I decided that my necklace still needed something. So I created a tiny beaded charm with a 2mm and 4mm bead on a head pin – just stack the beads on. Grip the pin with your round nose pliers and wrap the wire around one side to create a loop. Then, wrap the wire around the pin in neat coils, filling in the gap between the loop you created and the top of the beads. Trim away any extra wire with wire cutters.

Finally, I assembled all my pieces, which required punching an additional hole at the bottom of the heart. I stacked the heart on top of the oval and added a large jump ring through both of the top holes, and connected the small tag at the bottom of the oval with a second large jump ring. I used a small jump ring to attach the beaded charm to the bottom of the heart, as you can see below. Then, I added the pendant onto a 30″ necklace chain.

The end result is a great vertical design that hangs just below the ribcage on most women, but you can of course use nay length chain you find most comfortable for your own style. I am really loving the long necklaces right now
Thanks for joining me for today’s hand stamped necklace project with supplies from my friends at ImpressArt! Have a great weekend and I’ll see you guys again soon ~

nice post
looking good
Okay, Adrianne, this necklace is SSSSOOOOO much more beautiful than the one advertised on TV. I absolutely LOVE this :)
Great visuals. I am a visual learning. It is always a plus to have pictures to go along. Jewelry making is one of my hobbies. You make this look easy. I truly enjoyed the lesson.
This is a sweet design and definitely one that is gift able.
Really cool! I love the hand stamping.
Adorable as always! Making those loops out of the wire takes practice. I’ve had some weird shapes before! LOL
Very cute. I could see our teenage daughter wearing this one. Love how creative you are.
Thank you Adrianne for yet another wonderful project. Unfortunately with all the money spent due to health reasons I am yet to discover and do the wonderful projects however I have printed off and have a majority of the stamped projects on file
Lynne
One Of Designs
Australia