• Skip to primary navigation
  • Skip to main content
  • Skip to primary sidebar

Happy Hour Projects

  • home
  • about adrianne
  • buy the books
    • DIY T-Shirt Crafts (2015)
    • DIY Stamped Metal Jewelry (2016)
    • Rock Painting for Beginners (2019)
  • videos
  • crafts
    • diy beauty projects
    • kids’ crafts
    • paper craft projects
    • polymer clay
    • sewing projects
  • jewelry
    • bracelet projects
    • earring projects
    • necklace projects
    • jewelry tools & supplies
  • metal stamping
    • beginners’ tutorial
    • video tutorial
    • project ideas
    • metal stamping supplies
  • recipes
    • cocktail recipes
    • appetizers
    • main and side dishes
    • sweets and treats
  • by season
    • birthdays
    • new year
    • valentine’s day
    • st. patrick’s day
    • easter and spring
    • mother’s day
    • patriotic
    • fall
    • halloween
    • christmas
    • thanksgiving
  • privacy

Kool-Aid Play Dough

08/20/2012 by Adrianne Surian 13 Comments

Well, I finally got around to testing out a homemade play-dough recipe, and it turned out great!  Maybe you have seen this one floating around Pinterest?  (Do you ever wonder how accurate some Pinterest favorites are?)  I’m happy to say – this recipe is a keeper. :)

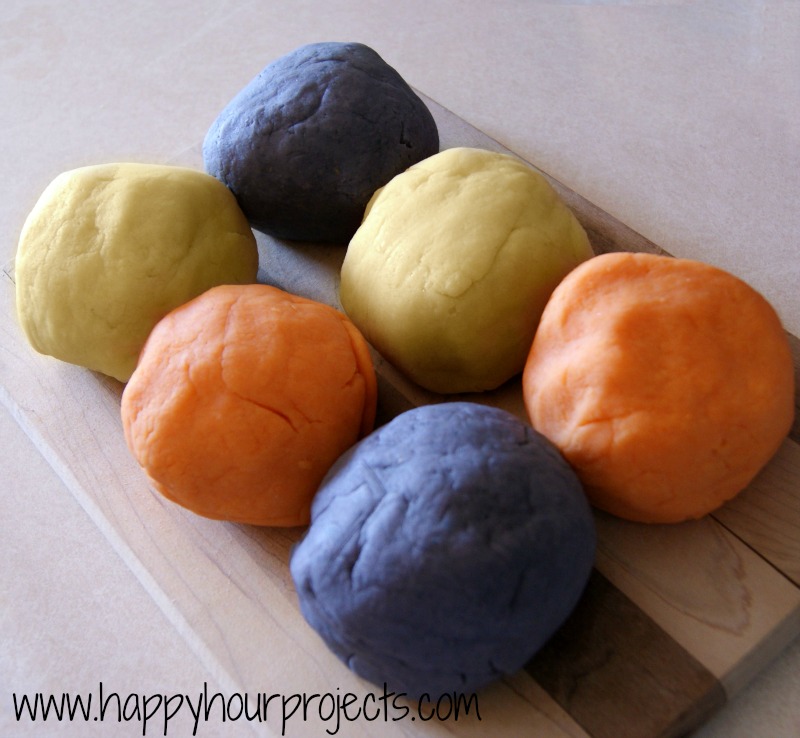
I’m pretty honest when I test out things I’ve seen elsewhere – whether it works or not, whether it’s as easy as people claim, etc.  I actually saw a LOT of variations on this recipe when I looked into it.  The one that popped up most often is the one I finally used.  As well as it worked out, I have to say – people must be using food coloring in their photos, because my dough came out a little dull, especially the yellow/lemonade one.

I opted for three batches: orange, grape, and lemonade.

Recipe:

1 packet Kool-Aid
1 c. flour
1/2 c. salt
2 Tbsp. vegetable oil
1 c. boiling water

I made up 3 batches in 30 minutes.  Because you use boiling water, it needs some time to cool before you can knead it properly with your hands, which is a great time to get to work on your next batch.  If I had made just one color, it probably would have taken me at least 20 minutes anyway.

Put your flour and salt into a medium-sized bowl, and stir in the Kool-Aid packet.  Sift these dry ingredients together really well.  The better it’s mixed when it’s dry, the less you’ll need to knead it to even out the color when it’s hot.  While I was stirring these up, I set 1 c. of water on to boil.  I honestly use my microwave, since it takes less than 2 minutes to boil, but I use this method often.  You do want to be careful if you use the microwave to heat water, because it can become superheated, and can cause your recipes to explode (which can burn you).  I could go into all the science behind this, but I’ll spare you – suffice it to say, if you don’t often use the microwave to boil water, be really careful or stick to the stovetop method.

Once your dry ingredients are really well-mixed, add your 1 c. of boiling water and 2 Tbsp. of oil.  Use a spoon to stir it – it’s WAY too hot to touch right now.

Once I got it about this stirred, I couldn’t make any more headway with a spoon.  I let it cool, worked on my other batches, and came back to knead it once it cooled off.

The texture is just right, and I liked that it didn’t require a trip to the store to buy cream of tartar like a lot of the recipes I saw.  Plus, the Kool-Aid makes it scented (though my husband thinks it still smells like clay, and not fruit).

I was so excited to let Raya try it out!  And wouldn’t you know it, Miss Skeptical wasn’t sure what to make of it.  This is about as experimental as she got:

 Oh well… I read it keeps for quite a while in an airtight container. :) Maybe she’ll be braver on another day.

I link up to these great parties!

Filed Under: Kid Crafts, Tutorials

copyright policy and terms of use

I love it when you love my work! All tutorials and photos published at Happy Hour Projects are copyrighted. If you would like to feature my tutorial on your website or share it on your social media you may use one photo to feature, as long as you provide a link back to the original post.

If you feature a photo, it may not be accompanied by the project tutorial or recipe, whether in my own words as it originally appears or paraphrased by you. This also includes personal sharing on social media and Pinterest. Publishing multiple photos from a project, or including instructions with an accompanying photo are not permitted and you will be asked to remove them.

I love to share my projects, and my tutorials, recipes, and e-books are ALL free for your personal use. However, photos and ideas that are published to this site are my protected intellectual property. You may print them at home, but please do not copy or distribute them. I also allow all designs to be made and sold at fundraisers, craft fairs, etc. If you are selling a piece made from one or more of my free tutorials in your online shop, I require that you use your own, original photography, and include a link back to my website to credit me as the designer.

I hope you enjoy what you read here, and please be fair when you share!
Previous Post: « Standing Up For Friends
Next Post: The Quilt Block Challenge – It’s Voting Time! »

Reader Interactions

Comments

  1. Sarah

    08/25/2012 at 4:57 pm

    I love making kool aid this way – it leaves a much nicer smell on everything!

    Thanks for linking up to our Keep Calm & Link up party – hope to see you again next week!

    Reply
  2. Jessi Wohlwend

    08/24/2012 at 5:01 pm

    Haha, that's awesome! You could make play doh in pretty much any color this way! Thanks for sharing at The Fun In Functional :-)

    Reply
  3. Heidi Fowler

    08/24/2012 at 3:36 pm

    Looks good enough to eat! I love that last picture. Thanks for joining the party at One Creative Weekend! I hope you have a great weekend.

    Reply
  4. Gina

    08/23/2012 at 10:57 pm

    Awesome! Going to have to give this a go.

    Reply
  5. Full Circle Creations

    08/23/2012 at 2:19 am

    So fun! Thanks for sharing at the All Star Block Party!

    Holly

    Reply
  6. Melanie

    08/21/2012 at 1:41 am

    I made this about a month ago and it's still going strong! Making some for preschool next week, too!

    Reply
  7. Kara

    08/20/2012 at 10:08 pm

    This is great … especially since my son eats it!

    Reply
  8. Kirsten

    08/20/2012 at 7:37 pm

    I've made this using a recipe that calls for 1 T of cream of tartar. No idea why, but it does make a very smooth feeling play dough. But what I love doing is adding glitter to the dough. If your little one is past the eating everything stage it makes for pretty sparkly fun! Also- cherry kool-aid makes the most vibrant red, orange makes a good orange color too. But the others stay pretty muted, food coloring can help brighten the colors.

    Reply
  9. Meredith

    08/20/2012 at 4:02 pm

    My mom used to make play dough this exact same way! I forgot about it until now :) Maybe I'll have to try some for Jackson.

    Reply
  10. Kristy

    08/20/2012 at 2:06 pm

    :) Very fun still! I want to make this with my kiddos.

    Reply
  11. Kadie

    08/20/2012 at 1:31 pm

    BaaaaHaaaaaa I love that she wouldn't play with it. Isn't that the way it goes. You spend time making something special for them and they wont even touch it. lol It's a great idea though. I think I'll have to save it for my little ones after the big ones go off to school.;)

    Reply
  12. Ang

    08/20/2012 at 12:51 pm

    what a cute idea! :) my kids would love this. happy monday!

    Reply

Trackbacks

  1. The Ultimate List Of 100+ Summer Activities For Kids! says:
    04/28/2017 at 1:35 pm

    […] 1. Kids Seaside Bingo 2. Tablecloth Coloring 3. 3 Ingredient Safe Puffy Slime 4. Letter Recognition Sensory Bin 5. Coffee Ground Fossils 6. Silly Sensory Ball Painting 7. Farm Sensory Jar 8. Kool-Aid Playdough […]

    Reply

Leave a Reply Cancel reply

Your email address will not be published. Required fields are marked *

Primary Sidebar

Hello, and welcome! I'm Adrianne, an artist, author, designer, and blogger in mid Michigan. I work from home, chase my two kids, and this once-city-girl is learning how to care for chickens and adjusting to life out in the country. I have a compulsion for daily creativity... sometimes it's jewelry-making, paper crafting, metal stamping, mixing and baking, or giving new life to recycled items. But with 2 young kids, time is short! My goal here at Happy Hour Projects is to share projects and tips that you can do in an hour or less. The ideas you find here are designed to add a little creativity in your day, no matter how much (or how little) time you have!

BUY MY BOOKS!

Copyright © 2021 Happy Hour Projects on the Foodie Pro Theme