
I’m soooo into layered necklaces right now. I keep seeing them this summer and it’s causing me to stack on more and more. When my husband and I were headed out the other night, I asked, “is 6 too many?” which sounds excessive, I know, but wearing several delicate necklaces together is like the new statement necklace. And I seriously love it. So today, I’ve put together a few minimalist necklaces to share with you that are meant to be combined with other complementary styles – so get bold, and try making up a few! Once you get the hang of basic wire wrapping to create connectors and pendants, each necklace makes up in 5 minutes or less.
I was inspired to make these particular designs out of my Blueberry Cove Bead Box for May, which Isobel keeps sending me as long as I keep telling you what kind of awesomeness is inside! If you’re not familiar with Blueberry Cove Beads, it’s a $27 monthly service that sends you a supply of coordinated beads and findings, with a theme. For May, it’s stones and crystals, which is of course right up my alley! (I think I read that you have until tomorrow, the 3rd, to get signed up for the June box!) Each month also comes with a bonus challenge to help inspire you. If you design something using the challenge, and share it with Blueberry Cove on Facebook or Twitter, you’re entered to win the next month’s bead box for free! Great motivation to get those creative juices flowing, and to show off what you’re making!
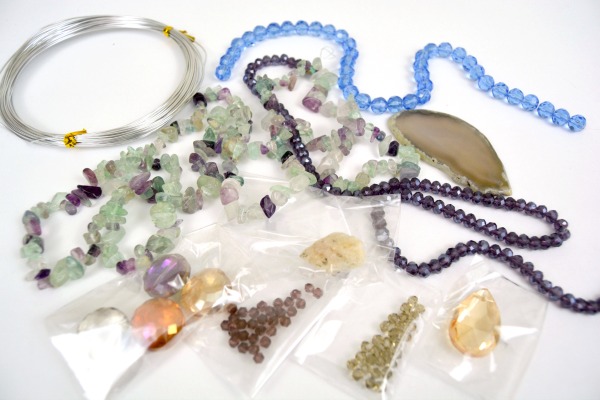
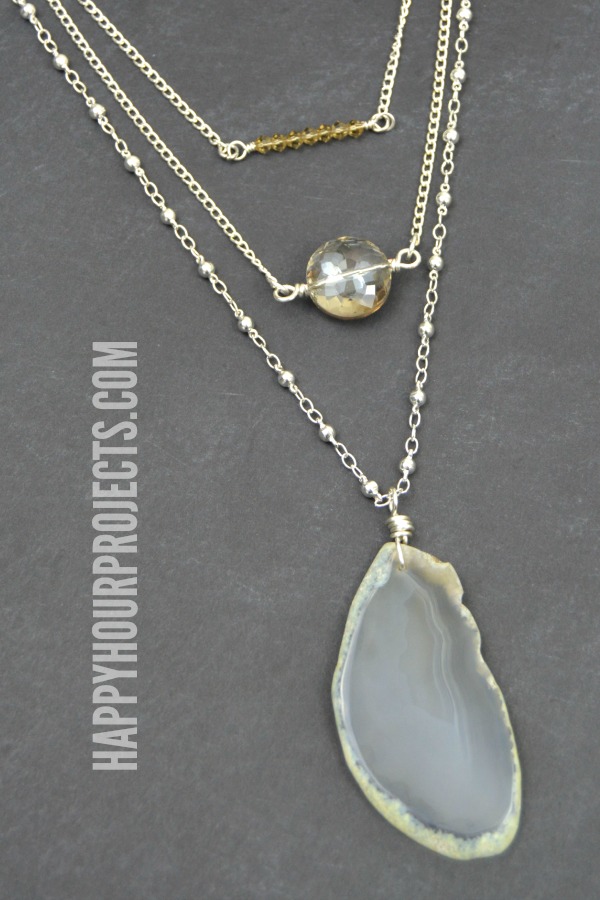
This month’s challenge involved the crystal bicone beads (they’re a small, 4mm size) so I made a beaded connector out of a few of them to make my shortest necklace. You can use any 4mm bead for this, but crystal beads are especially nice. Here’s a quick-list of supplies for making these layering necklaces, with plenty of room to choose elements that are just your style:
- 2mm chain (choose lengths anywhere between 16-36 inches)
- 18-gauge and/or 20-gauge wire (silver plated copper is my preference)
- 4mm crystal beads
- Large focal beads (like this ~1″ crystal bead)
- Large pendant (the sliced stone from the box is about 3 inches tall)
- 7mm jump rings
- Lobster clasps
- Wire cutters
- Round-nosed pliers
- Jewelry pliers

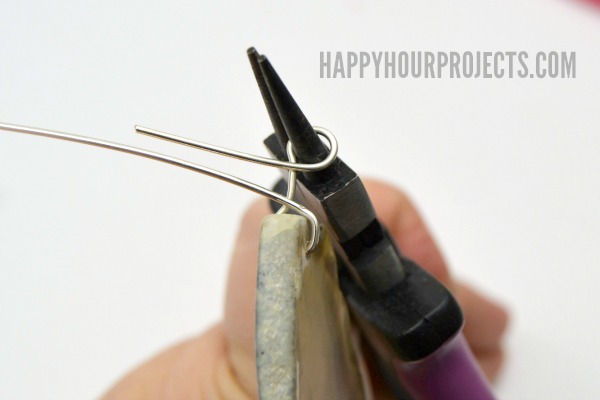
Cut a length of wire (you’ll need something 20-gauge or less for most beads this size) about 4 inches long. On one end, for a wire wrapped loop, which I’ll show you just below:

About one inch from the end of the wire, bend it slightly to one side (I bent mine to the left) then wrap it to the opposite side over the round-nosed pliers (to the right, in my case). Take the short “tail”, and wrap it around the longer end of the wire, forming a closed loop. Cut off any excess.
String your beads onto the wire, the repeat the process on the opposite side, forming a closed loop. I added 7 beads, creating a connector about 1 1/4 inches long – which is about the longest length I’d recommend for short necklaces.
I made a second connector from one large 1″ bead as well, using this same method.
Next, I added 18-gauge wire to the drilled pendant, which gives it a slightly more finished look than if you just add a large jump ring. To do this, feed the wire through the pendant hole, and about 1/2 up, wrap one end of the wire around your round nosed pliers. This will give you two “tails” of wire, and all you need to do is wrap them around the gap between the pendant and the loop. (Tip: start both tails on the same side of the wire – in my case, to the left. That way, you can wrap them both in the same direction, which is much easier.) Nip off any excess, and you’ve got an instant pendant.

For the large pendant, I strung it on 36 inches of chain. Because that’s more than enough length to fit over my head, I just connected the two ends of the chain together with a jump ring, rather than fuss with adding a clasp.
For the connectors, you will need to decide on your lengths. I chose 16″ and 18″. The connectors are approximately 1 inch long already, so I used 14.5 and 16.5 inches of chain (one inch for the connectors, and a half inch to accommodate the end clasps). Cut the chain into two equal parts, and attach each to either side of your connector with a jump ring. At the ends of the chain, add a jump ring to one side, and to the other, connect a lobster clasp to the chain with a jump ring. Jump rings should just be twisted open and closed again with your pliers.

Each necklace makes up so quickly, you can feel free to keep going if you like! But here’s what these lengths look like, layered together. These necklaces are 16 inches, 18 inches, and 36 inches.
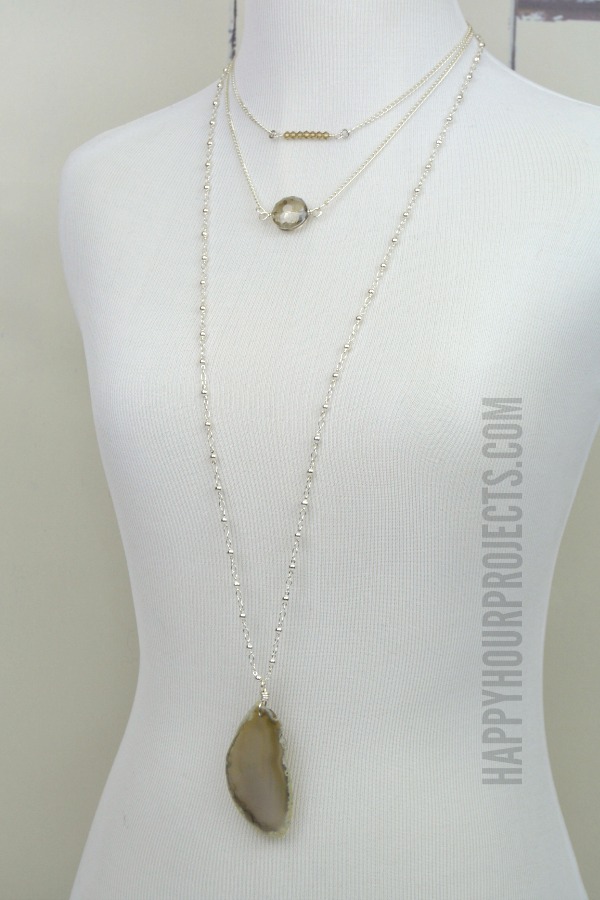
I just love them all together, and I’ll personally be mixing them with some of my stamped metal pieces. The stone is very earthy and organic, I get sparkle from the crystal beads, so some mixed media would round out my style perfectly!

Are you layering this season? What are you wearing? And back to that question I asked my husband… if they’re all delicate styles… is 6 too many? ;)

What I like most about this article is the encouragement to be creative and personalize creating necklaces from beads and stones.
Do you know what type of beads the purple and green ones are that came in that kit, I like those.
Thanks…
Carla
The green ones are fluorite gemstone chip beads. She does post the exact contents of the box on the website around the middle of each month, so if you don’t know what something is, you can look it up! :)
This is perfect timing, I am re-doing a necklace for my friend and it will work perfectly like the 2nd necklace- it is a coin pearl but she wants it on chain and the clasp is broken. Where did you get the chain, I need something “dainty” like this as well as the small clasps. Chain is so hard to order on line because you cannot tell the real size of it. Thanks for the inspiration and your perfect timing!!!
Okay this is my favorite chain for “dainty”: https://www.goodybeads.com/store/products/A008114.htm
When you’re shopping, look for a size of 2mm or less for these small designs!
Great, thanks. Is that the same chain that you used on the 2nd necklace?? Thanks so much!!!
The 2 necklaces with the beads are the 2mm chain. I used this chain for the long one: https://www.goodybeads.com/store/products/CH00339.htm
Sorry about that, My last comment was supposed to say “This is gorgeous! :-)”
This is gorgeous! ?