
Good morning! I think I could use a little luck and positive energy today, so it seems like a fitting day to share this fun lucky penny necklace with you. This piece is hand-stamped, but if you aren’t into stamping, you can still make a non-stamped version of your own! I’m going to give tips for using your doming block (or dapping block – they’re called both) which is an inexpensive tool that adds a finished-looking touch to metal discs, whether you stamp them or not.

I got the idea that you could dome a coin when I was perusing the ImpressArt website. Margot made a cute pair of “my two cents” earrings with pennies and I knew I wanted to make a lucky penny necklace for St. Patrick’s Day (okay, and for every day. I’m not all that superstitious but there is still something empowering about sitting down with a hammer and creating your own luck, after all). ;)
What you will need to make your own lucky penny necklace:
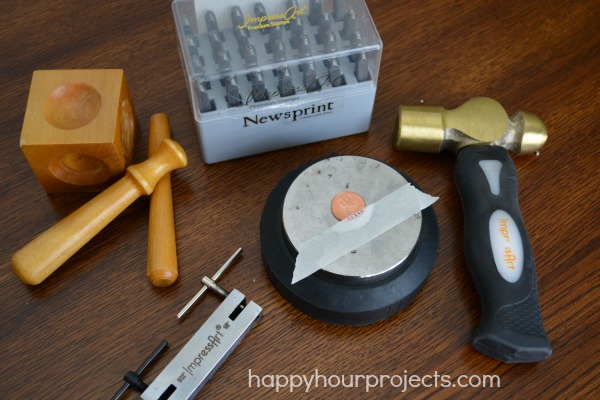
- A penny. An Irish penny would be especially fun! My husband also had me stamp one for him with the year we met. I used a new shiny one for this project.
- 3/4″ Aluminum blank
(silver would also work fine – I just like having a contrasting color to sort of frame up the copper)
- Metal hole punch
- Steel bench block
and Hammer - Dapping block
- Jump ring(s) and an 18″ chain
- Optionally – premium metal stamps
. Make sure they are hardened for metals like steel. If you are planning to stamp your penny like I did, you will also need masking tape, a marker, and a polishing pad
.
If you’re planning to stamp your penny, we’ll do that first. I have several posts with tips on stamping, but if you are truly a beginner, you will want to start with the Beginner’s Jewelry Stamping post. I will share some suggestions today, but if you’re looking to get started there are a lot more tips there on what to buy and how to begin. For the sake of simplicity, I’m going explain today’s project assuming you have your supplies already and you know just enough not to stamp your letters upside-down. ;) Are we up to speed? Excellent. (If not, peruse the beginner post, and you’re always welcome to leave questions in the comments or email me. I’m by no means a pro, but I love talking stamping!)
I always tape my piece to my bench block, and mark off where I’m going to stamp my letters. For one, this helps me with my spacing, but the other thing it helps with is vertical alignment. If you gently drag your stamp over your penny, you’ll be able to feel the edge of the tape. That acts as your base line, and it works for lining up all the letters without descenders. (In this case, “luck”. The “y” will descend below your tape line, but once you have stamped your first 4 letters, you can add a second piece of tape to place your “y”.)

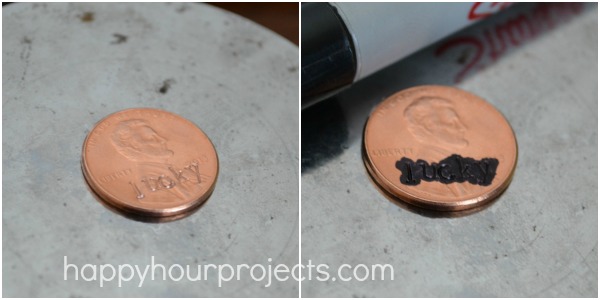
Hammer away. Pennies are tough. You will need a premium stamp set (mine is the ImpressArt set in Newsprint) AND you will have the added challenge that a penny is not flat. You’ll have to stamp on Honest Abe. This might be construed as defacing US currency which is not exactly legal. But I’m a rebel and I’m taking my chances. Anyway – I found it to be much more difficult getting my letters straight when I was working over the grooves, so I had to content myself with adjectives like “unique”, “charming”, and “one-of-a-kind”. It annoys me when I can’t get my letters straight, but they are okay, and I really want to be honest and transparent here, a beginner isn’t not going to have a flawless piece without some practice.
Once I had my impressions stamped, I darkened my letters with a Sharpie.
You can polish the excess marker off with a polishing cloth. If it’s really stubborn, you can use a paper towel with a bit of rubbing alcohol on it too, and get it off that way, though it may discolor your penny slightly.
Moving on, it’s time to pop a hole in your penny so you can string it. This also falls into the “defacing” category. I just figure if it’s okay to smoosh a penny into a souvenir while you are on vacation, this can’t be worse.
You will need a screw-down punch to make a hole. A hand-held one isn’t going to be strong enough for this gauge and metal composition.

Once you’ve popped a hole in your penny, punch one into your framing blank as well (the larger silver disc, if you are using one). You may also want to file the edge with a small fine if it’s rough.
Next, it’s more hammering. This project is a great way to get some stress relief. ;) It’s time to dome your discs/pennies. The aluminum will be easy, and in fact, you may want to start with it. You will place it in the block cavity (whichever one you like, but I’d choose a shallower one for the larger disc), use one of the punches (I start with the larger one, and move to the smaller one if necessary to finish up.)

Just set your blank or coin, and hammer on the end of the punch to depress it into the hollow. You will want to move all around the disc to get all the edges smoothly domed. If your blank slips around in there as you work, that’s fine, just move it back into place, and keep doming. Take it out and look at it, and see if you spot any flat spots. If so, just work it a little bit more until you’ve got a nice smooth finish.

When you’re happy with the doming, just stack the discs together and add a jump ring (I actually used two jump rings for extra security). Then, all that’s left to do is to string it onto your chain, and wear it!
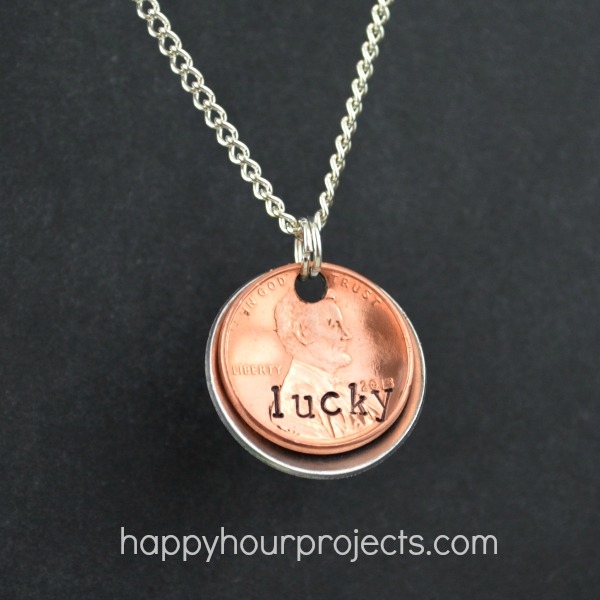
It’s a fun conversation piece, especially when you can say, “thanks, I made it!” I hope this project brings us both a little luck. ;)

Thank you for being you, and for everything you do.
I would like to make these for my students. I teach a unit about the Great Depression when a penny went a long way. Do you have a ball park on how much the supplies cost and where might be the best place to purchase them?
Thanks,
Deborah Pruden
Hi Deborah! I started to reply with some links, but I thought you probably aren’t the only one wondering. So I added links to products you can buy on Amazon up above in the supply list.
Supplies are going to run about $100 to get started stamping – but it’s a one-time investment. You could simplify by not doming the penny, or not adding the silver disc behind it. I don’t have a good source for inexpensive bulk chains to make necklaces, but depending on your students’ ages, making them up as keychains might save money and be more useful? Enjoy!
hi! So glad I saved this post from my email! Awesome project!
Very cool! I have used pennies to make jewelry, too. I was told (and found it to be true) that older pennies, I think pre-1984, are much easier to stamp and make holes in. Thanks for inspiring me to get my metal stamping supplies out to play!
Beautiful! Do you do anything to prevent the penny from tarnishing?
Lorna, a polishing cloth will go a long way if it begins to tarnish. If it can remove permanent marker, a little tarnish should be easily polished off every so often.
Loved the tutorial…great for introducing metal work to teens, Tweens, and elementary children. Thank you!
I love this, Adrianne! You’re a stamping goddess… (and I love that your hubby has a lucky penny with the year you met on it – how romantic)!
Those doming blocks look rad. I need to put together an “equipment I need to collect” list. :)
Another project on the “to do” list. It’s getting quite long! Thanks for sharing, Adrianne!
I absolutely LOVE this project! You are an amazing jewelry designer! :D
LOVE this…now I need a doming block and hammer…Margot!!!
This is adorable! Great tutorial! Cheers, Margot