• Skip to primary navigation
  • Skip to main content
  • Skip to primary sidebar

  • home
  • about adrianne
  • buy the books
    • DIY T-Shirt Crafts (2015)
    • DIY Stamped Metal Jewelry (2016)
    • Rock Painting for Beginners (2019)
  • videos
  • crafts
    • diy beauty projects
    • kids’ crafts
    • paper craft projects
    • polymer clay
    • sewing projects
  • jewelry
    • bracelet projects
    • earring projects
    • necklace projects
    • jewelry tools & supplies
  • metal stamping
    • beginners’ tutorial
    • video tutorial
    • project ideas
    • metal stamping supplies
  • recipes
    • cocktail recipes
    • appetizers
    • main and side dishes
    • sweets and treats
  • by season
    • birthdays
    • new year
    • valentine’s day
    • st. patrick’s day
    • easter and spring
    • mother’s day
    • patriotic
    • fall
    • halloween
    • christmas
    • thanksgiving
  • privacy

Happy Hour Projects logo

05/22/2013

Memory Wire Tube Bead Bracelet

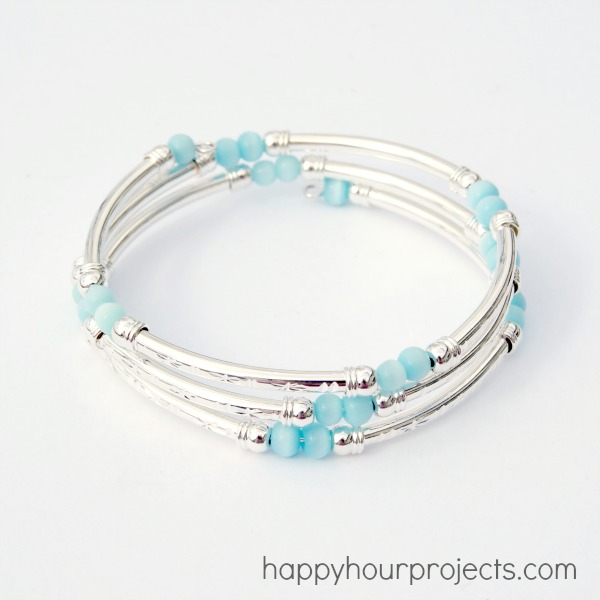
Today’s project is one I shared at Crafts Unleashed last month – it’s a fun and easy bangle that is great for jewelry beginners because it uses memory wire – that means there are no clasps or findings to worry about.  All you need to think about is what kinds of fabulous beads you want to use. ;)

Memory Wire Tube Bead Bracelet

I am loving turquoise this season, so I used a mix of turquoise beads and tube beads to create this look.  I’ll show you how I made mine, but keep in mind that memory wire bracelets are very versatile – giving you the chance to create any look you love!

What you will need:

Memory Wire Tube Bead Bracelet

  • Memory Wire
  • Tube beads – 3 packs of 4 will make this look.
  • Accent beads you love (I used a few inches of 4mm round Turquoise Shell Twister Beads™)
  • Round-nose jewelry pliers
  • Optional but helpful – Memory Wire Shears

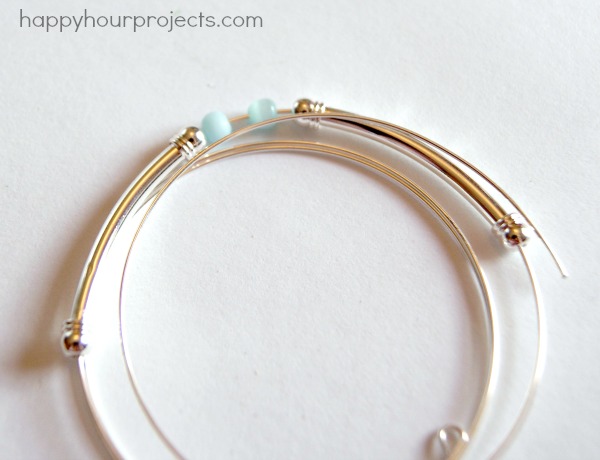
First, using your round-nosed pliers, make a small loop at the end of your memory wire coil.  This will hold your beads on as you work.  If you are working of a large spool, you can cut about 4 coils off to make this bracelet.   The memory wire I linked to above is pre-cut into coils of 4.

Memory Wire Tube Bead Bracelet

Begin threading your beads onto the coil.  There is no right or wrong way to do it, but I added two shell beads between each tube bead. You may certainly use just one, or several!

If you find that the tube beads aren’t exactly the same curve as your memory wire, you may need to bend (or un-bend, as the case may be) your wire slightly to match the curve.  You will only need to to this for a short length at the very beginning of your coil; once the beads are on, they will slide along just fine.

Memory Wire Tube Bead Bracelet

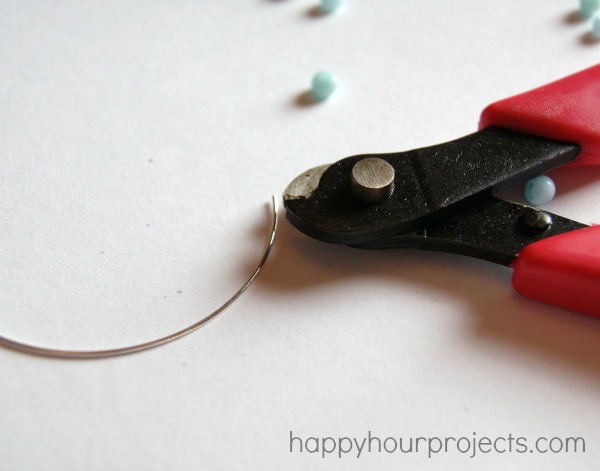
Once all your beads are threaded on, take your round-nosed pliers and make a curve in the end of your memory wire.  This just ensures that your beads don’t fall off when you use the shears to nip off the excess wire.

Memory Wire Tube Bead Bracelet

Memory wire shears aren’t essential, but memory wire holds its shape because it is hardened beyond average jewelry wire.  This make it easy to wear, but it’s not easy to cut with normal wire cutters.  It can be done, but once I tried the memory wire shears, I’m so glad I got them.  Memory wire is a lot of fun for bracelet-making, so if you’re anything like me, you’ll probably find them a worthwhile investment!

Memory Wire Tube Bead Bracelet

Finish making a loop in the end of your newly-cut wire, and that’s it!  It’s ready to wear, or to give as a gift!

Memory Wire Tube Bead Bracelet

Adrianne

Filed Under: Bracelets, Fashion, Jewelry, Tutorials Tagged With: beads, bracelet, memory wire

copyright policy and terms of use

I love it when you love my work! All tutorials and photos published at Happy Hour Projects are copyrighted. If you would like to feature my tutorial on your website or share it on your social media you may use one photo to feature, as long as you provide a link back to the original post.

If you feature a photo, it may not be accompanied by the project tutorial or recipe, whether in my own words as it originally appears or paraphrased by you. This also includes personal sharing on social media and Pinterest. Publishing multiple photos from a project, or including instructions with an accompanying photo are not permitted and you will be asked to remove them.

I love to share my projects, and my tutorials, recipes, and e-books are ALL free for your personal use. However, photos and ideas that are published to this site are my protected intellectual property. You may print them at home, but please do not copy or distribute them. I also allow all designs to be made and sold at fundraisers, craft fairs, etc. If you are selling a piece made from one or more of my free tutorials in your online shop, I require that you use your own, original photography, and include a link back to my website to credit me as the designer.

I hope you enjoy what you read here, and please be fair when you share!

Reader Interactions

Comments

  1. Robin Wisniewski says

    01/20/2020 at 6:03 pm

    Love it thank you so much!

    Reply
  2. Louise says

    02/28/2015 at 7:43 am

    I have not used memory wire so I am a little confused. Do you run the memory wire through the tubes? This bracelet looks simple enough as a starting point. I have been making jewelry for several years but never tried using memory wire.

    Thanks,
    Louise

    Reply
    • Adrianne says

      03/01/2015 at 10:16 am

      You sure do! It’s about as easy as it gets! :)

      Reply
  3. Maribegth says

    07/26/2014 at 12:31 pm

    Where do you find the memory wire? I heard they have 2 sizes but I can’t find it??? Can’t wait to try this bracelet……thanks for sharing your talents : )

    Reply
    • Adrianne says

      07/27/2014 at 9:11 am

      There’s a whole category of it at one of my favorite jewelry supply stores, Goody Beads: http://store.goodybeads.com/store/beads-and-supplies/Beads-Supplies-Wire-Memory.html. I used small bracelet wire, but you could find whatever size suits you best!

      Reply
  4. Susan says

    10/20/2013 at 3:07 pm

    What size are the tube beads? Thanks.

    Reply
  5. Rhondda Mol says

    05/24/2013 at 6:15 pm

    Love it! You have so many fabulous jewellery ideas :) Thank you for sharing them.
    Rhondda

    Reply
  6. Sonya Neal says

    05/24/2013 at 12:39 pm

    Once again Adrianne, you have made me smile! :) I love all that you do and you continue to inspire me each and everyday! So beautiful!! :)

    Reply
  7. Crystal says

    05/22/2013 at 11:01 pm

    Stunning!! So pretty!! I’m going to make this!! Love it!!

    Reply
  8. Shannon says

    05/22/2013 at 10:46 pm

    Love it! I am making mine with serpentine beads and copper tube beads.

    Reply
  9. Bethany says

    05/22/2013 at 8:18 pm

    This is so pretty! The silver just sparkles and goes so well with the blue beads.

    Reply
  10. Alli says

    05/22/2013 at 10:15 am

    Beautiful! I’ve never considered myself crafty enough to make something that exquisite! You make it look fun and easy! I may have to give it a try!

    Reply
  11. amy says

    05/22/2013 at 9:34 am

    GORGEOUS! Pinned it…I think I’ve pinned almost every piece of jewelry you’ve ever made, lol. Where’d you get the tube beads? I love memory wire.

    Reply
    • Adrianne says

      05/22/2013 at 9:42 am

      Thanks, Amy! I actually made it easy this time and linked to each product I used from Consumer Crafts up above! :)

      Reply
      • Babs says

        01/14/2016 at 6:26 pm

        Hi Adrianne, I just stumbled on this bracelet of yours and want to make for my sister. The links do not exist and you don’t say the size (ie: 38mm by 2mm) regarding the size of the tubes. Can you tell me that?

        Thank you!

        Reply

Trackbacks

  1. 26 DIY Wire Bracelet Ideas To Pizzaz Ladies Wrist - DIYS says:
    01/31/2022 at 3:08 am

    […] happyhourprojects […]

    Reply
  2. Happy Hour Projects - F | Pearltrees says:
    06/13/2017 at 2:28 am

    […] Silk + Pearl DIY Memory Wire Bracelet – Happy Hour Projects. Beaded Hemp Bracelet – Happy Hour Projects. Sea Glass + Pearl Charm Necklace – Happy Hour Projects. DIY Leather Bracelet + Bling Beads – Happy Hour Projects. Mad Love Hand Stamped Necklace + Starter Set Giveaway – Happy Hour Projects. Stacked Stone + Pewter Pendant – Happy Hour Projects. DIY Leather Bracelet – Happy Hour Projects. DIY Leather Bracelet – Happy Hour Projects. Crystal + Tube Bead DIY Memory Wire Bracelet – Happy Hour Projects. Memory Wire Tube Bead Bracelet – Happy Hour Projects. […]

    Reply
  3. Happy Hour Projects | Pearltrees says:
    05/17/2017 at 3:40 pm

    […] Clay Necklace – Happy Hour Projects. Memory Wire Tube Bead Bracelet – Happy Hour Projects. Grapevine Earrings – Happy Hour Projects. 45 Patriotic Project Ideas – Happy Hour […]

    Reply
  4. 14 Creative Crafts to Try This Summer says:
    06/14/2013 at 8:33 am

    […] 3.  Memory Wire Tube Bead Bracelet by Happy Hour Projects […]

    Reply

Leave a Reply Cancel reply

Your email address will not be published. Required fields are marked *

Primary Sidebar

Hello, and welcome! I'm Adrianne, an artist, author, designer, and blogger in mid Michigan. I work from home, chase my two kids, and this once-city-girl is learning how to care for chickens and adjusting to life out in the country. I have a compulsion for daily creativity... sometimes it's jewelry-making, paper crafting, metal stamping, mixing and baking, or giving new life to recycled items. But with 2 young kids, time is short! My goal here at Happy Hour Projects is to share projects and tips that you can do in an hour or less. The ideas you find here are designed to add a little creativity in your day, no matter how much (or how little) time you have!

BUY MY BOOKS!

Copyright © 2023 Happy Hour Projects on the Brunch Pro Theme