
Hey friends! So, it’s winter here. Michigan winter, in fact. And as a work-from home mom, I’m sure you won’t be surprised to hear that the messy bun is pretty much my go-to hairstyle most days. Sigh. But that’s ok! Because trending now is the messy bun hat! If you don’t knit or crochet: NOT TO WORRY. I’m sharing a pattern and free beginners tutorial today for a DIY messy bun hat using the loom knitter.

If you’ve used the loom knitter, then most likely to are familiar with the basic knitting stitches – and if you are then you will find this to be a very simple and easy pattern. It took me about 2 hours to make, and I use my loom knitter just a couple times a year.
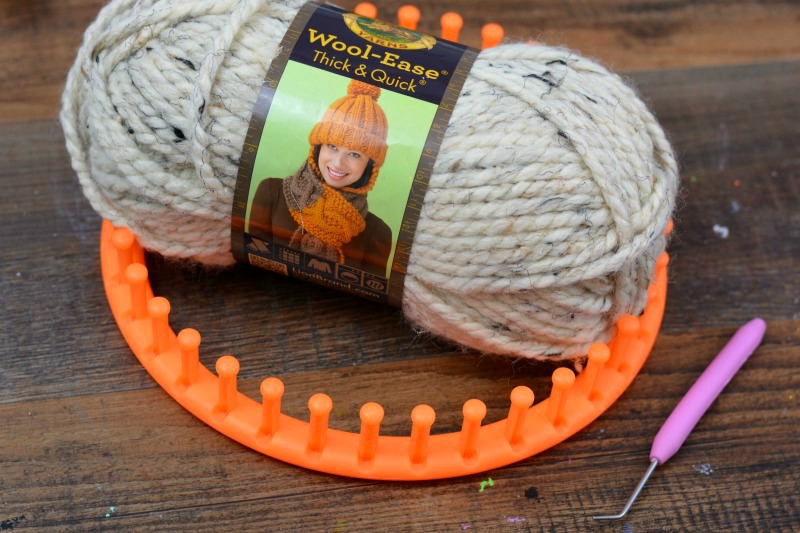
I tested out two weights of yarn for this project, and I’ll give you my thoughts on both. I found that it takes 55-60 yards of yarn (depending on how tightly you make your stitches). Here are a few affiliate links to find the supplies used if you need to do a little shopping!
Loom Knitter (Large / 36 Pegs) with hook and finishing needle
Yarn: Lion Brand Wool-Ease Thick & Quick Yarn (Oatmeal pictured) – This is a super bulky yarn, and this particular brand and color will make two hats from one skein.
Yarn: Lion Brand Unique Yarn (Jewel color pictured) – this is a category 5 weight, and to get enough bulk I found that I wanted two strands. You can get two skeins and work from both simultaneously or if you’re used to working with yarn and know how to keep it from getting tangled, you can actually work from both ends of the same skein. This is what I did, and I used the entire 109-yard skein.
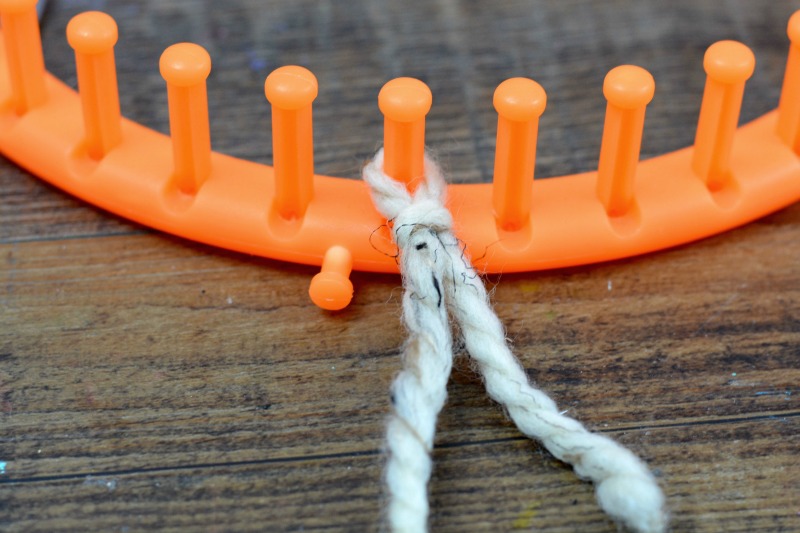
To begin: Make a slipknot at the end of your yarn. Loop it around your first peg, the one next to the starter peg identifier (on some looms it may be a different color, or most commonly, there’s a small peg on the front.
I knit from left to right, basically counterclockwise. If it’s more comfortable for you to go in the other direction, feel free! That feels awkward to me so all instructions will be presented left to right.

Now, cast on your first row by wrapping the yarn around each peg. The loops should face outward, and the yarn between pegs should be toward the inside. Go all the way around the loom.

Knitting uses 2 rows at a time, so to get started you will have to wrap a second row around the loom.

To begin knitting, use the hook to pull the lower stitch up and over the upper stitch, leaving one loop on each peg. Then, wrap a new row of yarn around the loom like you did to begin, and knit a second row.
Once you’ve reached 4 rows, I’m introducing a purl stitch that will add a textural stripe to your hat. (If you find that the purl stitch is too difficult for you as a beginner, it’s not essential to the construction of the hat. You’ll just end up with a smooth hat instead of enjoying those little ridges.

For the purl stitch, you’ll be pulling the upper stitch through the lower stitch. First, pass the working yarn below the stitch on the peg (left), then reach downward through the upper stitch with the hook to grab the yarn. Pull it upward, creating a new stitch (center). Pull the stitch off the peg, taking care not to lose the new stitch you created, and then replace the new stitch onto the peg (right).
If you would like to see the knit and purl stitches in action, I use them both in this YouTube Video tutorial for a lush infinity scarf. (And oh hey, just a thought, that would also make for a fabulous accessory!)
- Row 1-4: Knit
- Row 5: Purl
- Row 6: Knit
- Row 7: Purl
- Row 8-9: Knit
- Row 10: Purl
- Row 11: Knit
- Row 12: Purl
- Row 13-14: Knit
- Row 15: Purl
- Row 16-17: Knit
- Row 18: Purl
- Row 19-30: Knit
Note: Depending on the size of your head (or whether you run low on yarn!) You may want to finish the hat with between 28-32 rows. You’ll find what works best for you! My 6 yo daughter’s messy bun hat required 26 rows for her child-sized head.

Now, once you’ve knitted enough rows, measure 12-24 inches of yarn from the end of your knitting, and cut the yarn. (24 inches of yarn will be easier to work with, but you’ll be removing most of it when you’re finished so it will be wasted. You can decide based on whether you have a lot of yarn left or you’re running low.)
Thread a large-eye blunt needle onto the end of the yarn, and pass it through each loop on the loom, removing the loops as you go.
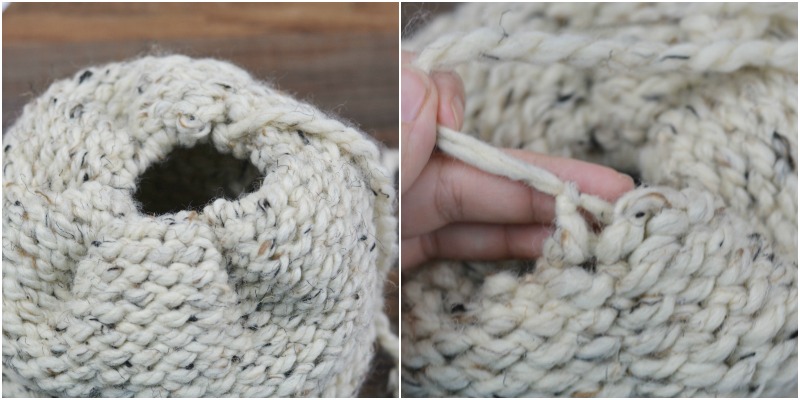
Now, for an average hat, you would cinch this yarn up tightly, closing the top of the hat. But to allow room for a ponytail or messy bun, close up the hole until it’s approximately 2 inches in diameter. Tie off the yarn to the starting point of where you began to cinch. To blend the end in, weave it down into the stitches below for 2-3 inches before trimming it off. Then, go back to the first row you started with the slipknot, thread the needle onto the loose yarn, and weave that into the stitches above it.
***UPDATE: I DON’T KNOW WHY I DIDN’T THINK OF THIS BEFORE. So when you go to cinch up the top of the hat, tie the finishing yarn off *before* you pass it through each of the loops and remove each loop from the pegs. Continue the steps, closing up the top of the hat just as above. Then, cut a 6-8 inch length of braided elastic cord (I used 1/4 inch braided elastic like this), and pass that through each loop at the top. Leave the yarn in place to hold the stitches up, while you work, until you have elastic cord threaded all the way through the top. Tie the two ends of the elastic together as securely as possible to close up the top of the hat (I used an overhand knot). Trim away the excess yarn, and leave short tails on the elastic.
This will allow the hole in the hat to stretch when you pass your hair through it, just like a hair tie. I cinched up the hole a little smaller, to about 1 inch in diameter. I am SO HAPPY with this result. Feel free to give it a try!***

Of the two hats, the acrylic jewel tone yarn did use twice as much length, but it’s softer and more stretchy. The wool-blend oatmeal color is rugged and organic and uses less yarn. Depending on the look you’re going for, choose the yarn that’s best for you! Just remember – 55-60 yards of super bulky yarn, or 110-120 yards of bulky yarn.
I hope you enjoyed this project! I had a lot of fun making it, and you can work on it during the game, your kids cartoons, or in the car! Show off those new loom knitting skills with your own DIY messy bun hat!

I absolutely love this DIY Messy Bun Hat pattern! It’s super cute and perfect for keeping warm while still letting my hair breathe. The step-by-step instructions are clear, making it easy for a beginner like me to follow. Can’t wait to try this out during the chilly months! Thank you for sharing!
This messy bun hat looks adorable and easy to make! I love the idea of using a loom for this project – it’s such a fun way to get creative with my knitting. I can’t wait to try this pattern out for myself! Thanks for sharing!
I absolutely love this DIY Messy Bun Hat pattern! ? It looks like a fun and simple project for beginners like me. I can’t wait to try it out and make a few for myself and friends. Thanks for sharing such a clear and easy-to-follow guide!
I absolutely love this DIY Messy Bun Hat pattern! It looks so cozy and perfect for winter. I’m excited to try this out using my loom knitter. Thanks for sharing such a beginner-friendly project!
I absolutely love this DIY Messy Bun Hat pattern! It’s perfect for beginners and I can’t wait to try it out. The step-by-step instructions look easy to follow, and I appreciate the helpful tips you included. Thanks for sharing such a fun project!
I absolutely love this DIY Messy Bun Hat pattern! It’s so perfect for beginners, and I can’t wait to try it out with some fun yarn I have on hand. The instructions are clear and easy to follow. Thanks for sharing such a creative project!
I absolutely love this DIY messy bun hat pattern! It’s perfect for beginners and the instructions are super easy to follow. I can’t wait to try making it for myself and maybe even as gifts for friends. Thanks for sharing such a fun project!
I love this DIY Messy Bun Hat pattern! The instructions are super easy to follow, and I appreciate that it’s beginner-friendly. Can’t wait to try it out for the cooler months. Thanks for sharing!
I absolutely love this DIY Messy Bun Hat pattern! It’s perfect for beginners, and I can’t wait to try it out with some fun yarn. The step-by-step instructions are super clear, which makes it less intimidating for someone new to loom knitting. Thanks for sharing such a cute idea for keeping cozy while still rocking a bun!
I absolutely love this DIY Messy Bun Hat pattern! The loom knitting instructions are so clear and easy to follow, making it perfect for beginners like me. I can’t wait to try it out and add some fun colors for the winter. Thanks for sharing!
I absolutely love this DIY Messy Bun Hat pattern! It’s perfect for beginners, and I appreciate how easy the instructions are to follow. Can’t wait to give this a try for some cute and cozy winter looks! Thank you for sharing!
I absolutely love this DIY Messy Bun Hat pattern! It’s perfect for beginners like me, and the step-by-step instructions are so clear and easy to follow. Can’t wait to give it a try and rock a cute messy bun this fall! Thank you for sharing such a fun project!
Just made two of these today. One in veragated yarn, and one in a solid. The details work on both. Thank you for this pattern. Will be using this again.
Do you have a picture of the hole with the elastic in it?
I have never used a loom before and I am a little intimidated. I want to make a hat for my sister for her birthday. I have a 31 prong. Is that ok or should I buy a new one? Super excited to start soon!
Could you put on a pattern how to take yarn off a round loom to make a ponytail hat with hair bands?
I haven’t made this hat yet, but it is along the same lines as what the locals around Kingston, On call the Pony Tail Toque. I make those quite often in the purple round loom.
I’ve been abloom knitter about 12 years and have made over 7000 hats that I donate to various kids charities, veterans charities and r non-profits that will use them for fundraisers. Your tutorial has given me the knowledge to do the pony tail hat and I am so excited!!!! I can’t wait to share with my loom knitting friends at Helping Hands Ladies of Cypress in Cypress Texas.
Thank you so much!!!!
Adrianne,
Thank You for Sharing, I can hardly wait to try this project… Thanks and have a Great Safe Day… Patty*
Love your hat! Making for Christmas for all the long haired bun wearers in the family. Your use of elastic is brilliant!! I’m actually going to use your idea in the ear warmers that I make. One side is stretchy and the finished side is always tight because of having to finish off. The stretchy elastic will make both sides of the headband stretchy so it won’t matter which way the wearer puts it on :)!!
This is a beautiful hat with great texture using both knit and purl rows. Since I have partial skeins of coordinating yarns; I am going to make stripes. Thanks for the easy-to-follow pattern.
i like it
wow looking good
I love this hat pattern, on my third one. Question: you mentioned using both ends of the same skein for a bulkier hat. I’m trying, but just end up with a tangled mess! Can you explain how to do this? It’s a great idea, but I seriously need some help!
Thank you,
Vickie
What I do is make 2 balls from one skein of wool and then use them both at the same time. I find this easier. I also keep my balls of wool in Ziplock type bags so they don’t roll around the floor.
Very easy to follow, simple hat patter. I even found out that if I found a missed stitch, it’s very easy to take out, repair, and keep going, not at all like knitting with needles. Thank you for showing us how to purl on the loom, I was pretty impressed with myself! Lol. It’s an adorable hat for the friend who asked for one. I’m just wondering tho, with the hole right in the middle, does she have to wear her ponytail on top of her head, she wears a high one, but not in the middle at the top of her head? Not sure I said that right, hope you know what I’m asking ?
Thanks again for a wonderful pattern,
I make Messy Bun Beanies on the looms. I use the drawstring method as a closure to the beanie. So if a person like my daughter doesn’t have thick hair, and her ponytail is thin, then she doesn’t have this huge hole sitting on her head. And she can pull her ponytail or messy bun through the top and close it in with the drawstring (yarn). And I also if she wants to wear her hair down with the beanie she can close it up a and tuck the drawstring inside the beanie for a regular looking beanie.
I’d love to learn how to do the drawstring method. Great idea for a versatile hat!
I’ve enjoyed making this pattern but thought I’d comment on how I do the elastic band. I buy the regular 2” ponytail holders & knit it into my last row. Hook the elastic band over your first peg & knit the yarn over top, then using your large-eye blunt needle, pass the needle through the elastic band & go onto the next peg until all pegs are finished. Finish off as normal.
Pamela this is so smart! Love it! That solves the pesky detail of a knot in your elastic too. Love it, so glad you shared.
I am also new to this. Could you give more detail on using the two inch pony tail holder and how you knit it into the last row? How do you stretch it to go around the entire last row?
Thanks,
Bob
Please do a video of the elastic in finishing off!
Can you do a video of this? Sounds great!
Video of 2 inch pony tail holder I meant
I thought of the 2” elastic hair tie idea as well. Until that is when I went to put it on my head and the seam of the elastic hair tie came unglued!! So I saved the project by using the braided elastic through each of the last loops before it all came unravelled.
I was just wondering how to do that instead of incorporated a length of elastic… Thank so much for including that tip!
I made this hat and followed the instructions. This hat came out child size which was disappointing because I loved the yarn.
Use a larger hoop if it doesn’t fit on your head, if it fits but short, add more rows .
I made one & thank you for sharing the pattern my daughter loves it & people have said they want one too. I was so proud because its easier then it looks:) Hoping to make some more like this one for gifts
Just started loom knitting. Made a couple of things…2 hats and an ear warmer…nothing I would give as a gift. Trying to learn how to finish off things better. How do you bind off an ear warmer and get it right for a head? I’ll keep following you!
Beth
This is very cute and I can’t wait to try it! I need to print it out and was wondering if there is a printer-friendly way to do so. Thank you so much for all the great ideas!
What a great tutorial!! I am a new loom knitter and found your directions very easy to follow! Does the pattern you provided create the pattern shown in the jewel tone sample. I LOVE it!
Thank you!
I HAVE JUST FINISHED THIS HAT AND HAVE ENJOYED MAKING IT. I AM A LEARNER OF LOOMING. I MADE THE HAT FOR A FRIEND AS AN EASTER PRESENT.
Hello, I have a ton of different colors of embroidery floss someone left at my home. Want to try this project and though I’m sure more time consuming, was wondering if you think it would even be possible to make a bun hat out of the embroidery floss? Using the same pattern you have used here?
Embroidery floss is wonderful used on the finer pegged looms like the little metal pegged sock looms and while it won’t ever have the stretch that most yarns do, due to the fiber content, the looming will give it a nice bit of give. It make marvelous iPhone covers or little “ditty bags” to hold money, make up, or small items together in a large purse. If you use it on the larger Knifty Knitter sized looms be sure to play with the number of strands to fill in the volume as it can work, may just take considerably more. It also makes marvelous wash cloths with any scarf pattern if you just stop at the square shape. Feel delightful and wash well!
Thanks for the information it has helped a lot since I am a self taught knitter myself I have made 10 of the messy buns so far if I want a regular beanie hat I close the top completely it’s a nice hat
the jewel toned hat looks like a different pattern. do you have the regular knitting pattern for that? also, do you have instructions for the other hat, without loom instructions? sorry, but I got a little lost! thank you
Omg this is so cute! And what a great idea with using the elastic! I am goingg to try making this. I am a beginner so I really really appreciate your instructions since you completely understand us beginners need beginners instructions lol!
I love all your happy hour projects. i always want to make your jewelry projects!
Oh and btw you are blessed with beautiful eyes :)
Hi Adrianne,
I like the hat, but I am wondering if this will fit a man’s head? My son has long hair and I am looking to make him one of these types of hats, but all I have found are smallish women’s hats.
Thanks
A MAN BUN HAT. I love it!
There is an XL size loom in a typical set of knitters. I am using a size L, and it will only create a snug-fit hat for an adult. I also use the same size loom for my kids – loom-knit hats typically stretch well, so moving up a size just means his won’t stretch much, but that’s nice because the weave will look thicker. If you move up to the next size loom, you can follow the same pattern – though it will use more yarn. I would also add about 4-6 more rows of knitting before finishing it off.
That’s strictly an estimate – because when you knit, your yarn choice and the tightness of your stitches will affect the final size of your hat. (In traditional knit and crochet, there are guidelines as to exactly which size hook or needles to use for every type and blend of yarn, and for each pattern. Because the looms are all one size, there’s some variation in the finished hat – which is why I recommended the yarns above,) But I have made a lot of hats lately and that’s what I would do! I just don’t have anyone with a man bun to test it out, so you’ll have to let us all know how it works out for you!
:) thanks
will give it a go and send it up to my son to be the tester