
Hey friends! I’ve got some fun mixed media decor to share, because naturally I can’t handle things being PLAIN in my creative space! This bright paintbrush and tool holder adds not only a pop of color, but keeps what I need close at hand – all the way around, it’s an expression of me.

So, I have moved. Yes, again. The past TWO moves, I didn’t even unpack all my crafty goodness, so I am THRILLED to share that I have a great space to get to work and share more around here. And, of course, in any new space, there’s some organization necessary to fit where I’m working. In my former studio, I had things close at hand very close to where I had them stored. In the new space, I keep more supplies at my table so I don’t go back and forth to shelves and drawers. I needed a solution to my paint and mixed media tools, so I picked up an inexpensive pencil holder and dressed it up it with my unique style.
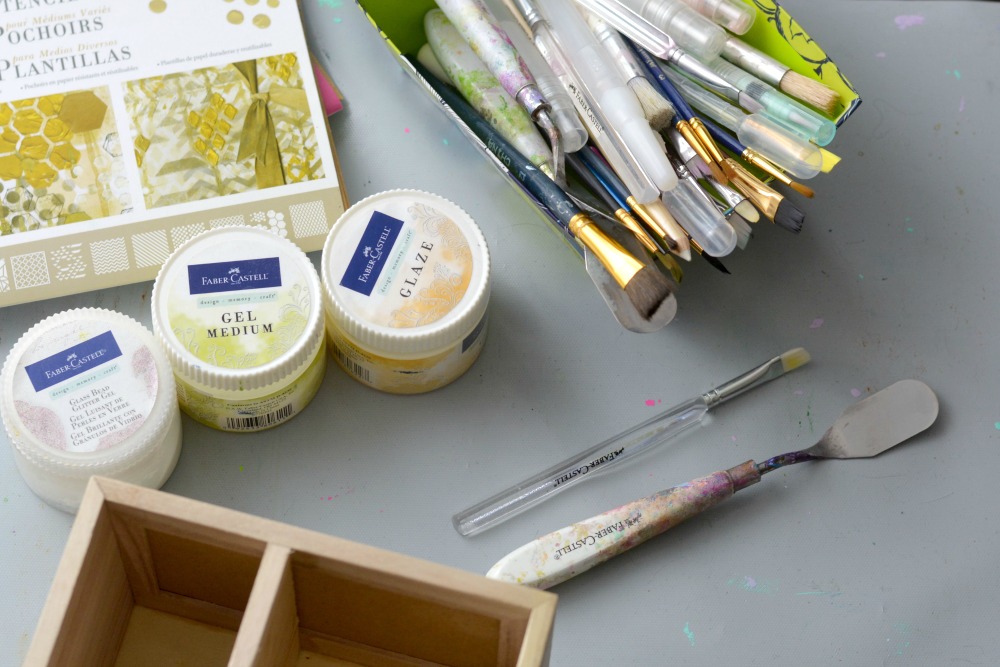
For this project, I pulled out my Design•Memory•Craft goodies – stencils, mediums, tools and Gelatos – and got to work! I’ll share how some of these products work here – this post isn’t sponsored, just a fun share of what’s new in my creative world! I have affiliate links below to what I used, in case you want to check it out, or do some shopping.
Here’s what you’ll need to tackle mixed media decor:
Design•Memory•Craft products:
Other Supplies:
- Craft Mat (Mine is the Ken Oliver Best Ever Craft Mat and I just love it)
- Paintbrush
- Wooden decor item
- Paper Towels and/or baby wipes
- Also used in this project:
- The Crafters Workshop stencil, 6×6 Mini Specimens
- Scrapbooking paper

I started by decoupaging some light colored scrapbook paper onto the front of the organizer using DMC Glaze. This step is optional, but I find the subtle pattern adds more dimension to the finished project.

Then I got to the good stuff – Gelatos! They’re pretty cool to use as tint for the Glaze and Gel Mediums. Just use your palette knife to cut off a small slice, and mix it well into a bit of glaze. I mix mine right on my mat and clean up with baby wipes, but you could use palette paper or something disposable if you prefer. The colors I used in the background are Stardust, Passion Fruit, and Mango.
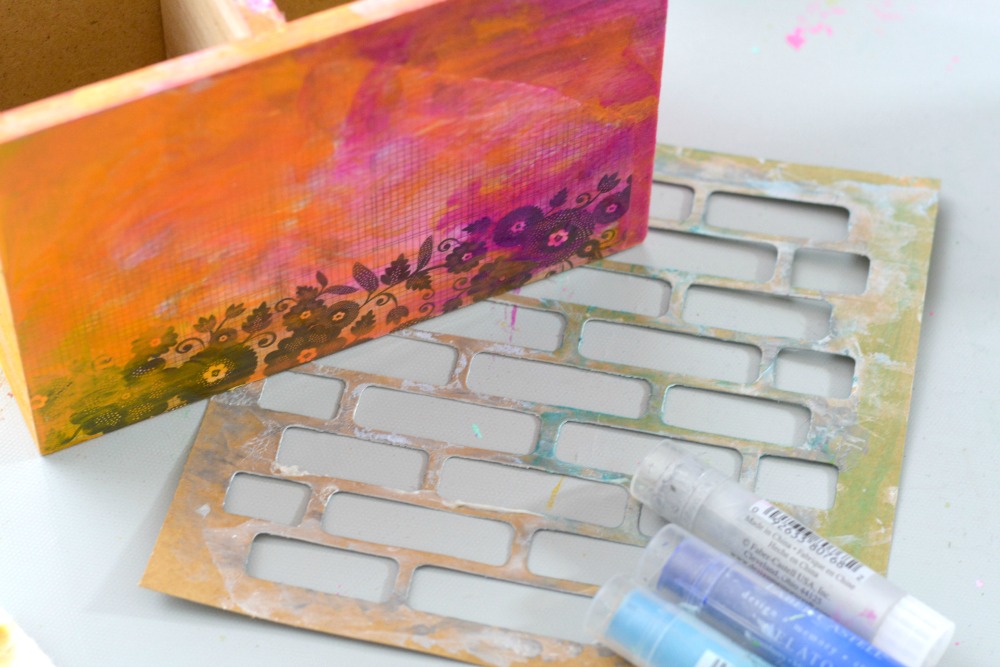
Next, I incorporated a little bit of blue and my favorite stencil, the brick texture. (Can you tell it’s been well-used?? Haha.) I mixed this with Gel Medium and used a combination of Boysenberry, Cotton Candy, and Metallic Icing. Wait for the first cat of glaze to dry before beginning stenciling.

Once I added some brick texture, I used the Mini Specimens stencil to add some rustic/steampunk-looking accents and butterflies. Yeah, that may not be a real look, but I don’t know how else to describe my style here? I also added a little stamping along one side to add Make • Write • Love – kind of a mantra in the studio!

It holds all my most-often used tools like scissors and paintbrushes, plus some extras! Overall, I’m really happy with how it turned out. It’s right on my desk, on-hand for any project.

So, that’s a recap of what’s new in my world (And I’ll show you the studio as soon as I get the boxes out!) I hope you enjoyed this little mixed media decor project, and I’ll see you guys again soon!

I enjoyed the straightforward tone and the careful explanations. It made the content feel accessible.
I love how the stenciled tool organizer adds color while keeping brushes and tools close at hand.
The mixed media finish with Gelatos and Glaze makes the piece feel both practical and personal.
That is a really useful and fascinating bit of information. I am quite appreciative that you just gave us this important information. Kindly provide us with updates like this. I appreciate your sharing.
I greatly appreciate your support and careful consideration of my suggestion. From my perspective, your idea proved to be really beneficial.
These are great mixed media decor to share!
nice
I just love these designs. These pictures are beautiful and classy. Thank you for sharing DIY and decorating ideas and inspiration.
nice post
looking good
Nice decor. I love your idea. It’s simple and easy to follow.