
Everyone can make some inexpensive fall decor with no sew bandana crafts! This pleated pumpkin can be made in just 10 minutes with only a few supplies, which means you can have a whole patch of pumpkins in an hour. Traditional orange works great for this project, but don’t overlook other fun fall colors! You could even make your pumpkin in teal, if your family participates in the teal pumpkin project (for kids with food allergies) so that you can display your participation every year. So grab your bandanas and let’s get crafty!

I shared this project a couple years back on the Consumer Crafts blog, Crafts Unleashed. Since that season is here again, I thought it would be a great time to dust this one off and share it with all of you! You can buy all your supplies right at Consumer Crafts (I’ll leave links for you in the supply list below in case you need to do a little shopping), or you can get creative and fill those pumpkins with dried beans, corn kernels, or even scented wax chips.
- A 22-inch Bandana
- Bean Bag Fill (1 lb for each pumpkin)
- Hemp Twine (I used 20 lb weight, but anything bigger would also work fine) – you will need about 6 feet, depending on how long you make your pumpkin stump. 6 feet should cover 2 inches.
- Craft Scissors
- 3-4 Rubber Bands to stabilize it while you work

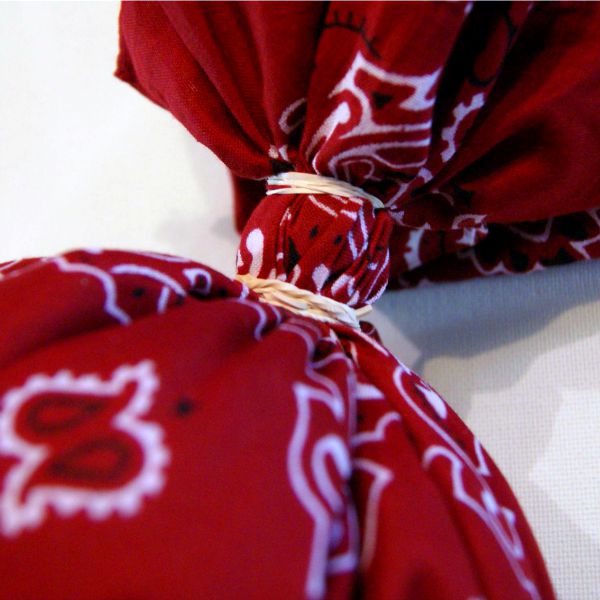
Find the center of your bandana, and cinch it up by about a 1-inch radius. These extra pleats will help your pumpkin to hold a rounder shape. I used a rubber band for this, but you could easily tie a piece of twine on tightly instead.

Carefully add your bean bag fill, and bring the sides up, gathering them at the top. Wrap a rubber band around the top to secure it will make your work easier.

I added a pair of rubber bands to mark where I planned to cut my “stump.”
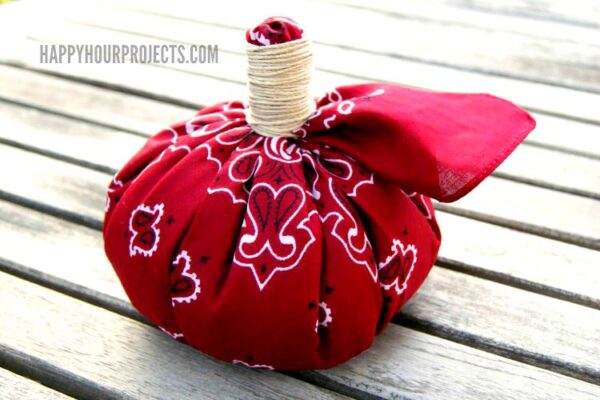
Separate out one of the long corners. Take a sharp pair of craft scissors and trim off all the excess fabric except this one corner. This will be your pumpkin “leaf.”

Tie one end of your hemp twine around the base of your pumpkin stump. Take the leaf/fabric corner, and cover over the raw edge of the stump. Now, wrap the stump (including the leaf fabric) tightly with your hemp twine. Wrap upward until you have covered the whole stump. Once you reach the top, wrap downward. When you reach the base of the stump, cut off your excess twine and tie the two ends together. Your leaf should cover this knot.

This is a really fun project if you’re into rustic fall decor, and it’s nice to make decorations that are rugged enough to last for a few seasons – just be cautious if you’re using real beans or corn as your filler that you don’t attract critters into your storage boxes at the end of the season.
Hope you guys have a great weekend!

nice post
nice post
looking good