
Hey friends! Over the summer, I published my third craft book, Rock Painting for Beginners. It’s a craft I really got into while most of my craft supplies were packed away – it’s an inexpensive craft that made me feel happy, and hiding painted rocks is a fun way to spread joy to others! One of the projects I created for the book is these easy pineapple decoupage painted rocks.
If you don’t consider yourself to be an accomplished artist, then this project is for you! It’s great for beginners, because all you really need to be able to do is some basic painting, and cut and glue. I love these cheerful pineapples (which are on-trend right now, too!)
Supplies needed to make Pineapple Decoupage Painted Rocks:

The following list contains affiliate links for your convenience when shopping for supplies or viewing more detail about the products I use. I do earn a small commission when you make a purchase through these links, and I thank you for supporting Happy Hour Projects! I only link to products I genuinely recommend.
- Rocks!
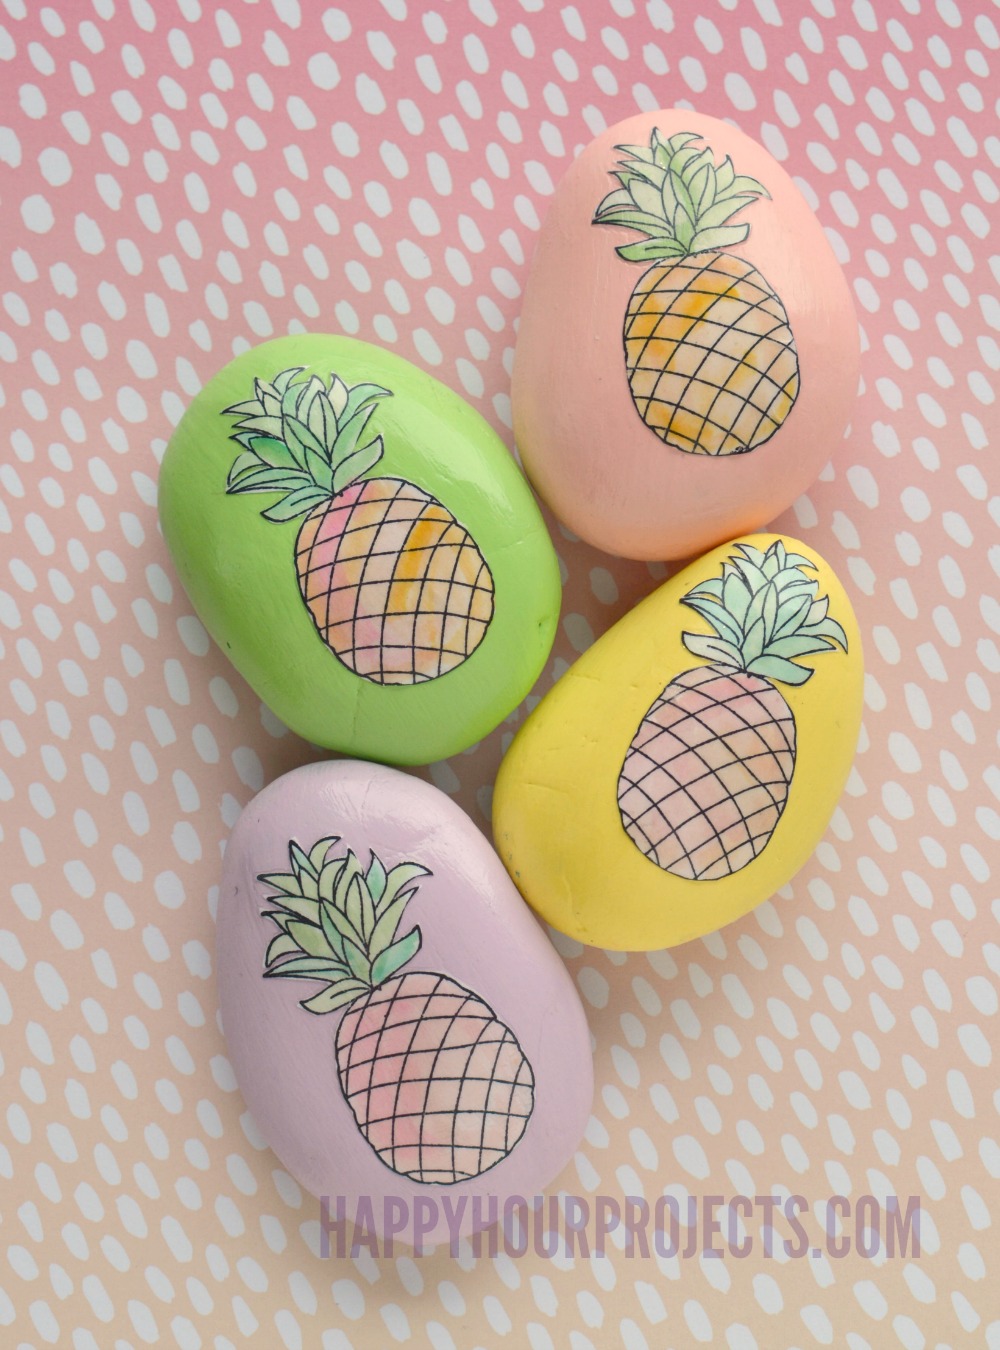
- Acrylic Paints – I used pastel colors in pink, purple, yellow and green, but any color works fine!
- Paintbrushes
- Pineapple Rubber Stamp
- Standard Printer Paper
- Archival Ink
- Watercolor Paints – I love using Ranger’s Distress Ink to watercolor, but any standard set of watercolor paints will do!
- Paint Palette
- Scissors
- Mod Podge or Craft Glue
- Varnish (I prefer the paint-on type, but spray varnish works fine too)
- Craft Mat or newspaper to protect your work surface
Begin by painting your rocks all over with acrylic paint. This may take a couple of coats to get good coverage. Acrylic paint does dry fairly quickly, but you may want to speed the process up by using a hair dryer or fan. Typically, I paint the top of the rock with 2 coats, then once it’s dry, paint the bottom with 2 coats.
Next, use your rubber stamp with a permanent ink like Ranger Archival Ink on plain printer paper. Use watercolor paints or inks to give the stamp a bit of color, and allow the paper to dry. I used combinations of pink, orange, and yellow in the base of the pineapple, and shades of green on the leaves. You don’t even need to worry about staying within the lines, because once the paper dries, you will cut the image out with scissors to adhere to your painted rocks!

Next, coat the backside of your pineapple image with Mod Podge or your favorite decoupage medium. Once the paper curls slightly, place it on the rock and smooth the edges down well.

Coat the face of the rock with another coat of Mod Podge to seal the image. Then, when the decoupage painted rocks are dry, add a protective coat of varnish sealant so that they can stand up to outdoor hiding and people handling them. I prefer a brush-on varnish – you can apply it right at your work station without worrying about overspray or ventilation. However, spray on varnish also works well.

Once the rocks are fully dried, you can optionally add a hashtag to the backside. Many communities have local groups who paint and hide rocks for others to find, or you can join my online community, #PaintHappyRocks! You can share your creation with me directly by Following and tagging @PaintHappyRocks on Instagram and use the hashtag #PaintHappy. You can also follow the PaintHappyRocks fan page on Facebook or join the PaintHappyRocks group on Facebook. This is an extension of one of my other websites, PaintHappyRocks.com.
Thank you all for joining me today for a little fun with paint! I’ll see you all again soon!

I love how vibrant the pineapples look. Have you thought about using other tropical fruits too? It could create a whole colorful garden!
This is such a thoughtful tutorial for beginners! I really appreciate how you break down each step—from painting the rocks to sealing them with varnish. The pineapple design is cheerful and the decoupage technique makes it accessible even for those who don’t consider themselves artists. Your encouragement throughout the post makes crafting feel less intimidating. The tip about using a hair dryer to speed up drying time is practical, and I love that you emphasize quality over complexity. This kind of project is perfect for a relaxing afternoon!
What I like most about this article is the combination of detailed instructions and encouragement for creativity. The author goes beyond just instructions and suggests many ways to turn paper beads into unique jewelry.
Great! Thank you for this beautiful and detailed class!
these pineapple painted rocks look fun and perfect for beginners to try
I am quite impressed with the crafts you make. The craft ideas are very beautiful and sophisticated.
Today is a good day
This way can be applyed to make this Christmas more beautiful.
Gracias por esta clase tan bonita y bien detallada, Dios la bendiga siempre, un fuerte abrazo.