• Skip to primary navigation
  • Skip to main content
  • Skip to primary sidebar

  • home
  • about adrianne
  • buy the books
    • DIY T-Shirt Crafts (2015)
    • DIY Stamped Metal Jewelry (2016)
    • Rock Painting for Beginners (2019)
  • videos
  • crafts
    • diy beauty projects
    • kids’ crafts
    • paper craft projects
    • polymer clay
    • sewing projects
  • jewelry
    • bracelet projects
    • earring projects
    • necklace projects
    • jewelry tools & supplies
  • metal stamping
    • beginners’ tutorial
    • video tutorial
    • project ideas
    • metal stamping supplies
  • recipes
    • cocktail recipes
    • appetizers
    • main and side dishes
    • sweets and treats
  • by season
    • birthdays
    • new year
    • valentine’s day
    • st. patrick’s day
    • easter and spring
    • mother’s day
    • patriotic
    • fall
    • halloween
    • christmas
    • thanksgiving
  • privacy

Happy Hour Projects logo

05/29/2012

Polymer Clay Bowl

Well, not like I needed another addiction (I’m trying all kinds of new things lately), but I’ve finally ventured into the realm of polymer clay.  How have I never used this before??  It’s inexpensive, easy to work with, and feels just like playing play-dough from way back when. :) This project was so fun!

I have been admiring the clay bowls that Stars and Sunshine has been posting lately, so I thought I’d try a version myself for Raya’s room.  She has a great tutorial – it’s what I used!  Hers has a little different look using lace imprints, so go and check that idea out too!

This little bowl required:

  • One package of clay (I used white, and painted it, but it comes in all sorts of colors!)
  • A rolling pin and trimmer (I picked up a set specifically for clay because I didn’t have a rolling pin, but a regular rolling pin and butterknife would work fine)
  • A round cutter (I used a plastic bowl)
  • A decorative stamp
  • An oven-safe bowl for shaping & baking
  • Sandpaper, paint, and gloss for finishing (all optional, depending on the look you’re going for)

First, roll out your clay on some wax paper.  I rolled mine out to about 1/4″.  If you’re using a food rolling pin, you’ll want to cover the top of your clay with another sheet of wax paper.  This roller is just for clay, and it’s nothing fancy, just a plastic tube.  I bet some PVC piping would work well, if you have some lying around.

I used a small plastic bowl as my cutter.  I love these little bowls for paint and stuff, when I found a 6-pack for $1 a while back, I got a set to beat up with my crafty projects.

Then, I trimmed it down.  You don’t need a fancy trimmer here, a plasitc knife would work fine.  Don’t worry about that rough edge – we’ll sand it down at the end.

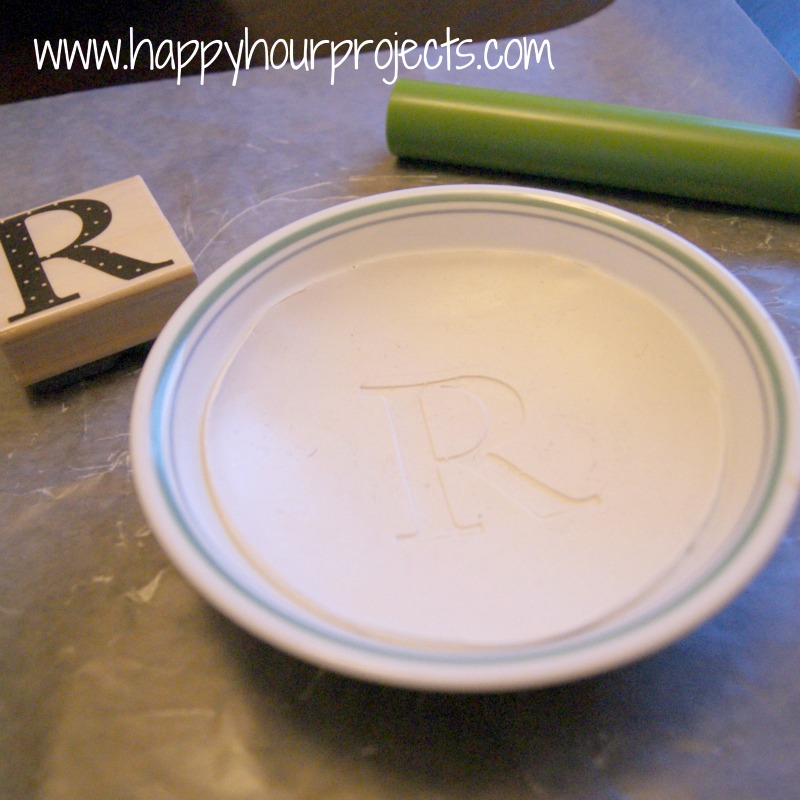
I flipped it over, so that I’d have a nice smooth surface to work on.  I used a rubber stamp (found this in Michael’s dollar section) to stamp a big “R”… for Raya. :)

Then, I just set it carefully in my oven-safe bowl.  Don’t let the size throw you, this is a small Corelle fruit bowl.  

I baked it according to the package directions.  Every brand and formula is a little different, so make sure you check!

When it was done, I still found it to be slightly flexible.  Now, for those of you who work with polymer clay – correct me if I’m wrong, but this seems to be pretty normal?  It’s not going to be quite like fired pottery clay.

To finish it up, I just sanded the rough edge, and painted with some acrylic paints.  I went with a very light coat of paint, letting my brush strokes show, but finishing is one of those things where there’s no wrong way to do it – just do what you like the looks of!  When I was finished, I added a light coat of Sculpey Gloss.  (I guess spray sealants are bad for polymer clay – so you definitely want something that paints on!)

And with that, I have a fun and easy little personalized piece for my daughter!

I link up to these great parties!
~ Adrianne

Filed Under: Polymer Clay, Tutorials

copyright policy and terms of use

I love it when you love my work! All tutorials and photos published at Happy Hour Projects are copyrighted. If you would like to feature my tutorial on your website or share it on your social media you may use one photo to feature, as long as you provide a link back to the original post.

If you feature a photo, it may not be accompanied by the project tutorial or recipe, whether in my own words as it originally appears or paraphrased by you. This also includes personal sharing on social media and Pinterest. Publishing multiple photos from a project, or including instructions with an accompanying photo are not permitted and you will be asked to remove them.

I love to share my projects, and my tutorials, recipes, and e-books are ALL free for your personal use. However, photos and ideas that are published to this site are my protected intellectual property. You may print them at home, but please do not copy or distribute them. I also allow all designs to be made and sold at fundraisers, craft fairs, etc. If you are selling a piece made from one or more of my free tutorials in your online shop, I require that you use your own, original photography, and include a link back to my website to credit me as the designer.

I hope you enjoy what you read here, and please be fair when you share!

Reader Interactions

Comments

  1. Robin Howard says

    07/25/2012 at 11:35 am

    Very cute project! Gave me some organizing ideas. Stopping by from Welcome Wednesdays. http://www.robinseccentricities.com/2012/07/welcome-wednesday-blog-hop.html

    Reply
  2. Jill says

    06/04/2012 at 12:04 am

    How fun is that?!? What a cute bowl! I love the color you chose and putting the letter in it is perfect! Thanks so much for sharing this as well at Thursday's Temptation.
    Jill

    Reply
  3. Evelyn says

    06/02/2012 at 12:03 am

    Polymer clay is something else that I have never worked with. I need to check it out. Great tutorial! Just popping over from Mamal Diane to check this out:) I would love for you to share this at Freedom Fridays. So hoping to see you there!
    PS Still enjoying following you.

    Reply
  4. Lauren says

    06/01/2012 at 8:25 pm

    ok..I want one of these for myself! :) I would love it if you came and linked up at Well Crafted Wednesdays! Here is the link:

    http://thewellcraftedhome.blogspot.com/2012/05/well-crafted-wednesdays-link-party-6.html

    Reply
  5. Jessi W says

    06/01/2012 at 7:48 pm

    I love the color of that bowl! It would be perfect for a nightstand or dresser to hold little odds and ends, or near an entry way for keys (we are always leaving our keys everywhere and can never find them!) Thanks for linking up to The Fun In Functional!

    Reply
  6. starsandsunshine.com says

    05/31/2012 at 10:07 pm

    Yours turned out beautifully! I love the texture of the green paint :) Thanks for linking back to me!

    Reply
  7. stacysewsandschools says

    05/31/2012 at 2:07 am

    I LOVE IT!!! This is something that I would love to do with my older kids. Thank you for sharing!! :)

    Reply
  8. creative heights says

    05/30/2012 at 2:21 pm

    Love this – I'll have to try it myself!
    Now following your blog
    Jess @ http://creativeheightsjg.blogspot.co.uk/

    Reply
  9. Daisy TrendyMomReviews says

    05/30/2012 at 12:54 am

    Following and looking forward to reading more!
    Daisy @ http://trendymomreviews.blogspot.com

    Reply
  10. MrsFoxsSweets says

    05/30/2012 at 12:44 am

    Neat! You are just making all kinda of fabulous things!

    Reply
  11. Melanie says

    05/29/2012 at 3:25 pm

    Cute! Like the color!

    Reply
  12. Melissa says

    05/29/2012 at 2:04 pm

    This is so cute!!!

    Reply
  13. Ladybird Ln says

    05/29/2012 at 12:53 pm

    WOW! This is so cool, I have never done this before, it looks like fun! I might have to make something!

    Carlee

    Reply
  14. Terry says

    05/29/2012 at 12:25 pm

    I really like this too, love that green colour. I picked up some clay and haven't done anything with it yet. Thanks for the tutorial.

    Reply
  15. Kelly says

    05/29/2012 at 12:18 pm

    This is really great. I love craft nights with my girls and this would be great to do for our Bible group “He is the Potter I am the clay” lesson…with a word in the center that we want God to shape us into…like kind, grace or friend…a great reminder and a great houseware…thanks for this great tut!

    Reply
  16. Kadie says

    05/29/2012 at 11:44 am

    OOooooo I love this!! I have wanted to try polymer clay out too. You really are on a roll of trying new things! What a great idea to use the rubber stamp on it.

    Reply

Trackbacks

  1. Happy Hour Projects - F | Pearltrees says:
    05/17/2017 at 4:24 pm

    […] Happy Hour Projects. Jewelry Stamping – Happy Hour Projects. Word Bracelets – Happy Hour Projects. Polymer Clay Bowl – Happy Hour Projects. Basic Sliding Knot Bracelet – Happy Hour Projects. Sunflower Necklace with Polymer Clay – Happy […]

    Reply

Leave a Reply Cancel reply

Your email address will not be published. Required fields are marked *

Primary Sidebar

Hello, and welcome! I'm Adrianne, an artist, author, designer, and blogger in mid Michigan. I work from home, chase my two kids, and this once-city-girl is learning how to care for chickens and adjusting to life out in the country. I have a compulsion for daily creativity... sometimes it's jewelry-making, paper crafting, metal stamping, mixing and baking, or giving new life to recycled items. But with 2 young kids, time is short! My goal here at Happy Hour Projects is to share projects and tips that you can do in an hour or less. The ideas you find here are designed to add a little creativity in your day, no matter how much (or how little) time you have!

BUY MY BOOKS!

Copyright © 2022 Happy Hour Projects on the Brunch Pro Theme