
So the classic geographic question in the states: is it soda, pop, or Coke where you live? I had a hard time trying to decide what to call this one today. I asked on Facebook last week, and most of you said when you open a can of indulgent bubbly beverage, it’s a soda. (Though I love that in New Zealand, it’s “fizzy”.) Then it came up that even on a soda, these are pop tabs, because they “pop” the cans open. So, I give up, today I’m going to show you how to make a soda pop tab bracelet, haha. Whatever you call it – this project is a lot of fun! (Oh, and I have to thank the friend who mentioned that a carbonated canned beverage is a beer. Fair enough.)

This is actually a very easy project if you are handy with the jump rings. I made up both versions of this bracelet in under an hour. Here is what you will need:
- 12 pop tabs for each bracelet (for an average woman’s 7″ wrist. More or less, if yours is larger or smaller.)
- 27 – 5mm jump rings
- One clasp, and one large 8-10mm jump ring
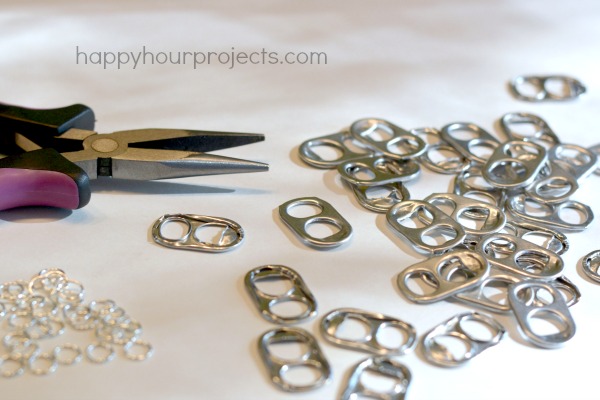
- Long nosed jewelry pliers
- Optionally, 12 teardrop beads or small dangling charms, and 12 additional jump rings
First, remove your tabs from your cans by bending them back and forth until they snap off. If you get any sharp edges, you can file them down with a small file. (And yes, you can see I’m wildly unsuccessful at quitting my Diet Mountain Dew habit. :P You can tell me all day long how bad it is for me, but it’s my favorite. I have one almost every day.)

But I have a whole bin of returnables (because we live in Michigan, and bottle deposits means that there’s an eternal collection of cans collecting in the garage waiting to be recycled) – so I just raided that for supplies. You will need about a dozen tabs for each bracelet. Once you have washed and dried them, attach them as shown below with 5mm jump rings.

When you’ve created your aluminum chain, it’s easiest if you attach a clasp. That will give you a fit that won’t slide off your wrist. If you’re not comfortable with adding a clasp, you can add 1-2 more tabs and just connect them together. The bracelet only needs to be large enough to slip over the largest part of your hand if you go this route – don’t make it too big, or it will keep sliding off.
To attach a clasp, add two jump rings to the end of your chain, and close them. slip one more ring through those two, and add a clasp of your choice (I prefer lobster clasps for bracelets). Do the same thing on the other end of your chain, adding a large ring instead of a small one and a clasp.

Finally, you can add beads if you like! These are a teardrop shaped glass bead, but you can also make a charm and add that. (If you’d like a how-to for making your own charms, check out my video tutorial for making charm bracelets.)

At a glance, it doesn’t even look like recycled pieces! It’s just a fun, chunky chain.

I love how it turned out. Ever since my daughter and I made our recycled bird feeders, it’s had me thinking about other ways to recycle and upcycle.

Got your own twist on this idea? Let’s hear it!

I love this tutorial! Upcycling soda pop tabs into a bracelet is such a creative idea. Can’t wait to try it out and add some unique pieces to my jewelry collection. Thanks for sharing this fun project!
I loved this tutorial! What a creative way to upcycle soda pop tabs into something stylish. Can’t wait to try making my own bracelet. Thanks for sharing!
This tutorial is fantastic! I love the idea of upcycling soda pop tabs into something as stylish as a bracelet. Can’t wait to give it a try and make some unique accessories for summer! Thanks for sharing!
What a creative and fun idea! I love how you’ve turned something as simple as soda pop tabs into such a stylish bracelet. Can’t wait to try this out for myself! Thanks for the step-by-step tutorial!
What a fun and creative idea! I love how you’ve transformed something so ordinary into a stylish accessory. Can’t wait to try making my own soda pop tab bracelet! Thanks for the clear instructions and tips!
What a fun and creative idea! I love how you’ve turned something so simple into a beautiful bracelet. Can’t wait to try this out – perfect for adding a unique touch to my accessories! Thanks for sharing!
This tutorial is fantastic! I love the idea of upcycling soda pop tabs into something so stylish and unique. Can’t wait to give it a try — my friends will be so impressed with my new bracelet! Thanks for sharing such a creative project!
What a creative way to upcycle soda tabs! I love the idea of turning something so simple into a stylish bracelet. Can’t wait to try this tutorial. Thanks for sharing!
I loved this tutorial! The step-by-step instructions were super easy to follow, and I can’t wait to start making my own bracelets. What a creative way to upcycle soda tabs! Thanks for sharing such a fun project!
Hi, i think that i ?aw ?ou visite? my blog so i came to “retu?n the favor”.I’m trying to find things to enhance my site!I
suppose its ok to use some of your ideas!!
I bought 5mm rings but it is impossible to get the 2 sides of the tab in that ring .
this is confusing
This is a great way to use those pop tabs! :)
I came across this crochet pattern, http://www.escamastudio.com/pages/how-to-crochet-flowers-pop-tabs. You use the pop tops as the petals and crochet around it. I know you don\’t crochet, but reminded me of this project you posted :)
Adorable! Crochet is on my to-learn list now that I have more craft time. :)
These are pretty.
We have an event at The Salvation Army called Refashionista. People purchase items from our stores, and refashion them into runway items – one lady made a dress out of a bunch of mens ties………. I love this item, and hope to get some volunteers to make them to sell at the event as part of the fundraiser. I’d be interested in other “refashion” items, jewelry, accessories, even the birdfeeder. Any help or suggestions are appreciated. Also, not sure if you can do this – but if any of your followers want to make them and donate them to The Salvation Army – we’d love to have their support! It’s a great cause, helping people around the world. Our event happens to be in Buffalo, NY. Thank you for all your inspirations!
Maybe you could weave ribbon through the holes and glue each end under the last tab. What do you think?
I love this. Nice job. I love it when you make jewlery Thank You
So fun! I bet these would lay nicely. I’m tempted to try it as a necklace.
I was actually surprised at how nicely it wears. I was just going for something kind of kitschy when I had the idea, but it turned into a decent piece – I really like it. It’s comfortable and moves well, and the “top” part of the tab has quite a lot of flex to it.
This came out great!!