
So I have been doing lots of reading up about printing on fabric, and it’s about time I actually gave it a try. I’ve been in quite the literary mood this week, with my book-page crafting, and I had a fabric project in mind that would be perfect adorned with some classic writing.
This is the first time I’ve tried printing on fabric, and I’ll tell you what – as usual, I learned a few things. So I will pass them along to you. :)
First of all, there are any number of tutorials out there. I seriously think I must have read about 50 of them in the past few weeks trying to figure out what the true best way to print on fabric is. This little experiment I’m going to show you is NOT COLORFAST and should NOT BE WASHED OR GET WET. So – think home decor, and things that do not go into babies’ mouths. I did order some fabric treatment for permanent printing, so I can talk more about that when I finally get it. (Incidentally – does anyone out there use Bubble Jet Set 2000? I’ve read rave reviews…)
But back to our non-waterproof project at-hand.

What you’ll need:
- Freezer Paper
- Iron
- Light-colored fabric
- Paper Trimmer or Rotary Cutter and Mat
- Inkjet Printer
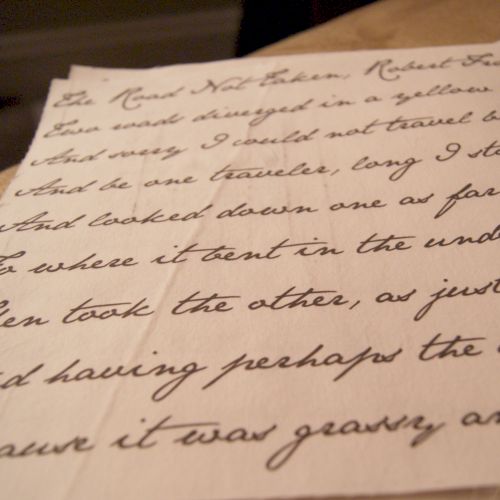
I decided to use Robert Frost’s The Road Not Taken (in a font I just adore, Jane Austen). I prepped it in Word, and then got my paper ready.
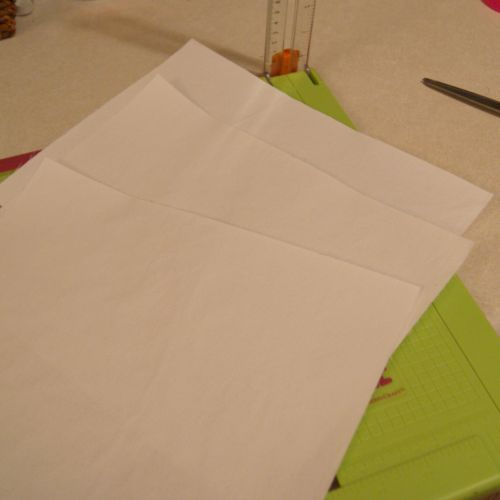
I will tell you what I did and what I would do differently. I tore off a decent-sized piece of freezer paper, enough for three sheets of fabric paper.

I ironed it into my white cotton. This was a well-washed piece of cotton, as I am upcycling an old bedsheet for this project. If you haven’t crafted with freezer paper before, you can find it in the aluminum foil aisle, and it’s a two-sided paper – one side is paper, the other side is waxed. You’ll be ironing it waxy side to the back of your fabric, if your fabric has a front and back side. You definitely don’t want your iron touching the waxy side of the paper. :) Iron at a medium-high setting with no steam.
I will suggest that you cut your paper and fabric down to slightly larger than your paper size and do it one at a time. Out of the dozens of articles I’ve read on this, not a single one addressed multiple sheets at a time. I’ll show you why three at a time didn’t work so well when we get there – it wasn’t a huge issue, but I think it would have worked better focusing on a smaller piece.

Once I got it all ironed on, I used my paper trimmer to cut it into three standard-sized 8.5×11″ sheets. Keep in mind that if your printer can handle legal-sized paper, you can get some additional length out of your print that way.
What I did not notice at this point was that my center sheet was really well-ironed, and my two side sheets could have used more ironing, because they wrinkled ever so slightly inside the printer. Had I ironed them one at a time to begin with, I doubt I would have missed these spots.
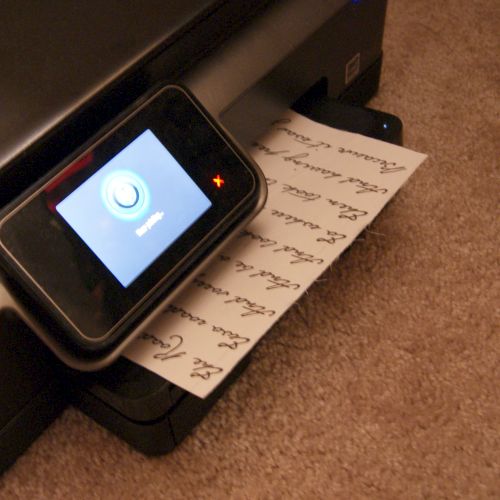
Anyway – for the part that makes you wonder if you’ve gone insane sticking fabric into your printer. :) What’s cool about printing right on the fabric is that you don’t have to do anything special (like reverse your design, like you would for an iron-on). You may want to run a test sheet of paper to figure out whether you need to put your paper in right-side-up or upside-down. In my case, I had to put it in upside down – the fabric side facing down – for it to print correctly.
And it worked great. Out of caution, I did only put one sheet at a time into the printer.
But they came out great! This one turned out really awesome:
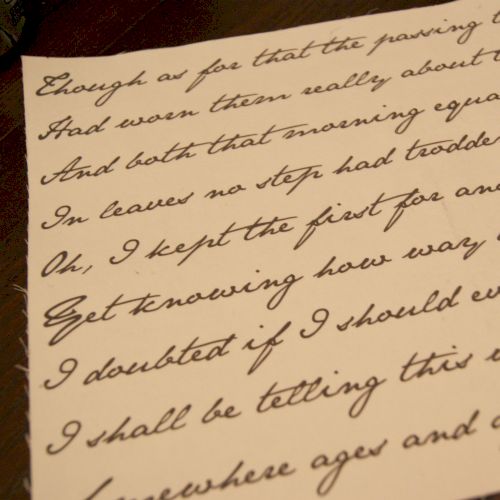
But the others got a bit of extra ink on them because of those tiny wrinkles that I didn’t see. Until now.
Now, for my purposes, I actually don’t mind. It’s why I used the font I did – I want it to look sort of hand-inked, so a bit of smudginess won’t bother me for this particular project. But if I were going for a clean and modern look, well, I would be extremely ticked off at myself right about now for not ironing more carefully. So learn from me, and iron your sheets really well.
Then, all you have to do is peel the freezer paper off the back of your fabric. It doesn’t even leave any residue.

Brilliant. It’s ready for sewing.
Now, I read all sorts of things about what you can do to preserve your ink. Not to the point of being washable, I don’t think, but possibly more water-resistant. The advice is to wait for 10 to 30 minutes for your ink to fully dry, and then iron it again without steam. Supposedly this sets the ink better. I do know that for the pre-treated printable fabric sheets you can buy in the packs, that’s part of the instructions. But quite honestly, when I read the instructions on those sheets, there was one of those California warnings that it was treated with chemicals known to cause cancer. So I don’t know if it was the carcinogens that needed to be set with the iron, or if it really does just help on the ink – either way, I didn’t buy the packs to find out. But I thought I’d pass along the info anyway. I figure, one more pass with the iron certainly isn’t going to hurt, anyway – so I did iron mine one more time.
Now – what am I making, printed with classic poetry? Well, that’s a post for another day, because my crafting hour is up, and this mama is very tired! But I certainly wanted to go into some good detail here about how to print on fabric, so that when we get to the actual sewing, I can just focus on that! And honestly – I’m really not trying to be secretive, I’m just a little superstitious about any big reveals before the project is finished. That way, if it all goes horribly wrong when I go to sew tomorrow (and this is me we’re talking about – I have craft-fails all the time!) then well, at least I’ve promised you nothing yet, LOL!
I link up to these great parties!
~ Adrianne
Hi,
I have used the Bubble jet set and it works very well. You will notice a that does fade it little but it’s certainly acceptable. I have also tried all the DIY recipes (i.e mixing various combinations of fabric conditioner, soda ash and alum) for making your own and not one of them has worked with my Brother and generic ink combination. I think that people seem to have better success with the Epson printers and their branded inks. If anyone has a recipe that works I’d love to know about it.
Also you can just use a medium to heavy weight iron on interfacing to back your fabric and my printer seems to accept this quite well and then you have a robust fabric that you use for your project.
Deb
Great tutorial, and really inspiring – I’m thinking about all kinds of reading – realted projects that would look great with a Jane Austen print! Book totes, journal covers, Kindle covers, etc etc…
PS Jean – Don’t put freezer paper in any printer that uses heat, the freezer paper will stick to the insides of the printer, it will be extremely unpleasant. I recommend the vinegar bath method that Meig mentioned above to make the print washable.
Who would of known that you could do so much with freezer paper? This is a great tutorial and I will be doing this project soon.
Melissa
Thanks for the great tutorial. The tips you learned from experience are so valuable. You are right — it makes you think twice before putting fabric through your paper printer.
I've added a post to the Luck O'the Irish Link Party.
Debra
That's funny, I was just doing a work project with that font yesterday! Good choice. :)
Armed with this information, I sense a nano project coming on… Now all I need is some of that elusive 'spare time'. I wonder if a laser print would work. That would at least be water resistant from the start. hmmm.
Great info, I love that poem, and of course I love Jane Austen, I am om pins and needles waiting to see what you will make! P.S. I think just about everything causes cancer in California, so I would not put too much stock in that;)
Carlee
http://www.ladybirdln.com
I am pinning this will have to try thank u
thanks for the great tutorial. i will have to try this. would love to know how to make it washable, if there is a way.
That is awesome! I'm pinning this right now and definitely trying this soon!
Is freezer paper the same as wax paper? I'm not able to find any in our grocery store.
I'm your newest Linky follower!!
This is how I print on my fabric, too. You can set it with a vinegar bath. Stinky, but it works.
This such a great tutorial! I hope you'll have time to add it to my linky party going on now
http://teaganstravels.blogspot.com/2012/03/destination-inspiration-linky-party-5.html
I am popping in fro It's So Cheri's Linky Followers party hop! I just noticed your Paddy'd Day hop! My DH is from Ireland so we love the holiday in our house. Will link up!
Cheers, Michelle
I just read a blog the other day that put fabric on the sticky side of full sheets of Avery labels and it worked like a charm. I haven't tried it yet, but I plan to, soon.
I have used the freezer paper and it worked for me as well. Thanks for sharing your experience on this subject!
tfs your great idea. hugs
I'm so glad you shared the font. I wouldn't have thought to ask but now I will definitely be using it. I love it too. I must get me some freezer paper. I've never seen it but again, haven't looked for it specifically. Are you a poetry fan?
I never knew there were so many things you could do with freezer paper. I am coming over from the Linky Blog hop and this is the second blog I am visiting and following and the second one with a post including freezer paper. lol