
I mentioned recently that I have a crush on Happy Mango Beads after they sent me a little care package for a bracelet project (did you see it? I used upholstery cord and wooden ring beads to make a fun piece!). Well, on a whim, I ordered a few of their recycled glass items, and I made up a really simple necklace with a bit or wire and some chain that I want to share with you today! I love the colors in this piece, they just say “summer” to me.

I’ll share links to the beads I used in case you’d like to check it out, but today’s post isn’t sponsored by Happy Mango Beads. I’m just a new fan. ;) If you like earthy, ethnic, or rustic kinds of beads, I think you would love them too!
What you will need for a similar design:
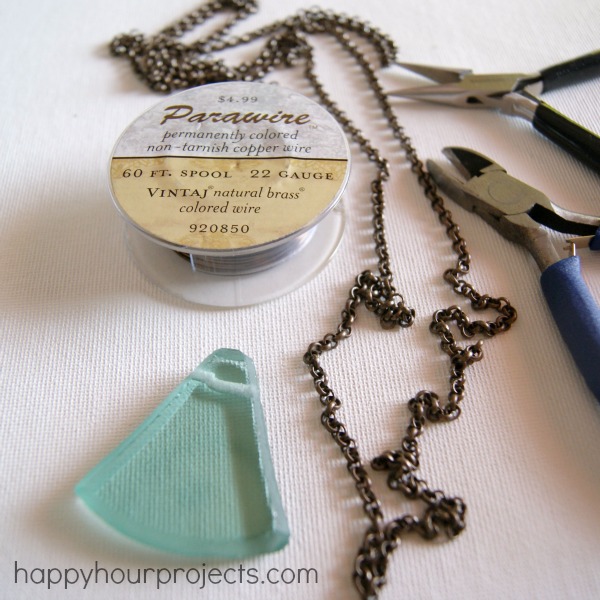
- Recycled Glass Pendant – this one is pale green but they have some other colors available too!
- 25mm recycled glass beads in a coordinating color. I got a whole strand, so I’ll be able to make a gorgeous bracelet with my leftovers!
- Vintaj Brass wire, chain, and clasp – I really like using 18 or 20 gauge chain, but I made do with what I had, which is 22 gauge (a thinner wire). Each gauge will work up a little differently. The chain is some bulk Vintaj Brass rollo chain I’ve had in my stash for a while, I used around 16 inches. You can use more or less depending on the length you like, and how many beads you want to add.
- Round-nosed pliers and wire cutters
First things first – I wanted to add a bit of wire to my pendant to make my own bail, since I’m using a thicker chain. I cut off about 10 inches or so of wire, and used my round-nosed pliers to make a loop for the bail.

To do that, first, I looped it around my round pliers in the center of the wire. Because of the thinner gauge, I looped it 3 times to make sure its stays nice and strong.
Then, I fed the tail ends through the drilled hole in the pendant. I centered the loop over the top and left a short little “neck” to wrap my wire tails around. I just wrapped up all the remaining wire, but if you find you have a lot of excess, you can trim it off. I just want to make sure mine is plenty secure!
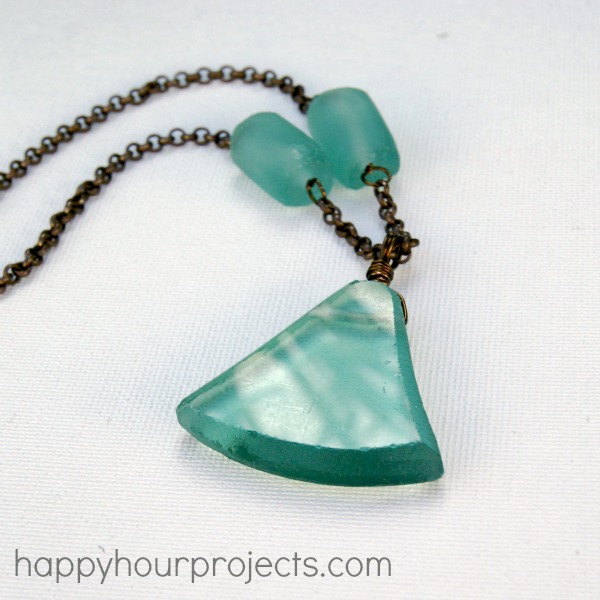
At this point, I was thinking I’d just add it to the chain and be done, but it looked a little plain on its own. So I added a couple of those barrel-shaped beads. Any beads would work, but these were the beauties I had ordered that I couldn’t wait to use in a bracelet, and they worked out really nicely! But, since you can’t string beads directly onto chain this thick, I needed to make each bead into a charm with two loops.

I cut a couple of 3-4 inch lengths of wire – one for each bead.
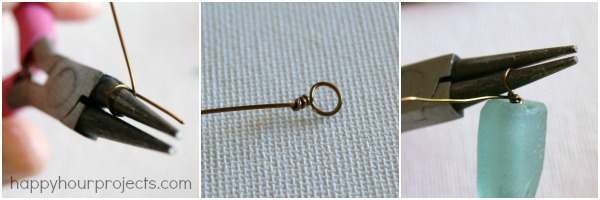
I made a loop on the first end with my round-nosed pliers by looping it around the pliers close to the end, and then wrapping the short tail around the wire. This ensures that it can’t inadvertently open up… and lose my bead. Once I had one end finished, I added the bead, and did the same thing on the other side of the wire. Just nip off any excess wire once you’ve wrapped your wire 3 or 4 times.
Next, I just needed to assemble it. I cut about 2 inches or so of chain for my center part of the necklace, where my pendant will be.

You can open the links of the chain, or use jump rings to attach the beads to the chain after stringing on the pendant. I just opened the existing chain links. Then, I added equal lengths of chain to the opposite sides of each bead to finish off the necklace (in my case, two lengths about 7 inches each to give me a total length of about 18 inches. This will vary depending on the size of your beads and how many you choose to use), and added a clasp on each end to finish it off.
My daughter immediately claimed it as her own. She even stuffed it in the couch when I told her it was bedtime – that’s her favorite place to hide things she wants to save for later. Little stinker! :)

But I know her tricks, so it was easy to reclaim, haha. I just LOVE how it turned out! And best of all, it only took me about 15 minutes to put together.
What are you wearing this summer? Any handmade jewelry of your own?

Precisely what I was searching for, thank you for posting.
I love this necklace! The reclaimed glass is beautiful. Great job!
Did you drill the hole in the glass? If so, how do you do that in such a tight area?