
Not only can you make use of some of the plastic bags they push on you at the grocery store (seriously – I think the only reason they withhold paper bags is to get me to buy their reusable bags), but you can also cut down on buying disposable plastic baggies and change it up with something cute and personal with a very simple sewing project. That’s a win-win-win, right? ;)
What you’ll need for each snack bag:
4-8 plastic grocery bags (I used 6)
Parchment paper
Iron
Fabric scrap at least 7″x15″ (optional, it just makes it pretty!)
Sewing machine and general sewing supplies (scissors, rulers, pins, etc).
Part One: Fusing your plastic. 20 minutes.
A note about this. You will be giving your plastic a gentle melt. Yes, I said gentle, but I also said melt. That means you should get good ventilation going. I did not notice any fumes whatsoever (if you regularly use spray paint or any of the heavy-duty adhesives – those are far heavier on fumes) but when you’re talking about changing the composition of plastic, it comes with the territory that you should take common-sense precautions. I said it was a feel-good project, but I didn’t mean you should achieve the feeling by sniffing fumes, LOL.
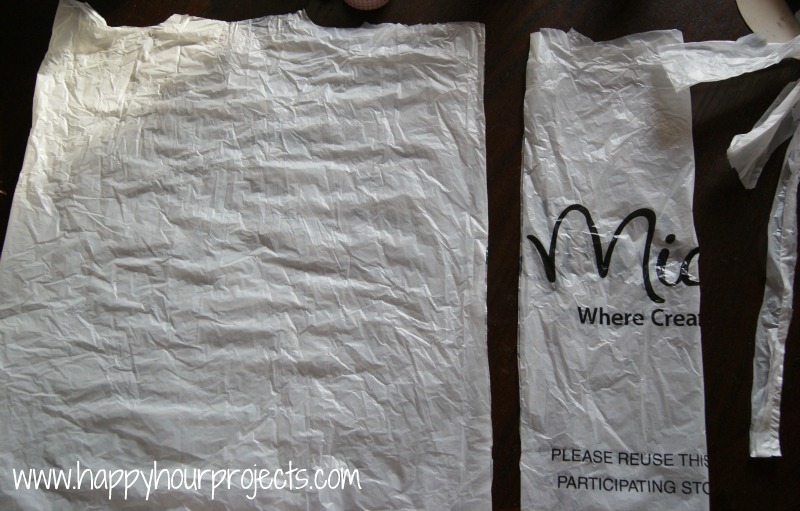
Flatten your bags and trim them down. To do this, just trim off the bottom and the handles. This will give you a tube-shaped sheet to work with.
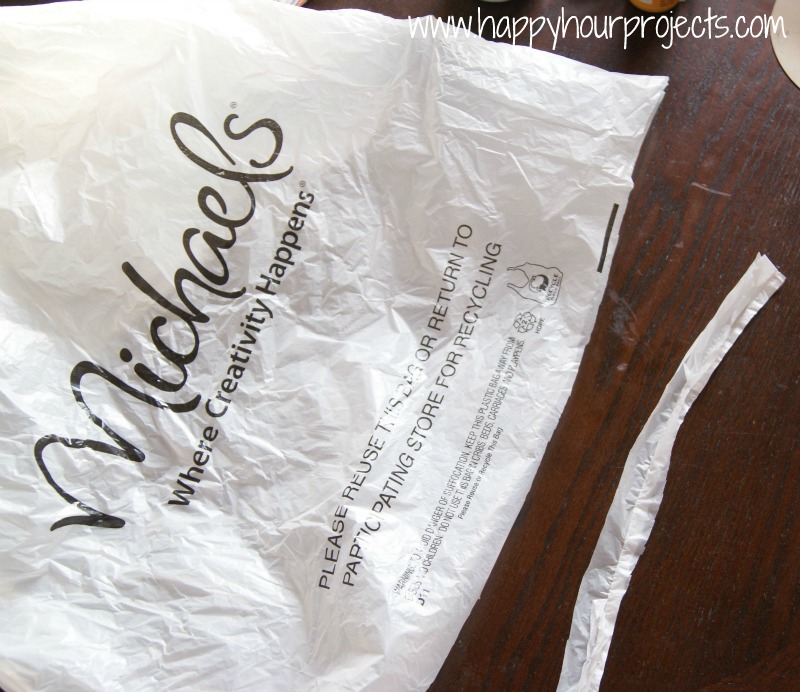
Additionally, you my choose to remove the printed portion (totally optional – but I did, just to have a plain white section of plastic). This will ultimately give you a decent-sized rectangular sheet once you open it up. If you’re using large enough bags, you don’t even have to cut it open, you can leave it doubled up.
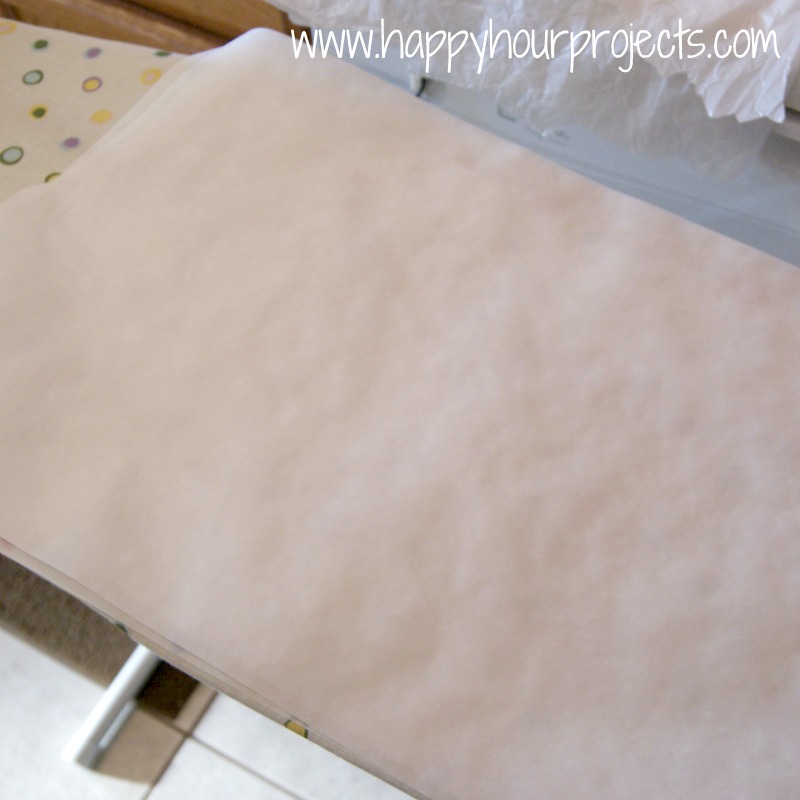
Trim two sheets of parchment paper. Ideally, they will be larger than your plastic, but if not, don’t worry. You can work with smaller sections at a time if you need to. You can also reuse your parchment for fusing, so trimming off big sheets won’t go to waste if that’s a concern. One goes under your plastic to protect your ironing board or whatever surface you’re ironing on, and the other goes on top of your plastic to prevent your iron from becoming a melted and burned mess. :)
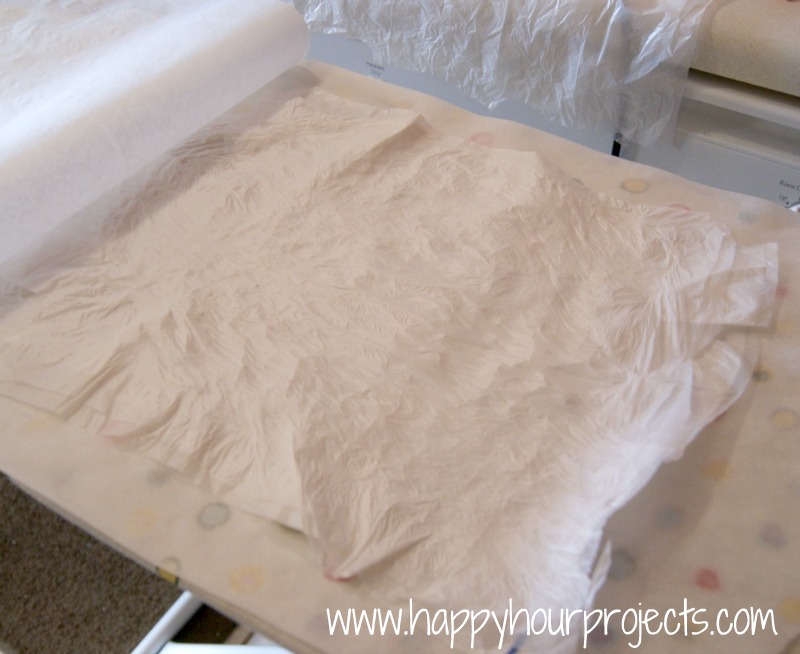
I started with three bags – three layers. Next time I will probably start with just two to make sure my initial fuse is nice and string before moving on. If your plastic is doubled, definitely just start with one bag/two layers. Because we’re sewing something small, it’s okay if every inch isn’t 100% perfect, but of course you want to do the best you can.
So, heat up your iron to the nylon setting. You may need to end up going a little hotter (I had my best luck nearly to the polyester setting, but you can always go hotter if necessary. You can’t un-melt plastic that’s gotten too hot, so start lower). Iron it all over, moving your iron around a lot. There doesn’t seem to be any trick, like moving in a straight line vs. a squiggly one – all you want to do is make sure that you only stay on any one section for a couple seconds. Lift your parchment every 30 seconds or so to see if your plastic is fusing, or if it’s still in separate layers. I found that once it started to fuse, it started to shrink a little, and get slightly wrinkly under my parchment. So check it often once you start to notice that happening.

Once your first two sheets are fused, add another, and iron it again, adding layers one at a time until you have your desired thickness. I used 6 sheets for a nice stiff plastic. If you plan to pack a lot of sandwiches, you may want to go with fewer layers so that it’s more flexible (basically, so you won’t squish your sandwiches closing stiff plastic).
This worked out great for a first try, but ideally, we will all eventually be so good at this that we get nice smooth sheets. ;) You can see in the photo below that mine is a bit uneven and wrinkly – partially due to starting with too many layers, and partially because I ironed a few places just a little too long. (Like anything, though – practice makes perfect, right?)
But once your plastic is fused – you can sew with it, just like fabric. (Cool, right??) This is why it’s OK for a less-than perfect sheet of plastic – we will be making sure all the edges are sewn into our baggie.
Part Two: Sewing your baggie. 15-30 minutes, depending on your experience level.
Trim your plastic down to a rectangle 7″ x 15″. You may certainly use any dimensions you like (and the ending size of your plastic piece may dictate how big you can make it), I just found that this was most similar to a sandwich baggie size and I like it really well. So, feel free to adjust, but I’m going to show you directions using 7″ x 15″. If you are covering your baggie with fabric like I am, trim that to 7″ x 15″ as well.
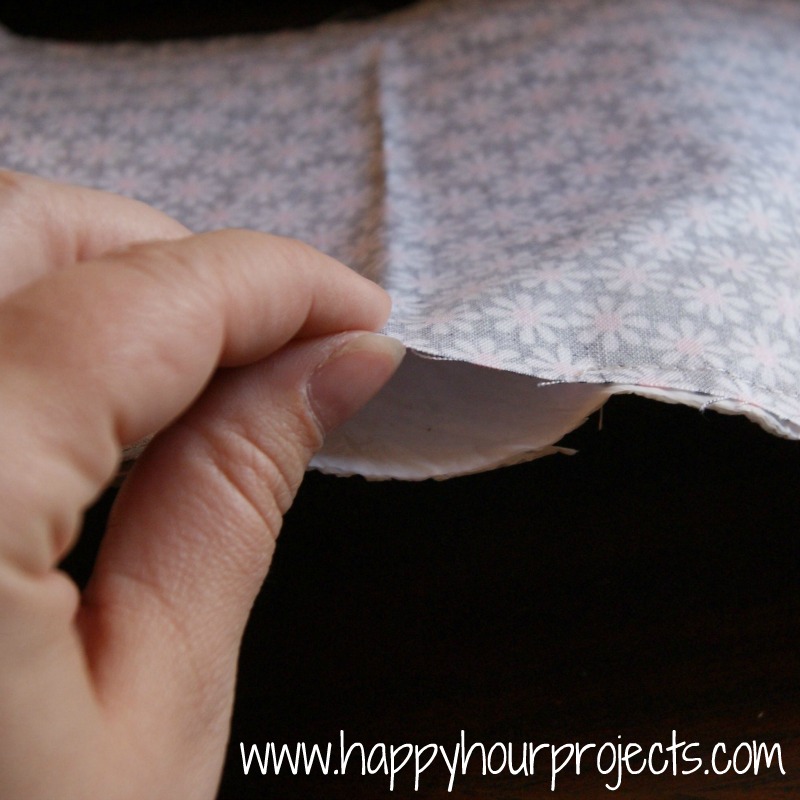
Place your fabric patterned side down on top of your plastic. If there is a smoother and a rougher side to your plastic, place the fabric against the smoother side.

You can pin it in place if you want, but I didn’t bother since this is a very simple shape to sew. Sew nearly all the way around. It will look like you are doing it wrong since you’re looking at the wrong side of your fabric. Leave a 3″ hole on one of the sides.

It can be the side or either one of the ends – just don’t put the hole right by the corner, it’s more of a hassle to even it out if you do. (When I make my next one, I will probably leave my hole on one of the ends!) Once you’ve sewn nearly all the way around, stop.
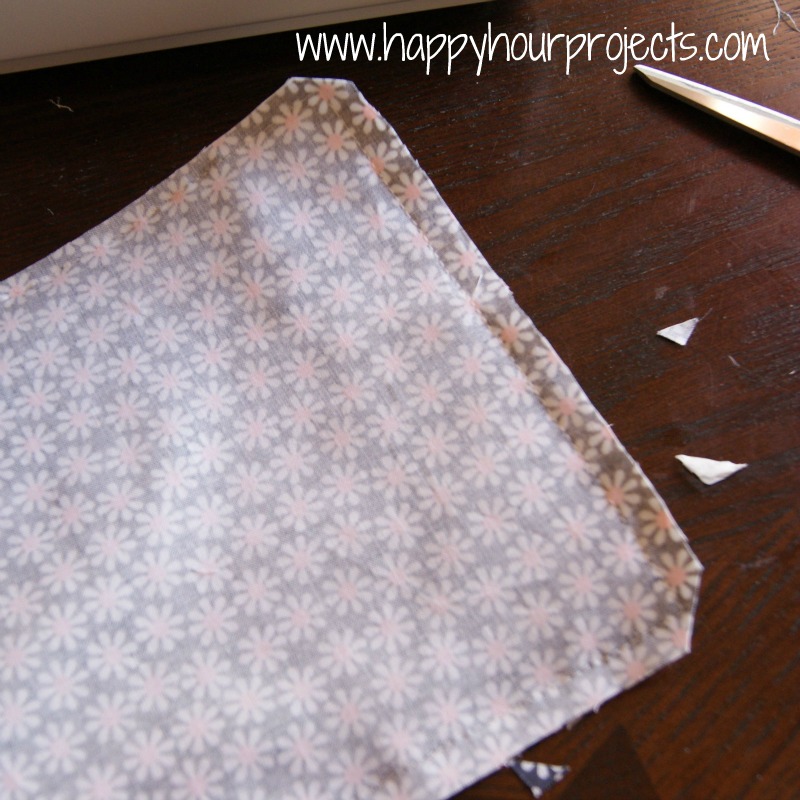
Trim the corners (being careful not to cut over the line you have sewn), and if you have a lot of excess fabric anywhere, trim that too.
Now find your hole, reach inside, and pull the insides out through the hole. If this is the first time you’ve turned fabric, it can be a little alarming, because it can look horribly wrong. Just keep going until you’ve turned the whole thing right-side out through the hole!

Pay extra attention to those corners – you may want to use a chopstick, a knitting needle, or a butterknife to press them out as square as you can get them. Resist the urge to poke your scissors in there… you don’t want to poke a hole in your project now that we’re so close to being done.
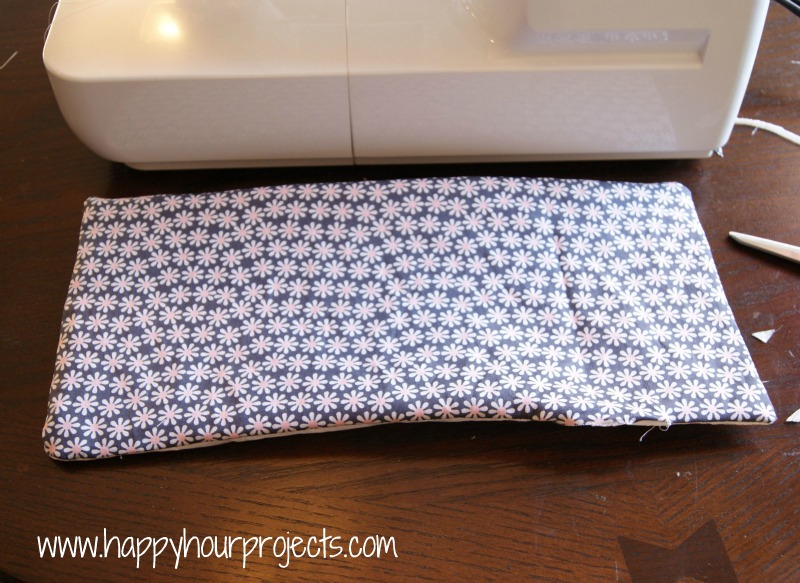
Now, find your hole again, and turn the rough edges sticking out into the hole as best as you can. You may want to pin it shut, though I didn’t bother.
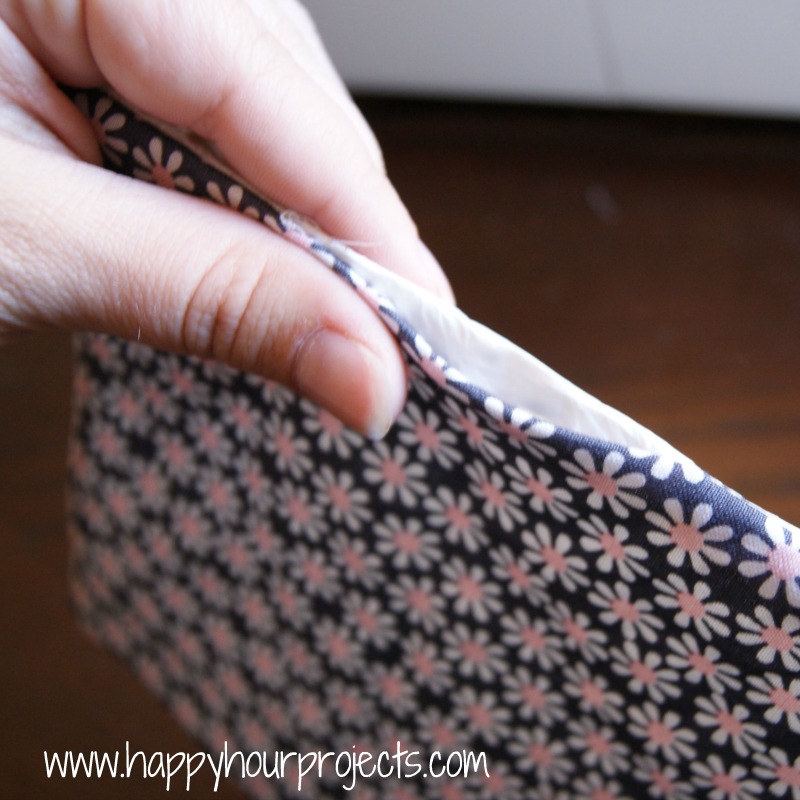
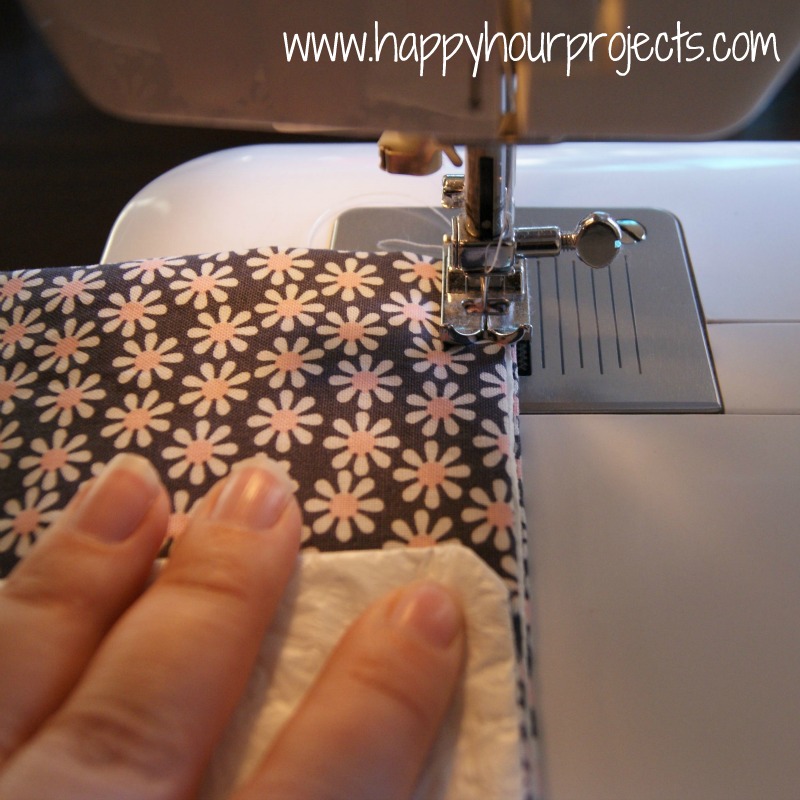
Sew along one of your short ends, as close to the edge as possible. (They call this topstitching – it just keeps your piece as flat as possible after you have seams sewn inside like that.) If you left your hole for turning on one of your ends – then make that the one you sew shut here.

I don’t feel like I got a really good photo pf what I mean, so take a look at this (ahem, low-tech) graphic, and sew along where I’ve put the dotted line.

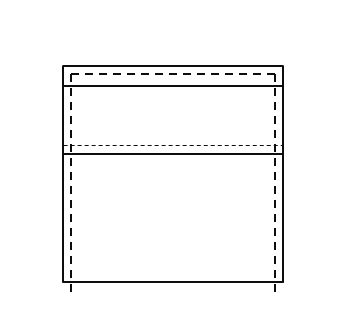
Now, fold up your baggie. You’re going to place your rectangle plastic-side up, with the line you’ve just sewn closest to you. Fold it up, and then form your flap by folding the sewn edge back down again. That sounds really confusing, I know, but take a look, here’s what it should look like. I left 1/2 inch distance from the back of the baggie to the top of the fold, then gave it a 2- 1/2 inch flap. If you had to cut your scraps a little short of 15″, you can make the flap 2 inches and it should still work well.

Now finally, sew from the bottom fold, all along the edge, until you get to the bottom at the other side.
Which, once again, sounds confusing, so I made another graphic to show you what I mean – sew along the heavier dashed line. (The lighter dashed line is the end you just sewed.)
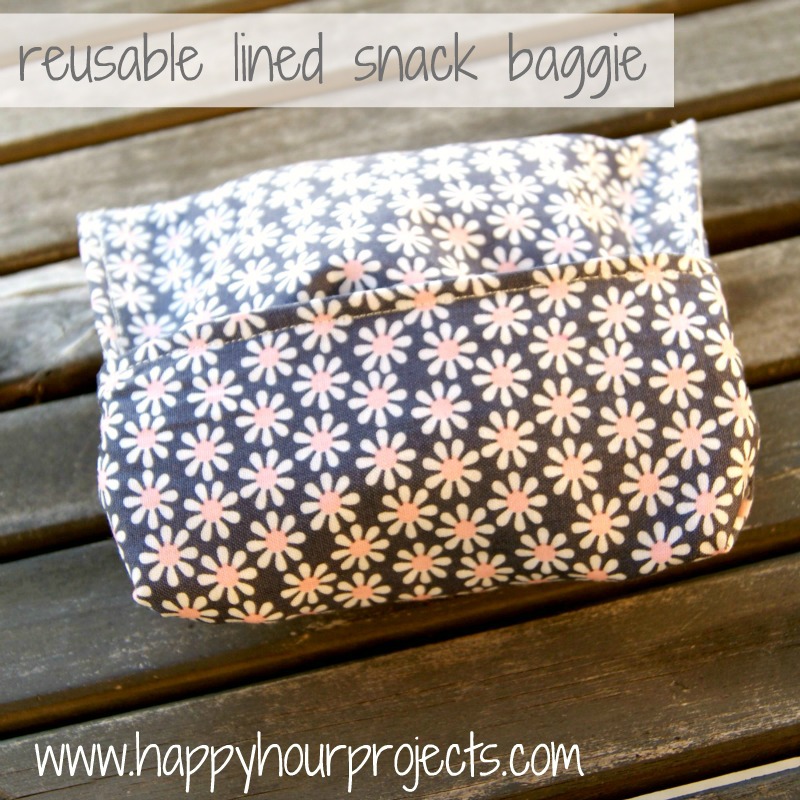
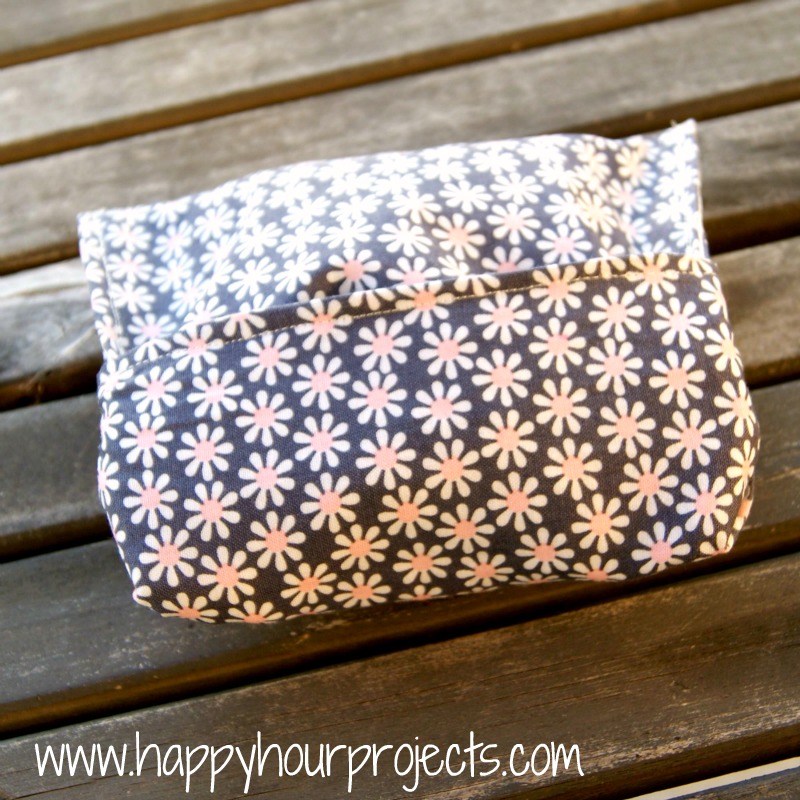
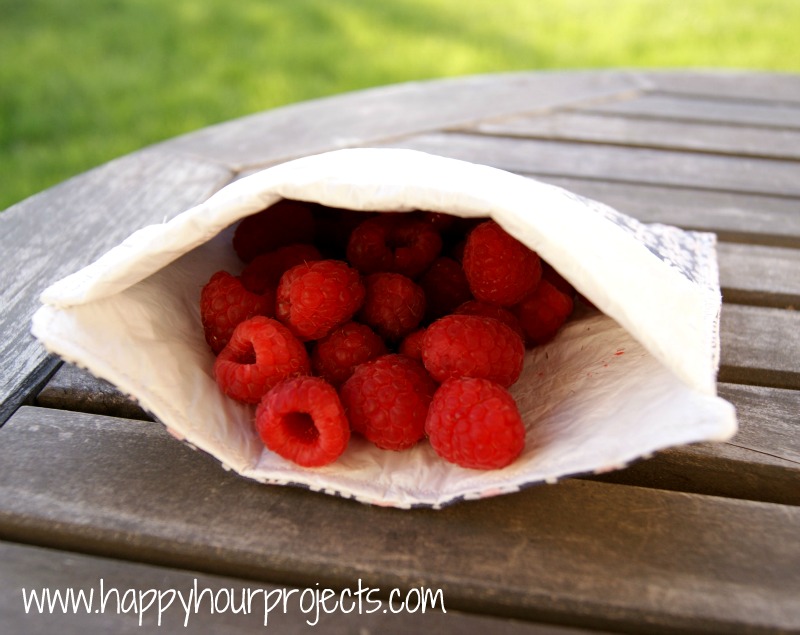
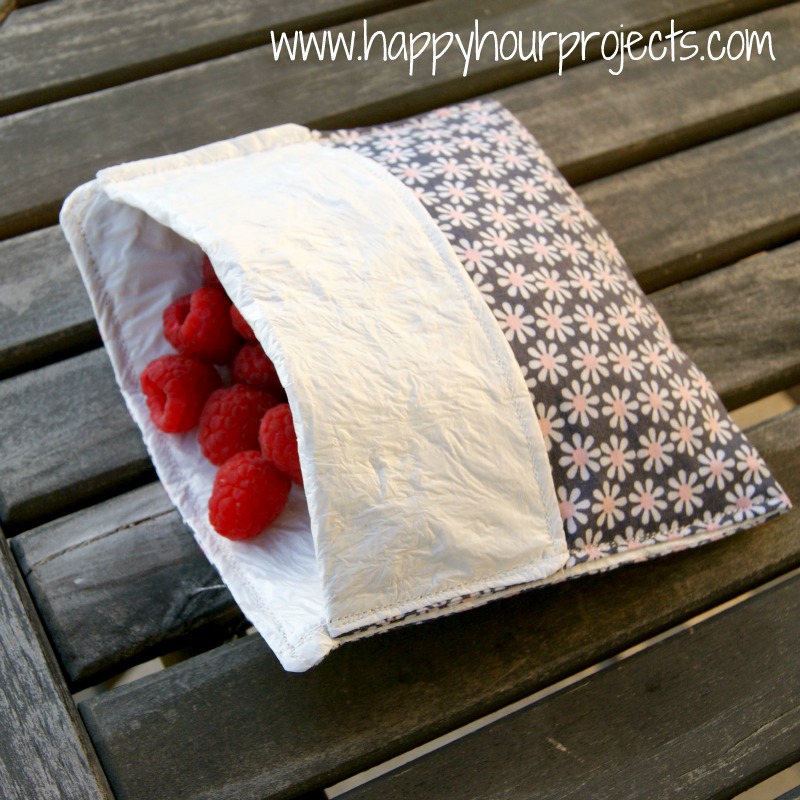
And you are done! Now, you have a baggie that can handle anything plastic can, that’s totally reusable – and pretty, of course! Oh, unless this is for your little mister, in which case it’s probably not “pretty” at all – but I’m sure you’ve made a cool one for him. ;)

You can fill it up, and to close it, fold the flap over the back of the baggie to make a little pouch.
What I love about this is that it can handle things that are damp or may stain (for example, delicious Michigan raspberries, mmm!)
If that happens – you can rinse it right out.
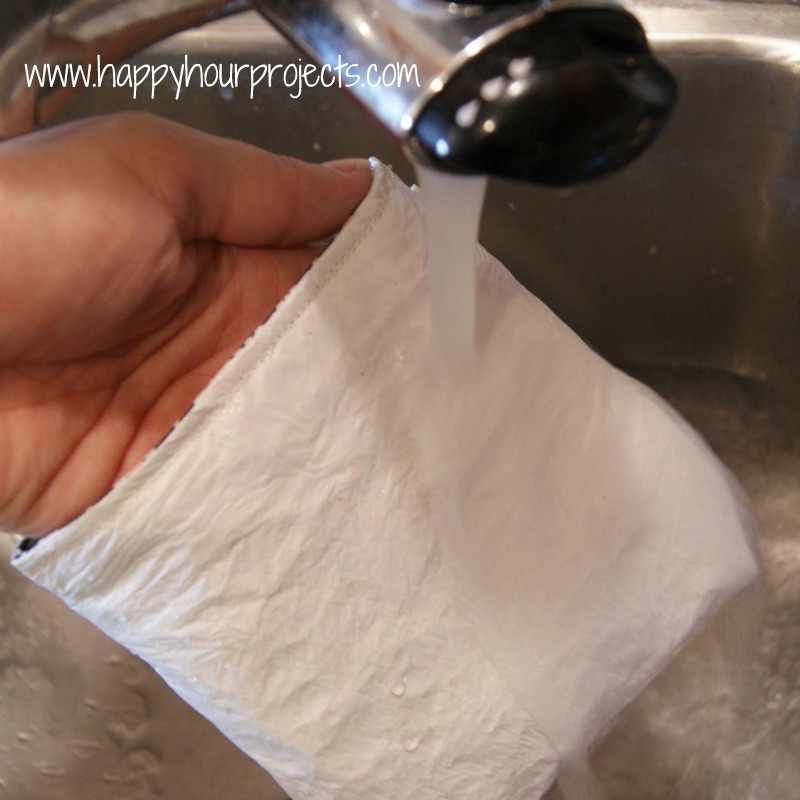
It is water resistant, but not totally waterproof along the seams. So if you fill it with water, it will of course drip a little. I would recommend hand-washing it in the sink and letting it air-dry – I’m not certain it will withstand something like the washing machine, though it will take quite a bit more abuse than a regular plastic baggie!

I am always interested in reusable things and ideas.Thanks for the post.
good post
beneficial content
congratulations have been a very nice sharing
Great project! I love the idea of recycling plastic grocery bags, but I’ve found an even better solution. I used the plastic bags from cereal boxes and my homemade sandwiches bags have stood up to a years worth of washing so far. You only need one inner bag from a box of cereal for each project. They are thick and waterproof without the difficult step of trying to melt the thinner bags together.
Great !!! I love the idea to mealt the bags… but now with your idea using cereal bags… I will try.
Julie, are the cereal bag lined ones machine washable? Or handwash only? I’m making snack bags for a friend, so wanting them to be as low maintanance as possible :)
Do you think the cereal that comes in the bag works too,or are they too thin? Know which ones I’m talking about they are like family size and usually around $3.99?
Woooow, I have been following you Adrianne for eons getting weekly segments of jewelry or hemp projects. Never knew you could sew, this project is super cool! Thanks you, I always want projects easy peasy if possible. You are THE BEST!!!
This has to be one of the best tutorials I have seen and read in a long time! Grea job! I’m looking forward to making some bags!
Hi Adrianne, What a brilliant idea! I definitely need to make these and when I do I will show them on my blog (and link back to you). Well done and thank you for showing us how to do this! Barbara xx
I love this. I stumbled over your post when I searched for a small bag to keep my lunch cool when going to work, things like smoothies, yoghurt and so on. So another idea: why not use those cooling bags you can get at your supermarkt (I’m living in Germany so you can get them at Aldi or Lidl) instead of only plastic bags. You can clean it as well because of the plastic lining. I will definitely try that out ^^
I love this whole project idea. It just occurred to me that the inner plastic liner bags in cereal boxes are both thicker than the market bags being ironed together in the project to make a thicker sheet (which might save a lot of time and work!), and guaranteed food-safe. Might be a good short-cut! I had been thinking about using the stuff for a while, and your idea just made it all come together for me – thanks!
Great idea, Susan. Shame I just threw one of these away a few days ago, I think it’s probably been collected with the rest of the rubbish by now! I just knew there had to be a use for cereal liners.
Barbara xx
I just made 4 of these in less than an hour!
I love this tutorial, and I plan to try this, but not tonight, maybe in the next day or two, what a great idea. I think Walmart or grocery bags will be fine, they put food in them to send home with us. I see no problem, but I wouldn’t microwave food in it.
The plastic bags we get from Walmart have a HOPE #2 symbol on them. According to the seventh generation website, they are not known to leach toxins. This is the same plastic used in milk bottles, etc. The comment area will not let me enter the actual link. It tells me I have too many URLs.
Thank you for sharing, Carol! This is great news for those of us who have been wondering. http://www.seventhgeneration.com/learn/blog/safer-kitchens-bag
I just cut a billion bags!!! going to get started ironing them now :)
I’ve made similar baggies and sandwich wraps. Instead of fusing plastic bags together which may not really be food-safe, I’ve reused plastic cereal bags from boxes of dry cereal. I know it’s food safe plastic and it cuts out a potentially messy step.
Brilliant! I was looking for a way to re-use the packaging food comes in.
Grocery store/shopping bags are NOT safe to use for food products.
Clever idea! You are right about knowing they are food safe. I will definitely be using this idea! Barbara xx
Hi there! I love this idea, such a good one :) I hope you don’t mind, I included it in a list of suggestions for reducing household waste on my blog, http://imalousycook.blogspot.com
If that’s a problem, I can remove it, but I think it’s a great idea!
I loved this and I made one. It works great, but I use velcro to hole the bag together. I will be making many more. Thanks
Made these tonight, took an hour to make two of them and they turned out great! Thanks for the wonderful idea and tutorial!
Just featured this great post…too good not to share!
http://4you-withlove.blogspot.com/2013/01/best-of-2012-yours-and-mine-features.html
I have been wanting to make a few of these for a long time! Thank you so much for posting this tutorial! I am off to pin this and will make a few in 2013!
I love this idea! Gonna try it soon!!
Grocery bags aren't food safe. Don't they rip? Great tutorial but why didn't you use rip stop or something similar?
Hi there! I LOVE this tutorial. It has been featured on my site….here is the link so you can grab the button and post it on your webpage. :))
Grab Your Button: http://sewliciousdecor.wordpress.com/2012/10/16/youve-been-featured.
Link to Post: http://sewliciousdecor.wordpress.com/2012/10/16/how-to-make-a-re-usable-lined-snack-baggie-tutorial
xoxo, Marti
This looks so cool! I really really want to try it but I'm sooooo confused! LOL Confused with the sewing portion. Do you have a video of the process?
Hi Adrianne! Just wanted to let you know I linked to this tutorial in my post about reusable lunch items for my 31 days series. You can check it out here (http://colormedomestic.blogspot.ca/2012/10/green-days-reusable-lunch-items.html) if you like. Have a great day!!
I thought this idea was so cute I just had to feature it on my Top 5 pins of the Week post!
Come on by to to see the post!
XOXO,
Nikki
ncmrsdye.blogspot.com
I agree. Using bags not specifically made for food would not be wise. Perhaps you can purchase food safe plastic? I wouldn't be inclined to use a bag from the grocer etc. there must be an alternative out there.
Great Idea!
I have been looking for a non plastic lunch bag solution for a while. the question I had here was… isn't this a plastic that will leach chemicals into the food? I don't suppose shopping bags are number 5 plastic. The danger does not arise only via microwaving.
I wouldn't microwave them. Even if the plastic can handle it (which I'm not 100% sure about?) that's how BPA's are released – by heating. You don't want to heat anything with food in it unless it's BPA-free (and this would include all plasticware that doesn't specifically say it's BPA free – like re-used cool whip tubs, butter dishes, any kind of plastic jugs). All of these plastic food storage items are fine in studies while refrigerated or kept at room temperature, but once you heat them up, that's when BPA's start leaching into foods.
are they safe to warm up in the microwave?
What a great idea! I am always looking for ideas to use my scraps on! Perfect for the lunch box!
You are too smart! Thanks for linking up at Pin It Wednesday!
I pinned this….Wouldn't these make great “I'm glad you are my teacher” gifts. My teacher friends all pack lunches. And I envy your tutorial writing skills. Lovely post dear!
I tried this but the plastic store bags I have I can not seem to get to work I tried my iron on many different settings and the bags either do not fuse together or just melt completely. And then I thought about you mentioning melting the plastic and to do it in a good room with ventilation. Do you know if it is really safe to put food on the melted plastic??? Just curious…
That was my thought too! These bags are meant to carry things and are probably not rated food safe. Toxins could be leaking into your food…..great idea, but I wouldn’t make it with questionable plastic….
awesome project, Adrianne.
Featuring your project today.
XO
Angie
I appreciate your step-by-step with fusing the plastic. This is the most detailed I've seen. I'll definitely try this as I get ready for back to school in the coming weeks. Thanks!
This is such a smart idea and great easy tutorial! Thank you for sharing on Blog Stalking Thursday! I have featured you with this week's party. Don't forget to stop by and grab a feature button and wear it proudly!
http://www.thecraftyblogstalker.com/2012/08/blog-stalking-thursday-52.html
Featuring YOU today! Thank you for linking up to {wow me} wednesday.
Ginger @ gingersnapcrafts.com
http://www.gingersnapcrafts.com/2012/08/take-look-at-you-my-favorites.html
Thanks so much for uploading it! It is being featued as one of today's top patterns.
Thanks again!
– Jess
Thanks so much for linking up this is a great idea. I just wanted to let you know that I'm featuring this today feel free to stop by and grab a button. I can't wait to see what you have to share this week.
Marissa
http://raegunwear.blogspot.com
This is seriously the coolest, I'm going to make some for when the hubs and I take lunch to work! Just wanted to let you know that I featured this today over at my blog! You can check it out and grab a Featured button here: http://practicallyfunctional.net/2012/07/features-from-the-fun-in-functional-9/
Love the Tutorial!! What a great little project to get the scraps used up! I may whip some up before school starts… box the ends a little for the ones big enough for sandwiches? So cute, thank you!!
Love this!!! That you recycled a plastic bag is simply fantastic. I would love if you uploaded a photo of it into SewSet, a new on-line sewing pattern & tutorial search engine, so others can find it when searching!
Thanks so much for sharing!
– Jess, SewSet.com
I lOVE THIS! Thanks for sharing.
What a GREAT idea! Genius!!
Wow just wow! I love it and want to make one :)
This is awesome! I've been toying around with something to use to line snack bags and this is easy and something we all have on hand (no matter how hard you try not to get more plastic bags!). Can't wait to try it.
I love this idea! The fabric is so cute, and it's a great way to reuse plastic bags :-) Thanks so much for sharing this at The Fun In Functional!
Whoa! That is amazing. I love upcycling. Stopping by from the blog hop. Hope to see you at True Aim! Thanks for sharing.
Great idea. Never thought of making something water resistant using plastic store bags. Thanks for all the great pictures as well. Gail (BibleLoveNotes.com)
Wow! Way to recycle in a realy cute way!
So cool!! I could use some of these! Just not sure if I can do it, haha.
Visiting from “What we wore, read, and made” link party.
– Jaime
http://mrsmamapanda.blogspot.com
Wow – great tutorial! Thanks for sharing at the All Star Block Party
Such a great and cute idea! Thanks for sharing at the All Star Block Party.
Holly
This is genius. I've wanted to make these for a while now but didn't want to go out and buy plastic or vinyl, etc. Using grocery bags is a great idea!
this is so fantastic!! A lot of work, yes, but we go through so many of those plastic baggies, this is great.
This is a great idea! Thanks for sharing the tut!
This would be great for my “protect the environment” daughter. I might play with different sizes for sandwiches, etc. in lunch boxes. Thanks for the tutorial.
Neat project!!