
Today’s project is a fun wrap bracelet that adds a little bling! I have shared a few beaded wrap bracelets before, and this technique is very similar. I am going to categorize this one as an intermediate jewelry project, but if you’ve ever done any weaving, you will find this to be more simple than it looks.

What you will need:

- Cord of your choice – this is a 1mm leather cord in a natural color.
- Rhinestone chain (you should be able to find this in the ball chain section of your craft store) – this is 2.5 mm size in a champagne color
- Glue-on end caps (and clasp) – these are 7mm caps. If you are using thicker cord or larger chain, you will need a larger size
- Coordinating or contrasting thread – mine is silver lame
- Jewelry glue
- Wire Cutters
Cut your cord and chain a few inches longer than you need. For a double-wrap bracelet, I make mine about 13 inches total. Triple wrap would be 19-1/2 inches, or 26 for four wraps. You want a wrap bracelet to fit more snugly than a normal bracelet, so I aim for 6-1/2 inches per wrap, but you can adjust this if your wrist is larger or smaller. The woven portion will also vary slightly depending on how much length your clasp adds – this one adds about 1/2 inch. So ultimately for my bracelet, I wove about 12-1/2 inches for a double wrap, and added a 1/2 inch clasp. Don’t let all the measurements make your head spin – you can also just wrap some cord around your wrist and estimate (that’s what I do)! But I want to be specific for those readers who like exact numbers.
I cut my cords and chain to about 15 inches to work with it, giving me about 2-1/2 extra inches, because once you get close to the end, you will need a little extra length to hold onto, so you can continue to work.
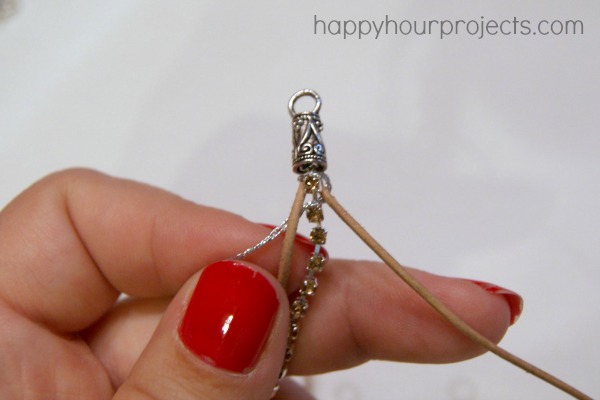
Add some glue to your end cap, and glue your cords and chain into it.

Now, unwind a bunch of thread for this. You can add more later if you come up short, but it will be harder to weave in the ends. I try to work with one continuous piece when I am able to. You will need a length about 2.5 times the length of your bracelet, and you will be doubling it up to work with. So you can be like me and just unravel a couple arm’s lengths, or you can measure about 6 feet of thread for a double wrap, 9 for a triple. I find that more than 9 feet is too difficult to work with all at once, you get too many tangles to make it worth it. So if you are making 4 or 5 (or more) wraps, just pull off about 9 feet at a time, and tie more on as you need it.
Find the center of your thread, and tie it around the top of your bracelet next to the end cap.
Now, to weave. It doesn’t matter which side you start on, I started on the left, so the directions will go from left to right, then back again. You can work right to left if you prefer.
Pass the thread over the left leather cord, under the chain between two rhinestones, and over the right leather cord. Then, wrap it over the right cord so that it’s coming up from the bottom, pass it over the chain in between the rhinestones in the same place, and then under the left cord. This completes one row.
You will repeat this throughout the bracelet – over the right cord, under the chain, over the left. Then wrap it under the left, over the chain, and under the right. I have seen similarly-styled bracelets that say you can just wrap your thread around all three cords, but I tried that and it didn’t work for me at all. What you will end up with is the cords will shift and won’t stay in place. The only way to keep your bracelet flat is to actually weave it like this.
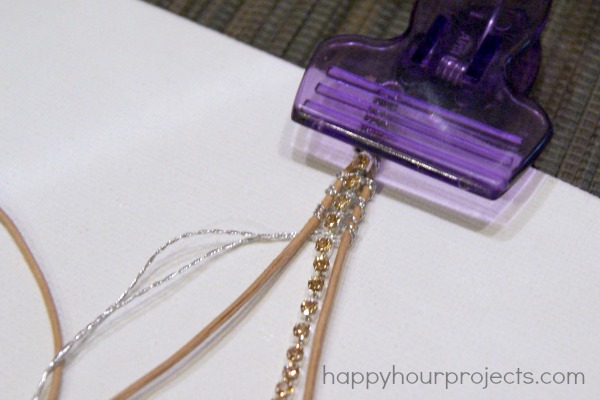
I find it helpful to secure my bracelet with a clipboard, or even a makeshift version like this… yes, that is just a chip clip on a canvas board, because I didn’t feel like going to look for my clipboard. ;)
Check the length against your wrist periodically – and don’t forget that your clasp will add a little length as well. When you get to the end, knot your thread securely. Use your wire cutters to cut off the link immediately after your knot.

Add some glue to your other end cap and glue it on.

Then, just add your clasp, and your bracelet is finished!
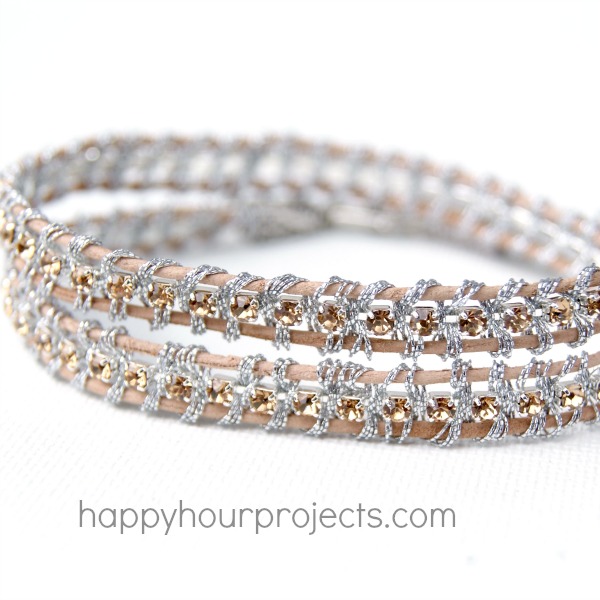
You can try varying the size and color of your cord or rhinestones for totally different looks with the same technique. It would also work for regular ball chain too! If you make this design, I’d love to see the spin you put on it!

I love this bracelet and I am going to have to get busy. I am always looking for things to make for gifts for my family and friends. Because I am totally disabled and live on a small income, besides I love, love, love to do any type of craft. Since I was a kid I sewed, embroidered, crocheted, and lots more. Now I make all sorts of beauty products, jewelry, just about anything you can think of. and my family always loves the gifts I make for them. Besides they love the idea that I took the time to make things for them.
thanks for all these great tutorials!
Is the lame that you used, stretchy?
can u please tell where u found the Clasp that u are showing it’s a lot fancier than i have seen i just did 1 leather wrapping bracelet and i an loving these bracelets and would love to find out where u got the clasp
thank u
Hobby Lobby has them quite often, and Happy Mango Beads was carrying them for a while too (though I haven’t seen them lately). I also use the plainer ones from Consumer Crafts: http://www.consumercrafts.com/store/details/catalog/jewelry-findings-caps/1999-4712 and haven’t had any issues with that kind being out of stock like I have these particular ones!
Wow, that is such a great idea! So pretty!
Very pretty! Love that silver thread :)
Beautiful! Imma pin this right now! :)
I love the way this looks with the silver thread! Very cute!
~Kelsy
Definitely going to try this soon! Although it will mean a dangerous trip to Spotlight… my boyfriend has banned me from going there recently, because I always come home with too many goodies that I can’t afford! I’ll have to make a sneaky exception!