
Hey friends! I’ve got a bracelet tutorial to share with you today that combines silk fibers and pearls for an organic piece with a boho feel. This DIY memory wire bracelet only takes a few supplies and no special jewelry making techniques. If you’ve got a steady hand, even beginners can make a beautiful silk bangle!

Today’s project is sponsored by Happy Mango Beads, which always inspires me to make jewelry using natural and unusual beads and jewelry components. Today’s project is no exception! I’ll leave links to the supplies used below in case you’d like to try this project at home (note – some are affiliate links) for your shopping convenience.

Supplies from Happy Mango Beads:
- 42″ hand stitched silk cord in any color or combination of colors (Sky Blue, Denim Blue, and Dark Denim Blue used here)
- 9mm Large hole irregular potato pearls (Blue)
Other supplies used:
- Bracelet memory wire
- 5mm Memory wire end caps
- Super New Glue
- Memory wire shears
- Bead stopper (not pictured)

To begin, cut 3-4 coils of memory wire. (You can also use more or fewer, depending on your personal taste.) Add a drop of glue to the hole in the memory wire end, and hold it on the end of your wire until it’s dry enough not to fall off as you work.
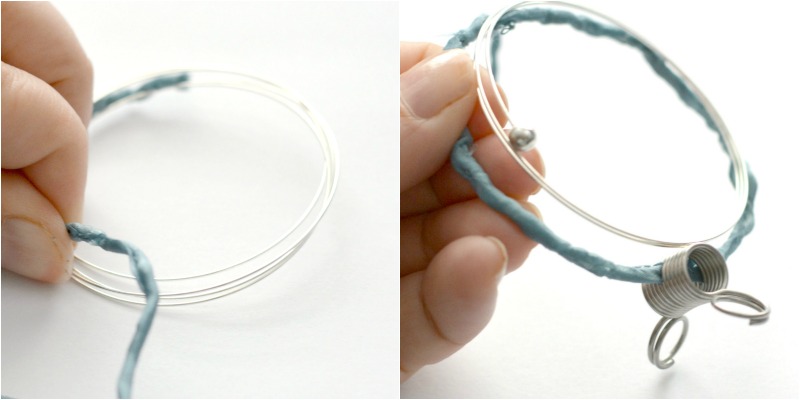
Next, begin slipping the memory wire inside the hand stitched silk. I’d love to tell you that it slips right on in seconds, but you will have to take care during this step not to put the wire through the outer part of the silk. One or two holes can easily be covered with beads in the next step, but you may have to poke the wire through some of the inner layers of silk.
Once you’ve threaded the silk onto about half a coil, you may find it gets too slippery to continue. You can secure the silk to your wire by clamping a bead stopper onto the silk-covered wire so that you can continue threading.
This step is not difficult by any means, but it can’t be rushed. Your finished bracelet will look nicer the more patient you are while working, so put on your favorite podcast or sit down with a friend and be prepared to spend 15-20 minutes working gently with the silk.

I used approximately 20 inches of each color silk – enough to allow for gentle ruching or gathering. For this step, let your own preference be your guide! Do not worry if the silk ends don’t fit nicely together. All the frayed ends (as shown in the above photo) will be tucked in and hidden under pearls.

Finally, you can finish raw edges and hide any holes or thin spots by threading beads onto the end of the memory wire before gluing on the final end cap. I used ten pearls, but you can add more if you have a lot to cover, or if you just prefer more beads!
Next to each end cap, you’ll have a raw end of silk cord. Slipping the pearl up directly next to the end cap will hide this. Any places you changed colors of silk will also need to be tucked inside of pearls to hide the seam. Additional beads should be arranged along the wire in various places.

Fiber jewelry is one of the hot trends this year, and pearls and silk are especially luxurious and surprisingly affordable when you make your own DIY memory wire bracelet!

Thanks for joining me for today’s jewelry project, and I’ll see you all again soon!

Beautiful bracelet! I’m having a very hard time finding silk ribbon that I can put the wire through. Do you know exactly what this type of silk ribbon cord this is called or how I can find it? Thank you for sharing your beautiful project!
It is all the best.
nice post
wow looking good
dear mam
I must say I like your style style. very classy but also very simplw to make. Dumps up for you.
thanks for your nice ideas.
beautiful
Love it!!