• Skip to primary navigation
  • Skip to main content
  • Skip to primary sidebar

Happy Hour Projects

  • home
  • about adrianne
  • buy the books
    • DIY T-Shirt Crafts (2015)
    • DIY Stamped Metal Jewelry (2016)
    • Rock Painting for Beginners (2019)
  • videos
  • crafts
    • diy beauty projects
    • kids’ crafts
    • paper craft projects
    • polymer clay
    • sewing projects
  • jewelry
    • bracelet projects
    • earring projects
    • necklace projects
    • jewelry tools & supplies
  • metal stamping
    • beginners’ tutorial
    • video tutorial
    • project ideas
    • metal stamping supplies
  • recipes
    • cocktail recipes
    • appetizers
    • main and side dishes
    • sweets and treats
  • by season
    • birthdays
    • new year
    • valentine’s day
    • st. patrick’s day
    • easter and spring
    • mother’s day
    • patriotic
    • fall
    • halloween
    • christmas
    • thanksgiving
  • privacy

Silk & Silver Easy Layered DIY Bracelet

04/26/2016 by Adrianne Surian 14 Comments

Hey friends!  If you’re looking for a DIY bracelet tutorial that’s got a bit of boho flair, you’re doing to love this easy design.  Suitable for beginners all the way up to experienced jewelry makers, you won’t need specialty tools or techniques for this project – just scissors, glue, and basic bead stringing!  Silk and silver accents come together in this warm-weather piece that only takes about 10 minutes to create.

Silk & Silver Layered Tube Bead DIY Bracelet at happyhourprojects.com

Today’s design is sponsored by Happy Mango Beads, and I’ll link to the exact products I used in the list below, in case you wish to re-create this design for yourself at home!  While they are a valued sponsor and partner of Happy Hour Projects, they give me free reign to design what I love and to share my style with you.  All ideas and opinions are, of course, my own.

Silk & Silver Layered Tube Bead DIY Bracelet at happyhourprojects.com

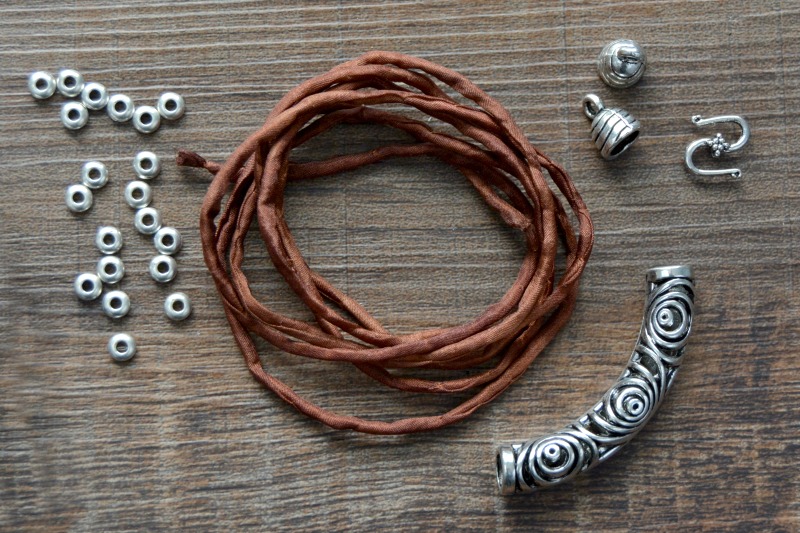
To make this bracelet, you’ll need the following Happy Mango Beads supplies:

  • 42″ Brown Hand Stitched Silk Cord
  • Large Pewter Tube Bead (51mm)
  • 20 – 5mm Pewter Spacer Beads
  • 2 – 11mm Pewter Cap w/Bail
  • Pewter S-Hook

Not Pictured:

  • Jewelry Glue
  • Large-Eye Beading Needle
  • Scissors
  • Ruler

Silk & Silver Layered Tube Bead DIY Bracelet at happyhourprojects.com

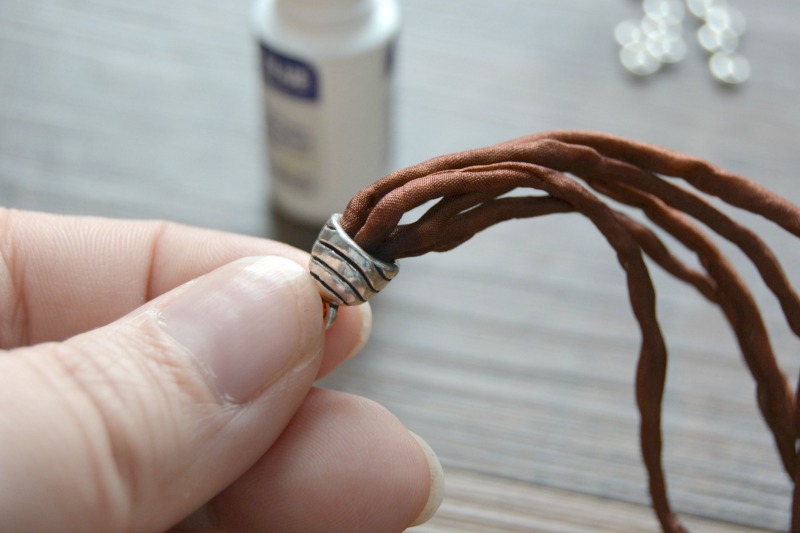
To begin, cut the silk cord into 5 equal pieces (they will be approximately 8.25 inches each).  Add a few drops of jewelry glue to the inside of one of the bead caps, and glue all 5 strands in.  A note on glue: any type of glue that is suitable for both fibers and metal will work!  I am using Super New Glue here which is a fast-drying, liquid base super glue.  It’s a matter of personal preference, but as these silk cords are absorbent fibers, you’ll have to use caution not to add too much glue to the caps – just 2-3 drops will be plenty!  Much more, and you risk the glue being visible at the ends of the cords.  You can also use an epoxy type of glue like E6000 which will not be as absorbent, but it will also need longer to dry.

Silk & Silver Layered Tube Bead DIY Bracelet at happyhourprojects.com

String 2 spacer beads onto each of the five silk cords.  You can of course use more, if you look at my design and think that more silver accents would be better!  However, I only snagged 20 of these beautiful beads on my last shopping spree, so I had to make do with 20.  I did not have much issue at all with slipping the beads directly onto the silk cord, but if you struggle, a large eye beading needle will help with any stubborn individual cords.

Next, gather all 5 cords together, and thread them through the large tube bead.  For this step, you will likely need the aid of a flexible large eye beading needle.  Then, add 2 (or more) spacer beads to each cord.

Silk & Silver Layered Tube Bead DIY Bracelet at happyhourprojects.com

Gather all the cords together, and measure a length of 7 inches on the bracelet.  Cut the excess cords, and glue the second bead cap into place covering the newly-trimmed cords.

At this point, your cords and beads may need to be adjusted slightly to be centered on your bracelet.  The fit of the beads in this project will be loose enough to adjust, but snug enough along the cord that you shouldn’t experience much shifting.

Silk & Silver Layered Tube Bead DIY Bracelet at happyhourprojects.com

Connect the ends with an S-hook (or your favorite type of clasp) to finish the bracelet.  Check the package directions for the glue’s drying time before wearing, but most formulas will be dry enough for wear in in hour or less!

Silk & Silver Layered Tube Bead DIY Bracelet at happyhourprojects.com

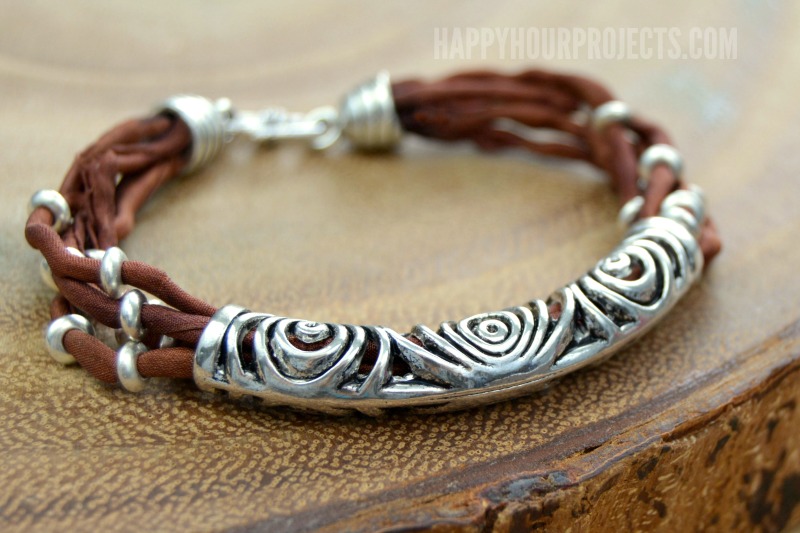
I love the organic look of layered bracelets with natural fibers like silk cord, but don’t forget that the beauty of making a DIY bracelet is that you can use other materials – ribbons, hemp, or even fine chain can transform the look of the piece to make it truly your own.  I hope you enjoyed today’s quick jewelry design with Happy Mango Beads and me!

Adrianne Surian

Filed Under: Bracelets, Fashion, Jewelry, Tutorials Tagged With: 10-minute project, accessories, beads, boho, bracelet, DIY, easy, fashion, Happy Mango Beads, jewelry, layered, silk

copyright policy and terms of use

I love it when you love my work! All tutorials and photos published at Happy Hour Projects are copyrighted. If you would like to feature my tutorial on your website or share it on your social media you may use one photo to feature, as long as you provide a link back to the original post.

If you feature a photo, it may not be accompanied by the project tutorial or recipe, whether in my own words as it originally appears or paraphrased by you. This also includes personal sharing on social media and Pinterest. Publishing multiple photos from a project, or including instructions with an accompanying photo are not permitted and you will be asked to remove them.

I love to share my projects, and my tutorials, recipes, and e-books are ALL free for your personal use. However, photos and ideas that are published to this site are my protected intellectual property. You may print them at home, but please do not copy or distribute them. I also allow all designs to be made and sold at fundraisers, craft fairs, etc. If you are selling a piece made from one or more of my free tutorials in your online shop, I require that you use your own, original photography, and include a link back to my website to credit me as the designer.

I hope you enjoy what you read here, and please be fair when you share!
Previous Post: « Shells and Suede Easy Wrap Bracelet
Next Post: DIY Beaded Arc Wire Necklace »

Reader Interactions

Comments

  1. kanchipuram sarees

    08/18/2018 at 3:40 am

    nice post

    Reply
  2. golu dolls chennai

    08/18/2018 at 3:40 am

    wow looking good

    Reply
  3. Cathy

    08/13/2016 at 5:01 pm

    Great job! I really like this Bracelet
    You are so creative!
    Thank you for the ideas!!
    Cathy

    Reply
  4. Diana

    07/01/2016 at 12:55 pm

    Thank you! I’m a beginner and your detail instructions and pictures are EXCELLENT! All I have to do is run off the instructions and purchase the materials,
    Please! Continue posting your amazing designs,
    So appreciative,
    Diana

    Reply
  5. Marianne Rao

    06/26/2016 at 9:12 am

    Hi! Love your designs and tutorials….. am surely going to make a few:)

    Reply
  6. marie reine

    06/16/2016 at 9:08 pm

    j’aime ce que tu fais, très généreux de partager avec nous tes modelés j’apprécie beaucoup

    Reply
  7. Kandee

    04/27/2016 at 12:01 pm

    Love this!

    Reply
  8. Mostgirlicious

    04/26/2016 at 7:04 pm

    This is such a great look – it can be boho or elegant, depending on the color of cord. I love this – you are very inspiring.
    Thanks!

    Reply
  9. Olivia

    04/26/2016 at 5:07 pm

    So beautiful. You should create a book with all your ideas. The photography is very good in detail and color interest too. Thanks for inspiring my creativity. You really are pretty awesome.

    Reply
  10. Aleta

    04/26/2016 at 3:30 pm

    I LOVE, LOVE LOVE this bracelet! You are such a Fabulous designer.

    Thank you for sharing with us.

    Reply

Trackbacks

  1. Happy Hour Projects | Pearltrees says:
    05/17/2017 at 11:40 am

    […] Easy DIY Initial Necklace – Happy Hour Projects. Autumn Memory Wire Bracelet – Happy Hour Projects. Easy DIY Flower Mirror Set – Happy Hour Projects. Easy DIY Necklace | The Agate Slice – Happy Hour Projects. Simple Stone DIY Bead Necklace – Happy Hour Projects. Double Charm DIY Hand Stamped Necklace. Easy DIY Drop Earrings – Happy Hour Projects. Easy Embossed DIY Earrings – Happy Hour Projects. How to Make a Wire Wrapped Bead Pendant – Happy Hour Projects. Follow Your Heart Hand Stamped Necklace | Stamping Round Blanks – Happy Hour Projects. It Was a Craft-Tastrophe! | Craft Room Organization – Happy Hour Projects. DIY Wire Heart Necklace – Happy Hour Projects. Figure Eight Wire Earrings – Happy Hour Projects. Silk & Silver Easy Layered DIY Bracelet – Happy Hour Projects. […]

    Reply
  2. One Pretty Thing | Pearltrees says:
    10/21/2016 at 1:25 am

    […] hair and makeup. String Wrapped Bangles. How to Make Tree Branch Wire Bracelet With Orange Beads. Silk & Silver Easy Layered DIY Bracelet – Happy Hour Projects. Hey friends! If you’re looking for a DIY bracelet tutorial that’s got a bit of boho flair, […]

    Reply
  3. 17 Amazing DIY Spring-Inspired Jewelry Projects - Style Motivation says:
    05/02/2016 at 8:51 am

    […] happyhourprojects.com […]

    Reply
  4. CraftCrave | DigiFree | CraftCrave says:
    04/27/2016 at 1:56 pm

    […] Silk & Silver Easy Layered DIY Bracelet – 1 freebie(s)? […]

    Reply

Leave a Reply Cancel reply

Your email address will not be published. Required fields are marked *

Primary Sidebar

Hello, and welcome! I'm Adrianne, an artist, author, designer, and blogger in mid Michigan. I work from home, chase my two kids, and this once-city-girl is learning how to care for chickens and adjusting to life out in the country. I have a compulsion for daily creativity... sometimes it's jewelry-making, paper crafting, metal stamping, mixing and baking, or giving new life to recycled items. But with 2 young kids, time is short! My goal here at Happy Hour Projects is to share projects and tips that you can do in an hour or less. The ideas you find here are designed to add a little creativity in your day, no matter how much (or how little) time you have!

BUY MY BOOKS!

Copyright © 2021 Happy Hour Projects on the Foodie Pro Theme