
Hey friends! Today’s project is for the metal stamping fans (or for those of you considering trying it!) and it’s a great project all season with a winter theme. I’ll be showing you how to combine various design stamps together to create unique snowflake images that are beautiful for tying on packages or even to incorporate into your DIY jewelry designs!

I’ve been working with design stamps a lot more frequently lately, because I’m finding there are so many ways to bring textures and images to life to fill a blank disc. I’m also finding that unexpected shapes can make for some interesting patterns. Each combination of stamps creates a unique overall design – just like real snowflakes. With that in mind, it was only logical that I stamp up some winter-inspired discs as package tie-ons with the help of today’s post sponsor, Beaducation!
I’m using the following products in today’s post, but I encourage you to get creative with the shapes you may already have, or may have your eye on to buy for another project!
- Steel Block (or use the Metal Stamping Starter Kit)
- 1 lb. Brass Hammer
- Acrylic Paint Dabber or a Sharpie Marker and polishing cloth (the marker and cloth is included with the starter kit)
- 1″ Aluminum Circle Blank(s)
- Tiny Fat Lined Heart Stamp
- Triangle Curve Design Stamp
- Broken Arrow Design Stamp Set
- 2mm Uppercase Kismet Stamp Set
- Hole Punch Pliers
- Fine-tip Marker and Ruler

First, begin by drawing the basic lines to follow to create a 6-pointed snowflake. I used a fine-tip marker and ruler and drew three intersecting lines. I’ll be honest – I just went by eye to get the spacing right for my six lines. They were slightly off, but that’s kind of the challenge and the charm when you’re stamping by hand. As long as you’re close, the overall look will overshadow any stamping errors!
There are a couple of features that I want to draw your attention to from Beaducation – first, the aluminum blanks have a protective plastic film on them that peels off. This prevents scratches in shipping, storage, and while stamping, and it also makes it easy to wipe off any marker lines you want to get rid of. It also means that after stamping, you’ll need to remove the plastic film from your piece before darkening and polishing it.
The second feature that I want to point out is the chiseled ends of the design stamps. This may appear to be a small detail at a glance, but it aids stamp placement in a BIG way. You can much more easily align stamps EXACTLY where you intend to stamp them, because instead of trying to center a large stamp, you can actually see down the shaft all the way to the design itself. Trust me – this is a great feature!

I stamped a pattern along each of the lines using arrows, hearts, and the curved border stamp. In the center, I used a 2mm letter stamp to add an initial (which is totally optional). Now, remove the film and darken your aluminum blank either with acrylic paint or permanent marker. (The acrylic paint is slightly more messy but wipes away cleanly, and the permanent marker will hold up longer over time but requires you to polish it fully with a polishing cloth or polish pads. However, since these are gift tags and won’t get daily wear, I opted for the easy route and used paint.)
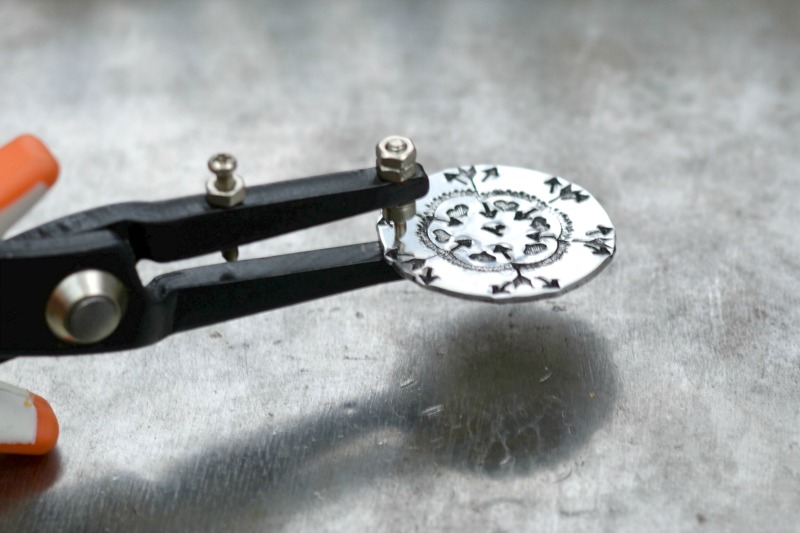
Finally, just punch a hole in the disc so that you can tie it onto a special gift! You’ll need to use twine or cord for attaching the disc to packages, but commercial tie-ons use string as well so it won’t look strange even when used with a wide bow or ribbon.

The fun part about these tie-ons is that they are perfectly suitable for incorporating into jewelry, or attached to a keychain, so your gift recipient can enjoy your embellishment for as long as they would like to – or, they can also be saved and re-used in future years.

Before I close this post, I want to share some of the trendy new design stamps that have just been released! While they didn’t suit my project today (although with a larger disc, you could have a lot of silly fun making these into snowflakes!) I couldn’t resist sharing the brand new succulent and camper designs. Aren’t they adorable??

Thanks for joining me for today’s fun and festive project, and I hope you enjoy creating your own snowflakes by looking at design stamps in a new way!

Note: As a Beaducation blogger, I received certain products free of charge to help me create a free tutorial for my readers. All opinions and ideas are – as always – my own.
In Geometry Dash SubZero, players can start in any of the three levels they choose. For the best experience, though, it is suggested that they start with the easier levels and work their way up to learn how to handle and time the game.
These snowflake gift tags are such a cute idea! I’ve been looking for some personalized ways to dress up my presents this year. The metal stamping seems like a fun way to get creative, and I can already imagine customizing them with different colors of ribbon. It’s almost like designing your own miniature drift cars, only with snowflakes! I might have to try this out – thanks for the inspiration!
i like it
wow looking good
This is the best way we are knowing to get the credit card here.