• Skip to primary navigation
  • Skip to main content
  • Skip to primary sidebar

  • home
  • about adrianne
  • buy the books
    • DIY T-Shirt Crafts (2015)
    • DIY Stamped Metal Jewelry (2016)
    • Rock Painting for Beginners (2019)
  • videos
  • crafts
    • diy beauty projects
    • kids’ crafts
    • paper craft projects
    • polymer clay
    • sewing projects
  • jewelry
    • bracelet projects
    • earring projects
    • necklace projects
    • jewelry tools & supplies
  • metal stamping
    • beginners’ tutorial
    • video tutorial
    • project ideas
    • metal stamping supplies
  • recipes
    • cocktail recipes
    • appetizers
    • main and side dishes
    • sweets and treats
  • by season
    • birthdays
    • new year
    • valentine’s day
    • st. patrick’s day
    • easter and spring
    • mother’s day
    • patriotic
    • fall
    • halloween
    • christmas
    • thanksgiving
  • privacy

Happy Hour Projects logo

07/09/2014

Spiral Clasp Wrapped Cord Bracelet

Good morning!  I’ve got a simple design to share with you today that doesn’t take any weaving, beading, or even special techniques or tools.  If you can wrap and use glue, then you can make this bracelet.  It’s a fast project, which is always my favorite.  Here’s the two-tone design with natural cords, where the spiral clasp is the star:

Spiral Clasp Wrapped Cord Bracelet at www.happyhourprojects.com

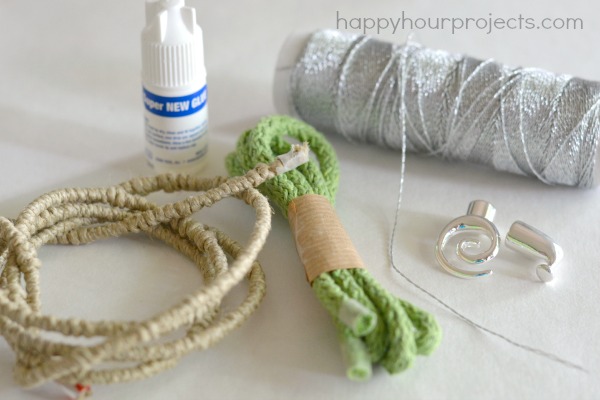
Supplies to make your own easy wrapped bracelet:

  • Spiral clasp – I got mine at Goody Beads.  It’s available in a 3.2mm size and a 6.2mm size, but now that I’m sitting down to write this post, I see they’re both sold out this week.  I used the 6.2mm size that you will find in the 5mm leather category when it’s back in stock, if you’re looking for this exact clasp.  This style would work for any decorative clasp, though – so get creative!
  • Cotton, hemp, or bamboo cord in coordinating colors.  This can be any size, as long as the total diameter fits your end cap.
  • Contrasting thread – I used silver to match my clasp, but again – this style is only limited by the colors and textures you dream up.
  • Scissors and jewelry glue

Spiral Clasp Wrapped Cord Bracelet at www.happyhourprojects.com

This bracelet is easy to construct, and the only thing you’ll need to be careful of is keeping your cords at an even tension as you wrap (if one gets longer than the other, it will curve).  Oh, and also not gluing yourself.  But hey, that happens to even the best of us, sometimes.  Ahem.

Cut your cords at about 8 inches (more or less, if your wrist is larger or smaller).  You may also want to make adjustments if your clasp is especially large or small, because that will add length once you glue it on.  8 inches is more than you need for length, but you will want at least 1/2 inch on each end to work with and trim off at the end.  You may notice below that I’ve taped my ends before cutting them off – larger woven cords may need to be cut this way to hold together.

Just tie a knot, and begin wrapping the end!  I wrapped about 3/4 inch.

Spiral Clasp Wrapped Cord Bracelet at www.happyhourprojects.com

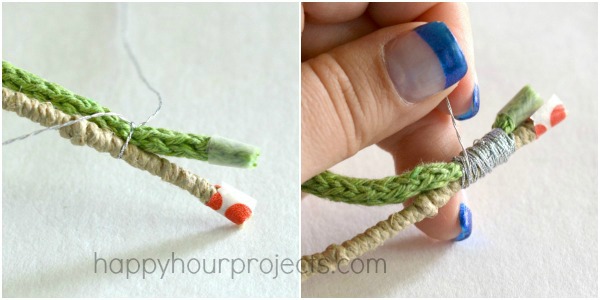
Once your end is tightly wrapped (and you’ve checked that it will fit into your end cap), wrap down the length of your cords to the other end.  Wrap that end with a tight wrap to match your starting point.  I also wrapped back to the beginning to give my wraps a criss-crossed look, but that’s totally up to your style.

Spiral Clasp Wrapped Cord Bracelet at www.happyhourprojects.com

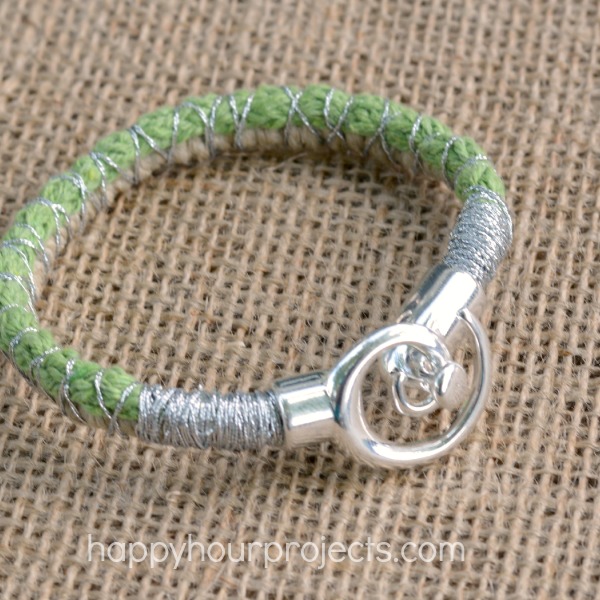
To finish it off, tie a knot at the end, and trim the cord ends closely.  Add a few drops of glue to your end cap (making sure to get all the way around the cap) and add the end cap on.  I waited to trim my thread until I knew it was securely glued.

Spiral Clasp Wrapped Cord Bracelet at www.happyhourprojects.com

Add the other end of the clasp to the other end of your bracelet, making sure it’s rotated so that the ends will clasp together (and that one end isn’t twisted to an odd angle).  And that’s it!  When the glue dries in about 5 minutes, it will be ready for wear – making this piece about a 10-minute design.

Spiral Clasp Wrapped Cord Bracelet at www.happyhourprojects.com

I went with earthy colors here, but I’m thinking a neon combo with embroidery thread would also be adorable.

Spiral Clasp Wrapped Cord Bracelet at www.happyhourprojects.com

What colors are you wearing this summer, anyway?  I’m curious what’s hot in your neck of the woods!

Adrianne Signature

Filed Under: Bracelets, Fashion, Featured, Jewelry, Tutorials Tagged With: 10-minute project, accessories, bracelet, cord, easy

copyright policy and terms of use

I love it when you love my work! All tutorials and photos published at Happy Hour Projects are copyrighted. If you would like to feature my tutorial on your website or share it on your social media you may use one photo to feature, as long as you provide a link back to the original post.

If you feature a photo, it may not be accompanied by the project tutorial or recipe, whether in my own words as it originally appears or paraphrased by you. This also includes personal sharing on social media and Pinterest. Publishing multiple photos from a project, or including instructions with an accompanying photo are not permitted and you will be asked to remove them.

I love to share my projects, and my tutorials, recipes, and e-books are ALL free for your personal use. However, photos and ideas that are published to this site are my protected intellectual property. You may print them at home, but please do not copy or distribute them. I also allow all designs to be made and sold at fundraisers, craft fairs, etc. If you are selling a piece made from one or more of my free tutorials in your online shop, I require that you use your own, original photography, and include a link back to my website to credit me as the designer.

I hope you enjoy what you read here, and please be fair when you share!

Reader Interactions

Comments

  1. Carol says

    07/11/2014 at 11:41 am

    Love this idea! Saw this at LooksiSquare and had to come visit. I have a weekly link party on Fridays. Would love for you to share :)

    Reply
  2. Martha says

    07/10/2014 at 7:43 am

    I have enjoyed your emails. Just wanted you to know that were I younger I would try every one of your ideas. Reading them and thinking about gives me so much joy. You are a reall smart woman and it shows with every creation you share.
    Thank you.

    Reply

Leave a Reply Cancel reply

Your email address will not be published. Required fields are marked *

Primary Sidebar

Hello, and welcome! I'm Adrianne, an artist, author, designer, and blogger in mid Michigan. I work from home, chase my two kids, and this once-city-girl is learning how to care for chickens and adjusting to life out in the country. I have a compulsion for daily creativity... sometimes it's jewelry-making, paper crafting, metal stamping, mixing and baking, or giving new life to recycled items. But with 2 young kids, time is short! My goal here at Happy Hour Projects is to share projects and tips that you can do in an hour or less. The ideas you find here are designed to add a little creativity in your day, no matter how much (or how little) time you have!

BUY MY BOOKS!

Copyright © 2026 Happy Hour Projects on the Brunch Pro Theme