• Skip to primary navigation
  • Skip to main content
  • Skip to primary sidebar

  • home
  • about adrianne
  • buy the books
    • DIY T-Shirt Crafts (2015)
    • DIY Stamped Metal Jewelry (2016)
    • Rock Painting for Beginners (2019)
  • videos
  • crafts
    • diy beauty projects
    • kids’ crafts
    • paper craft projects
    • polymer clay
    • sewing projects
  • jewelry
    • bracelet projects
    • earring projects
    • necklace projects
    • jewelry tools & supplies
  • metal stamping
    • beginners’ tutorial
    • video tutorial
    • project ideas
    • metal stamping supplies
  • recipes
    • cocktail recipes
    • appetizers
    • main and side dishes
    • sweets and treats
  • by season
    • birthdays
    • new year
    • valentine’s day
    • st. patrick’s day
    • easter and spring
    • mother’s day
    • patriotic
    • fall
    • halloween
    • christmas
    • thanksgiving
  • privacy

Happy Hour Projects logo

11/22/2016

Stacked Stone + Pewter Pendant

Hey friends!  I’ve been back in the studio after a hectic start to this month and I have a tutorial to share with you today for making this earthy, nature inspired pendant.  The stacked stones have an almost zen appeal, and the tiny pewter accents give it a little shine!  I’ve worn this piece out a few times, and every time, without fail – someone has asked where I got it.

Stacked Stone + Pewter Pendant at happyhourprojects.com

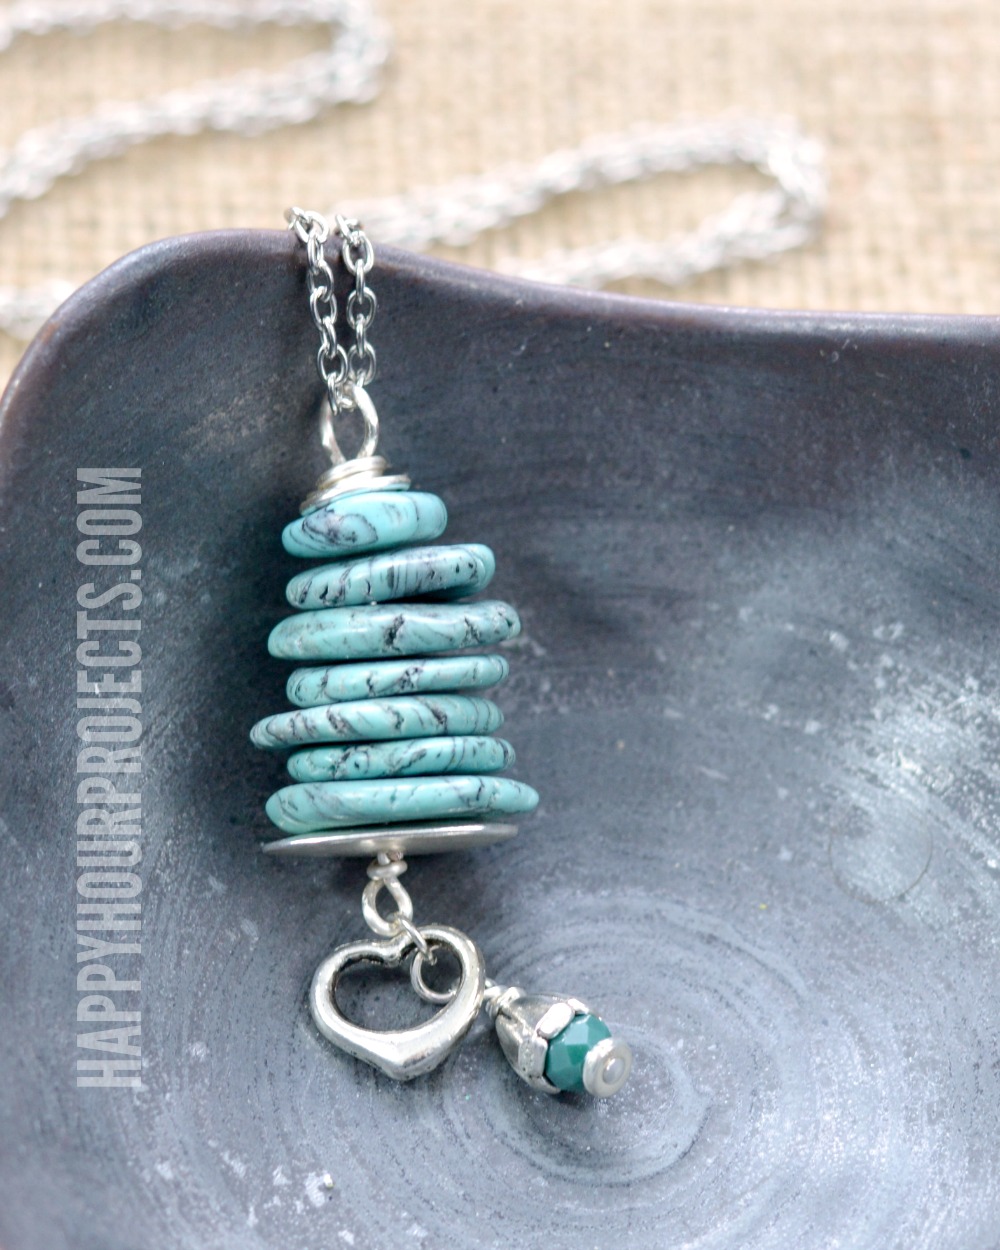
And I get to say, I made it.  And you can, too!  Happy Mango Beads is sponsoring today’s design and I’ll link to all the products I used from their store in the list below so that you can click and buy, if you would like to.  I love the natural elements that Happy Mango Beads is known for – it’s my go-to source when I’m looking for something rustic, organic, or unusual.
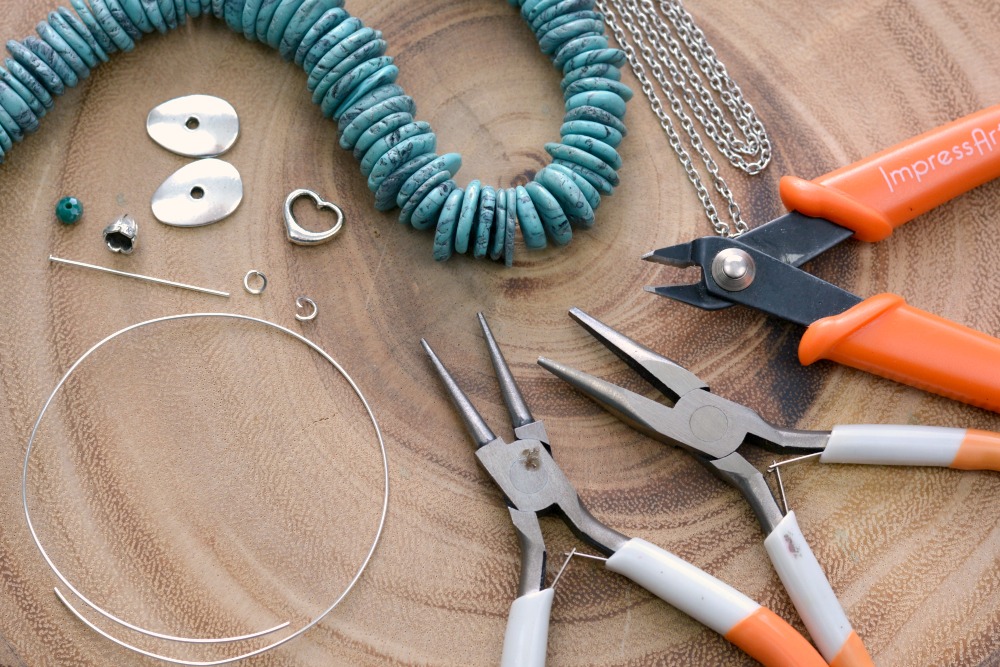
Stacked Stone + Pewter Pendant at happyhourprojects.com

Supplies:

  • 7 howlite disc beads, varied sizes (these range from 9mm – 23mm)
  • 18mm oval pewter disc bead
  • 11mm pewter open heart charm
  • 6mm pewter bead cap
  • 4mm rondelle crystal bead (I used a teal color to match)
  • Decorative pewter head pin
  • 30? 2mm Cable Chain
  • 6 ” 18-Gauge Silver Plated Copper Wire
  • 3 – 5mm Jump Rings
  • Round Nose Pliers
  • Chain Nose Pliers
  • Wire Cutters

Stacked Stone + Pewter Pendant at happyhourprojects.com

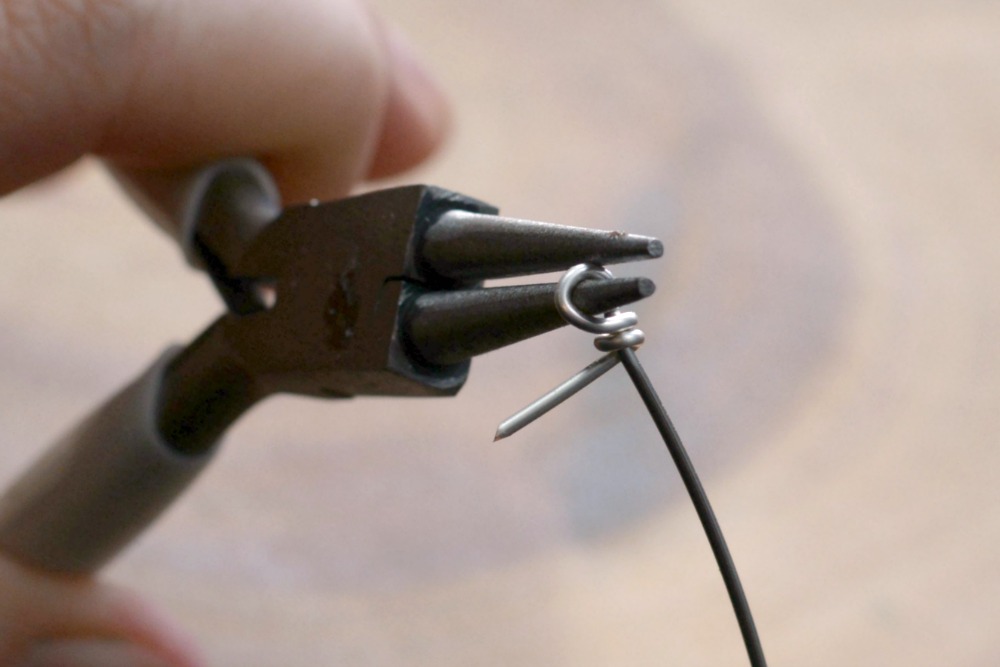
Begin by cutting a length of wire approximately 8 inches long.  (This doesn’t have to be exact – you’ll be trimming any excess off.)  About an inch from one end, wrap your wire around one side of your round nose pliers, forming a loop.  Next, wrap 2-3 times around the wire itself under the loop, as shown above.  Trim off the excess wire.

Stacked Stone + Pewter Pendant at happyhourprojects.com

Next, stack one pewter disc bead onto the wire so that it rests against the loop you just made.  Then, add stone beads in a graduated pattern from largest to smallest.  There’s a lot of flexibility in this step; you can try different sizes or shapes together to see what you like the looks of best.  I used flatter stones and added seven.  You may enjoy the look of more or less!  Once you’re happy with your stack, create a large loop in the wire at the top of the stones.

Stacked Stone + Pewter Pendant at happyhourprojects.com

Wrap the tail end of the wire around, between the loop and the top of the stones to fill the gap between.  I continued to wrap several times, creating a spiral on top of the smallest stone.  Because we’re working with irregular elements, don’t focus on the number of times to wrap or the exact dimensions to create, but rather let the stones you have selected guide you.  Each necklace will be slightly different, and unique from all the others!

Stacked Stone + Pewter Pendant at happyhourprojects.com

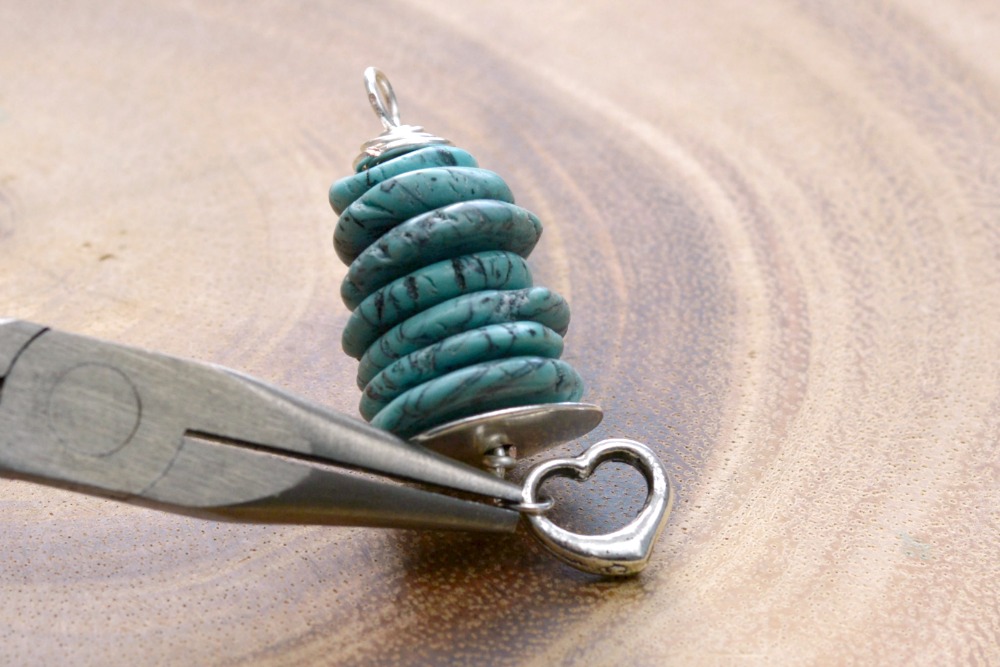
Next, attach a charm or two at the bottom of the stone stack with a jump ring.  I used an open heart bead, and then at the last minute also decided that I wanted to bring the color down further.  I threaded a 4mm teal rondelle crystal glass bead onto a head pin, added a bead cap so that the bead was just barely peeking out, and wrapped the top of the charm in the same way as I finished the stacked stones – form a loop, and wrap the wire around the pin.  Trim off the excess wire.

This is another area where you may wish to add different elements, attaching each charm at the bottom with a 5mm jump ring.

Stacked Stone + Pewter Pendant at happyhourprojects.com

Finally, I strung the pendant onto a long (30″) chain.  Because I slip the long necklaces over my head, I typically don’t bother to add a clasp to them, I just attach the two ends of the chain together with a jump ring!  You can of course add a lobster clasp to finish yours – especially if you’re planning to sell your pieces, or planning to shorten the chain to a length that might not slip over everyone’s heads.

This piece is easy to make once you’ve mastered basic wire wrapping, and jewelry artists with some experience will find that this piece comes together in 10 minutes or less!

Thanks for joining me for today’s quick stone necklace tutorial, and I’ll see you again soon!

Adrianne Surian

Filed Under: Fashion, Jewelry, Necklaces, Tutorials Tagged With: 10-minute project, accessories, beads, DIY, gifts, Happy Mango Beads, jewelry, necklace, pendand, stone

copyright policy and terms of use

I love it when you love my work! All tutorials and photos published at Happy Hour Projects are copyrighted. If you would like to feature my tutorial on your website or share it on your social media you may use one photo to feature, as long as you provide a link back to the original post.

If you feature a photo, it may not be accompanied by the project tutorial or recipe, whether in my own words as it originally appears or paraphrased by you. This also includes personal sharing on social media and Pinterest. Publishing multiple photos from a project, or including instructions with an accompanying photo are not permitted and you will be asked to remove them.

I love to share my projects, and my tutorials, recipes, and e-books are ALL free for your personal use. However, photos and ideas that are published to this site are my protected intellectual property. You may print them at home, but please do not copy or distribute them. I also allow all designs to be made and sold at fundraisers, craft fairs, etc. If you are selling a piece made from one or more of my free tutorials in your online shop, I require that you use your own, original photography, and include a link back to my website to credit me as the designer.

I hope you enjoy what you read here, and please be fair when you share!

Reader Interactions

Comments

  1. kanchipuram sarees says

    08/18/2018 at 3:00 am

    nice post

    Reply
  2. golu dolls chennai says

    08/18/2018 at 2:59 am

    wow looking good

    Reply
  3. Stacey says

    05/17/2017 at 12:54 pm

    Gorgeous pendant!! I really want to make this, but I am having trouble finding the howlite disc beads on the “Happy Mango” site. Are there any other beads that you could recommend?

    Thanks so much!

    Stacey

    Reply
  4. wendy says

    12/12/2016 at 11:44 am

    it’s a really lovely pendent!

    Reply

Trackbacks

  1. Happy Hour Projects | Pearltrees says:
    05/17/2017 at 11:12 am

    […] Brass + Crystal Teardrop DIY Earrings – Happy Hour Projects. Silk + Pearl DIY Memory Wire Bracelet – Happy Hour Projects. Easy DIY Jewelry | Beaded Hemp Bracelet – Happy Hour Projects. Sea Glass + Pearl Charm Necklace – Happy Hour Projects. DIY Leather Bracelet + Bling Beads – Happy Hour Projects. Mad Love Hand Stamped Necklace + Starter Set Giveaway – Happy Hour Projects. Stacked Stone + Pewter Pendant – Happy Hour Projects. […]

    Reply
  2. CraftCrave | DigiFree | CraftCrave says:
    11/23/2016 at 4:42 am

    […] Stacked Stone + Pewter Pendant – 1 freebie(s)? […]

    Reply

Leave a Reply Cancel reply

Your email address will not be published. Required fields are marked *

Primary Sidebar

Hello, and welcome! I'm Adrianne, an artist, author, designer, and blogger in mid Michigan. I work from home, chase my two kids, and this once-city-girl is learning how to care for chickens and adjusting to life out in the country. I have a compulsion for daily creativity... sometimes it's jewelry-making, paper crafting, metal stamping, mixing and baking, or giving new life to recycled items. But with 2 young kids, time is short! My goal here at Happy Hour Projects is to share projects and tips that you can do in an hour or less. The ideas you find here are designed to add a little creativity in your day, no matter how much (or how little) time you have!

BUY MY BOOKS!

Copyright © 2022 Happy Hour Projects on the Brunch Pro Theme