
I had so much fun with today’s idea, guys. It was one of those light bulb ideas after having seen some serving utensils where you could add your own beads – I picked up a canape knife knowing I wanted to do something with it, but not quite sure of what. I saw some new cube-shaped metal blanks – and bam! Instantly personalized serving utensils! What a fun hostess gift or party accessory, don’t you think?

In case you missed it, I shared the easy recipe for a ham & onion cheese ball last week, so if you’re not sure what you’d use a canape knife for, I have a 4-ingredient appetizer you can bring to your next party. :) I make the cheese ball for all our get-togethers because it’s easy and popular – which is why I picked up the little bead-able knife when I saw it. I knew I’d use it!

I found my supplies at Goody Beads, and I’ll share links below in case you’re looking to make this project. If you decide to make a purchase through any of these links, it does support my blog at no extra cost to you (and thank you!) which helps me design even more free projects to share with you.
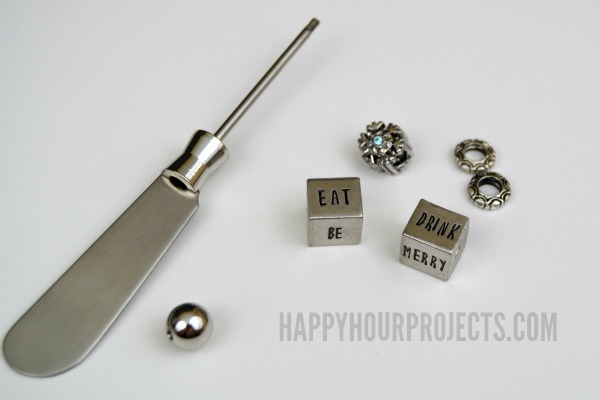
Here’s what you’ll need to make personalized serving utensils:

- Your base. I chose a canape knife (sometimes they’re just called spreaders) but there’s a WHOLE category on the Goody Beads site with beadable gift items, like wine stoppers, bottle openers, serving spoons and more. Choose whatever suits your entertaining or gift-giving style.
- Bench block and hammer
- Metal stamps (I love the new Lollipop font from ImpressArt for this project)
- Large hole beads. I used two 1/2 inch pewter cubes, an 11mm snowflake, and two slim spacer beads. Here’s where you can make it your own, though – choose your favorite colors or themes!
- Marker and polishing pad
- Optional but helpful: stamp straight tape
Here’s why I love this font for these cubes: it’s tall and skinny. You can fit 5 letters across on a 1/2 inch cube, and the height helps fill it in well. Lollipop is a really fun, inspirational kind of font in my opinion, so it’s perfect for celebrations. I also love that it’s all uppercase – which means every letter is the same height, with no descenders. That makes it a really great choice for a beginner!
To stamp the cubes, I found that centering the middle letter in the center was the best way to start. So for “merry”, I stamped the first “R”. Then, I used stamp straight tape along the top and bottom of the letter to hold it in place while I worked to the outer edge. This held my cube still, plus it helped me make sure my word was straight. The tape is optional – you don’t absolutely need it – but I do use it for most projects.

I stamped a pair of words on each face of the cubes, so that no matter which way you’re looking at it, you get a different message! You *might* be able to squeeze 6 letters onto a cube, but I just used 5 or less. There are also smaller cubes, 3/8 inch sized, that you can use, and those would fit up to 4 letters. Pewter is also an idea metal for beginners, because it’s soft and takes an impression easily.
After stamping, I darkened the letters. You can oxidize it any way you like, but I go the easy route most often and use a permanent marker to darken the grooves, then use a polishing pad to clean up the surface. You just have to rub with the polish pad until all the excess ink is buffed off.

Finally, I just assembled the knife! The top ball screws off and on to add beads. If you want to be sure you never lose a bead, you can add a drop of glue to the inside of the ball cap. If you want to change colors or themes depending on the party, you can just screw it on without glue, so that you can change the beads later!
What do you think? I can’t wait to stamp more gifts, after how cute this was when it came together! Do you do a lot of entertaining this time of year? What would you personalize?

Also, what other holiday words did you stamp around the blocks?? Did you stamp on all sides??
Thanks again…
Carla
I did! I did Eat-Drink, Be-Merry, Peace-Joy, and Good-Cheer. Thanks for clicking through – this was such a fun project! I hope you enjoy. If you’re new to stamping, I have TONS of info in my beginner’s tutorial, so you can check that out: http://happyhourprojects.com/jewelry-stamping/
Hi there, I love this project, I just ordered all of the supplies to make them. I cliked on the products through your blog links so hopefully that will give you the credit.
Adrianne, this is GENIUS!!!! I absolutely LOVE this idea for a handmade gift!
I LOVE It!
Ever since I won that ImpressArt set from you a few weeks ago, I’ve fallen in love with their stamps. They’re such good quality!
Are those beads soft? As in, they’ll stamp easily? That’s my biggest issue – hard surfaces (and well…. ignorance of the best techniques, too)
They do stamp easily. Pewter is probably the easiest to stamp of all the metals, in my opinion!