
Hey friends! I’m loving the new succulents trend happening. Maybe I can just relate to cacti because I’m a bit prickly sometimes myself, but I think that cactus art is completely adorable. Today’s post sponsor, Beaducation, recently released a line of succulent design stamps and they are so awesome! I stamped this sassy cuff bracelet using 2 sizes of the cactus design, and I can’t wait to show it off today! If you’re looking for fresh ideas for hand stamped jewelry, you’re going to love this one.

Also? I can’t resist saying it’s officially HAMMER TIME for today’s project! (See what I did there? Ahhh I love bad jokes as much as I love cacti. Ahem.)
So yeah, let’s jump right in! I’ll include links to the products I used below so that if you need to do any shopping, you can easily find the components you will need!
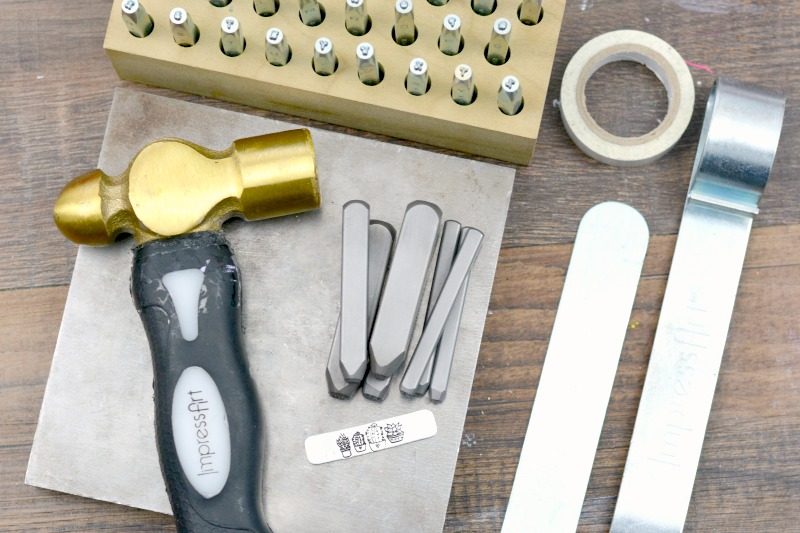
- Steel Block
- 1 Lb. Brass Hammer
- Small Uppercase Kismet Letter Stamp Set (2mm)
- 7mm Cactus Design Stamp
- 10mm Cactus Design Stamp
- Heart Design Stamp Trio (Medium and Large Hearts)
- Stamping Tape
- ImpressArt Stamp Enamel
- 1″ Wide Aluminum Cuff Blank
- Bracelet Bending Bar

I stamped the message on a diagonal first of all, for looks, but also, so that I could fit the entire phrase on a line without it cutting off. I used stamping tape to measure the distance between lines of lettering, and I used the phrase “Can’t Touch This” several times. I filled each row of lettering with 2mm hearts before and after the phrase to be sure it reached from edge to edge. Because I didn’t perfectly center each line of text, I filled however many hearts (1, 2, or even 3) that I needed to reach both the top and bottom edge.

Next, I filled the space between lines of text with primarily large (10mm) cactus stamps. Close to each edge, I added 7mm cacti and 3.5 mm hearts to fill the cuff.
The cactus stamp has a lot of detail and it’s quite large. Because of this, you’ll most likely need to strike each stamp more than once to get a clear impression, and that can get tricky with design stamps if you haven’t used them much yet. Beaducation has a method they describe as “tilt and tap”, and it’s THE way to go with these cute cacti. Essentially, you’ll tip your stamp in each direction to be sure that all sides get even coverage. You can read more about it on the Beaducation website here. I have a few places on my cuff I ended up with a double impression from allowing my stamp to shift ever so slightly as I used it – so the key is, don’t rush! But also, don’t beat yourself up if your cuff isn’t perfect. It happens to all of us sometimes, and the all-over pattern will help to draw attention away from any errors.

When the entire cuff was covered, I used Stamp Enamel to darken it. For starters, you can’t oxidize aluminum, so you will have to use another permanent ink or enamel to darken the impressions. And with the all-over pattern, the enamel works best because you can wipe it onto a larger area, and wipe it clean afterward. This is a large surface to polish for clean detail, so using Sharpie marker would take a lot more time and a lot more effort to polish it clean. I had a couple areas I had to polish, if you look above, but the enamel (or acrylic paint, if you prefer) is the way to go.
Finally, once the blank was finished, I used my bracelet bending bar to curve the cuff. For the 1″ wide blank, the bar works much better than the bending pliers – though the pliers will work! You’ll just have to go over each area thoroughly with the bending pliers.
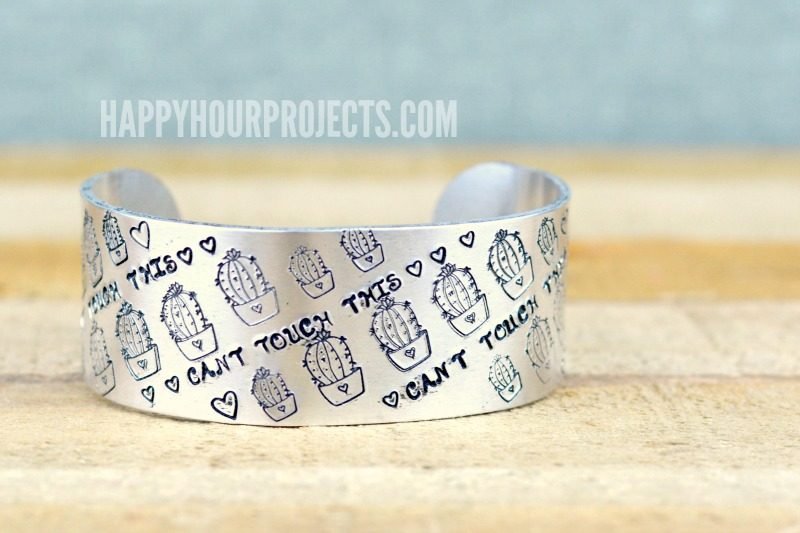
The end result is smart and on-trend, and will get a smile out of most everyone who takes the time to read it! In addition to the two cactus stamps, there’s also an aloe vera and a green prince succulent stamp in the succulent collection so you can try other looks as well!

Thanks for joining me for today’s hand stamped jewelry project, and I’ll see you again soon!
nice post
looking good
Very pun-ny!
By the way your book is awesome.
I really love your work. You have so creative mind. I really try this at home.
love it