
Well, in case you’ve been following along with the competition over at One Artsy Mama (by the way, have you voted yet? You’ve got until noon to vote on the final projects!) it’s been five rounds, five different mediums, and I’m still hanging in there. Perhaps you’ve even started to wonder what sorts of things I might not be good at.
Well, many things, I assure you, but today I’m going to talk about being bad at freehand painting.
I have been telling my husband that I really want a footed cake plate. I’ve been looking out for something I really liked, but it’s all so expensive – it’s a pretty frivolous investment considering how little I make things that require being placed on a pedestal (cooking and baking – that’s another one of my not-so-strong suits). But honestly… I still like pretty things! I happened to see a sunflower plate at Pier One Imports that I liked the looks of, but in true DIY-fashion, of course I thought to myself, I can do that!
Well, it turns out, I really can’t, but I want to share anyway, because in case you *are* a good freehand painter, you can use this idea to make something really lovely! Ready to see my version?? Don’t judge me…

To his credit, my husband says it looks great. But he is biased – I could list like ten other creative people off the top of my head who I am sure could do a whole lot better than this. ;)
Ready to see how it’s done, though? I would really love to inspire someone to take this to an appropriate level. I maintain this is a great idea, it just needs someone slightly more talented than I am to execute it properly.
All this took was a clear glass plate and bowl from the dollar store, and some acrylic paints and sealant that I had on-hand. If you find a candlestick with a nice wide base, you could probably use that instead, I was just worried about it tipping over, so I opted for the bowl’s wide rim for my base. You’ll also need some heavy-duty adhesive (I used E6000, but Gorilla glue would probably work well).

Wash your pieces well. Then, turn your plate upside-down to paint it. This keeps the food surface food-safe and protects your design.

Because you’re painting from the underside, you have to paint it… backward. You paint your highlights first. In my case, that meant the highlights of the sunflower seeds. I just painted a ring around a disposable cup to get a round center as a guideline.

I went a little overboard on the white. I did add a darker brown to it to. It did give it some nice texture, but I’d tone down the white if I did it again.
While I let that dry, I painted the outlines of my petals. I went with a more orangey mix of the yellow color. I really just swirled some yellow and orange together, and used a few different shades.
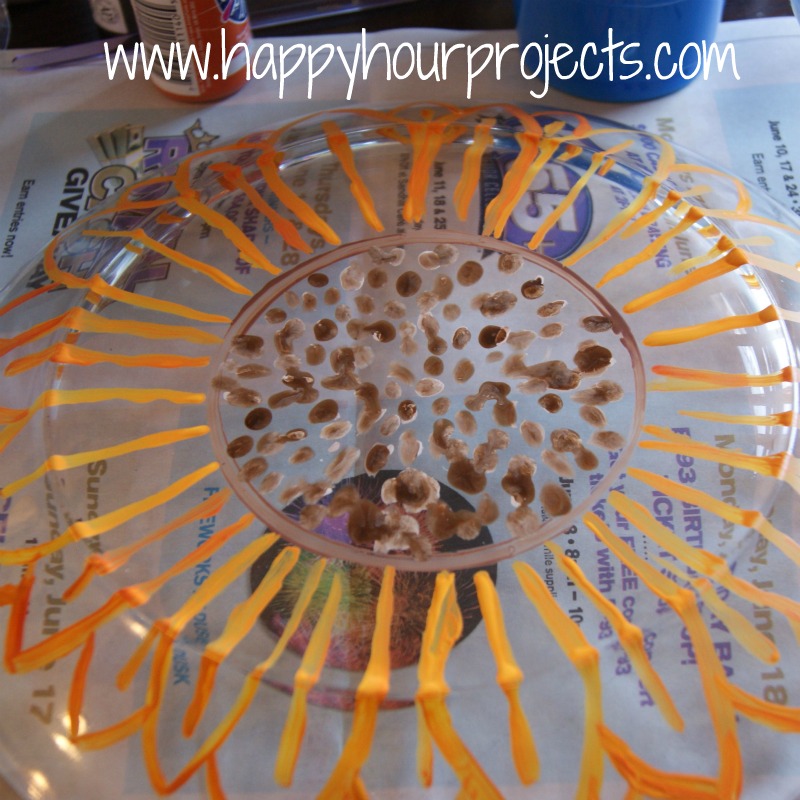
Then, I painted the whole center brown, which you can’t tell, because my photo is way too blurry to share. But I painted the brown center and let that dry, and meanwhile, started painting my petals in yellow.
One it all dried, I painted another coat of yellow over the whole thing so that there weren’t any thin spots.
When it was dry again, I used a glossy sealant spray and sprayed the whole bottom to protect it. do not spray the top of the plate, you want to make sure it’s food safe, and besides, it doesn’t need it. : )

When it was dry yet again, I used some E6000 to attach my bowl base to the plate. I just put it on the raised edge of the bowl’s bottom to make sure it came into contact with the plate all the way around. Make sure you get it centered – measure it, if you have to!

Then, let it cure overnight! Here’s the top view of my backward-painting:
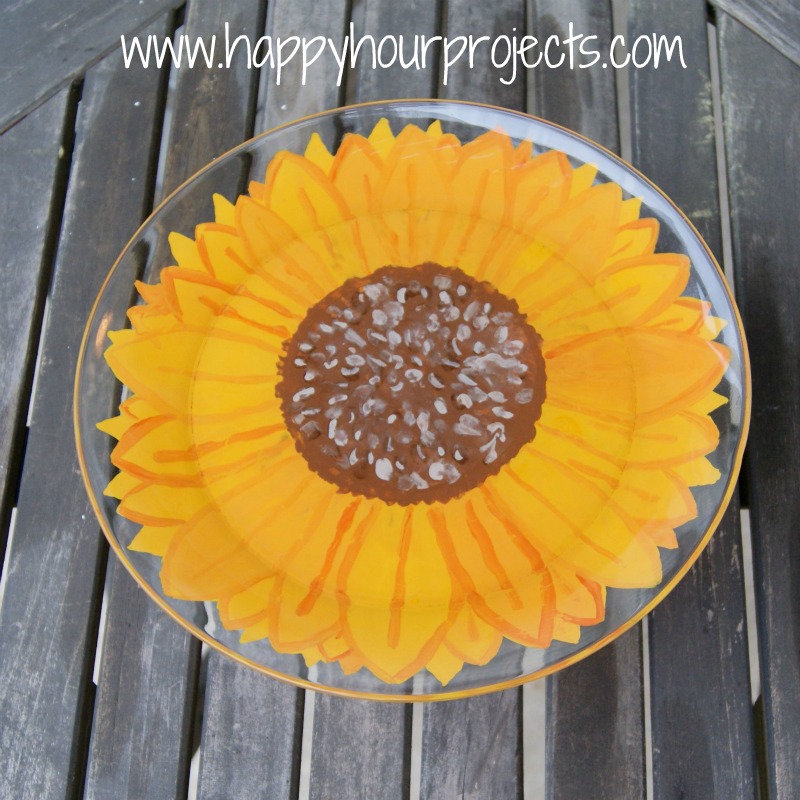
It could be better, it could be worse, right? All in all, worth the $2 investment, if for nothing else but the lesson learned. And your possibilities here are really endless. Maybe if I found a different design that was easier to paint, I’d be happier with the result. :P Maybe something foolproof, like a nice stencil? How would you paint yours?
I link up to these great parties!
~ Adrianne
Sunflowers are my favorite – a beautiful cake plate! I'm your newest follower from “Flour Me with Love” blog hop. I would love a follow back if you get a chance: godsgrowinggarden.blogspot.com
Thanks
Angie
I think this is AWESOME!!!!! AND YOU PAINTED IT BACKWARDS!!!!! You did great!!! I just love it… it's so so cute!!!!!! Pat yourself on the back gal*****!
Thanks so much for sharing this with the ALL STARS BLOCK PARTY!!!
Carri
simplydonewright.blogspot.com
WOW!!! I LOVE IT!!!! I wonder if I'm artsy enough to give it a try…. LOL
stacysewsandschools.wordpress.com
I think it looks great! That's the beauty of handmade items…they don't have to be perfect cuz they're handmade! Thanks for sharing at The Fun In Functional!
A beautiful and cheerful plate for $2. Can't beat that
Oh goodness how cute is this!! You are much to hard on yourself, it is perfect! Using the bowl instead of the usual candlestick is genius! I'd love it if you shared this at my party going on now at http://www.kathewithane.com!
I love this idea. And you've inspired me to make one. I like you did a great job painting your sunflower. It's actually harder to paint on glass than on a canvas or wood because it is unforgiving. Great job. Thanks for linking up to the All Star Block Party!
Holly
I think it came out great!
I agree with the others, I think it looks great! I would for sure need the help of a stencil. It's so nice and summery!
It's cute! I can't freehand paint AT ALL, so I think this is great!
It looks great!
I think it's beautiful! You do GREAT at freehand painting – and it's backwards! Kudos to you!
Jill @ Create.Craft.Love.
OMG – you had to paint it backward?!!! I think you did a great job. I wouldn't even have thought ahead enough to get that part right. I do think a stencil would be easier to do but I like your version (and hubby is a smart man).
Absolutely adorable! I love when someone posts a new idea to use with dollar store items!
Jessica