
Hey friends! I’ve got a fun DIY multi strand bracelet to share with you today. As long as you can glue two things together, you’re going to like today’s project! I’ve had my eye on these vinyl disc beads for a while now, trying to decide how to use them. I was staring at the strands and thinking I liked them just how they are – and with a bit of glue and a couple of tools, I can wear them that way!

I experimented with two sizes from today’s post sponsor, Happy Mango Beads. This way, if you like larger or smaller beads, or more or fewer strands, you know how many you will need. They’re slightly irregular (which is what makes the layers look so cool) but either the 2-3mm or the 4-5mm sizes work well with the glue-on end caps. I’ll leave links to the products that I used below, in case you want to do some shopping, or learn more about these supplies.
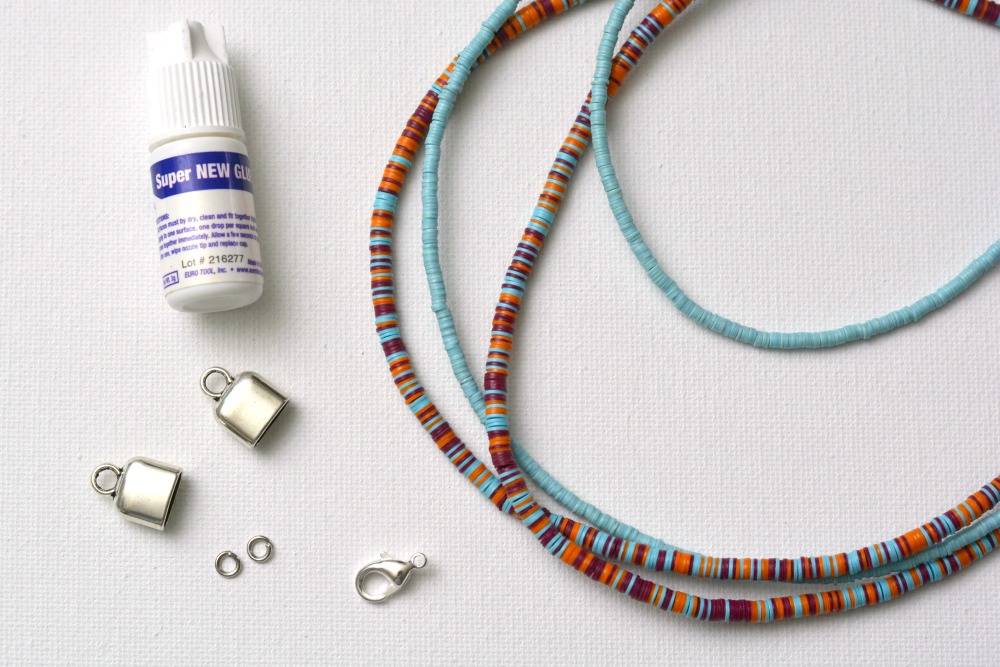
Here’s what you will need to make this DIY multi strand bracelet with vinyl disc beads:
- Vinyl Disc Beads from Happy Mango Beads (used here: 2-3mm light blue and 4-5mm multi)
- 2 – End Caps – 17mm Pewter Cap with Bail from Happy Mango Beads
- 2 – 5mm jump rings
- 12mm lobster clasp
- Chain Nose Pliers
- Your favorite stringing medium (Fireline, beading wire and crimp beads, etc.)
- Jewelry Glue

So first – the stringing. I am going to admit here that I did not un-string and re-string these beads; I used the cotton cord they came with. For better strength (especially if you like this design and want to make them and sell them) I recommend re-stringing them on beading wire or cord. If you’re using the pre-strung cord, cut a length LONGER than 6.5 – 7 inches (depending on your wrist size – I used lengths of 6.75″) because you’ll need enough extra cord to tie a knot.
If you’re re-stringing them properly, you can use a crimp bead or a snug knot at the ends of your strands – and conserve beads as well. You’ll be able to get 4 parts (and possibly 5) from one 34-inch bead strand. If you tie a knot, add a drop of glue to the end of the knot to help secure it while you work.

Next, add a few drops of glue into one of the end caps, and insert the bead strands. Don’t rush this step – it can take a minute for the glue to dry enough to get a good grip on your bead strands. If it’s not dry enough and your strands fall out, just replace it, and try not to get any glue on your fingers. For one, you just generally want to avoid gluing things to yourself! But mainly, you want to be sure that you don’t leave glue fingerprints on your nice shiny end caps. The 4-5mm beads fit 2 strands nicely, and the 2-3mm beads will require 3 strands.

Once your strands are dry enough to continue working, use pliers to add the clasp to your bracelet. Because the bail on these end caps is a nice big circle, I used two jump rings to attach the lobster clasp (so that the clasp faces the right direction when you go to wear it). If you’re using a hook or toggle clasp, you will want to attach each end of your clasp with one jump ring.

So the hardest part about this easy DIY multi strand bracelet is literally just waiting for the glue to dry! Once your beads are strung, both these bracelets took me 20 minutes to make, including drying time.

I hope you enjoyed this simple vinyl bead bracelet project, and I’ll catch you guys again soon!

I absolutely love the idea of creating a multi-strand bracelet with vinyl beads! The color combinations you showcased are so vibrant and fun. Can’t wait to give this DIY project a try for a girls’ night crafting session! Thanks for the inspiration!
The updated HappyMod platform performs well and feels more responsive overall. I found several trending games quickly, and most installations completed successfully without crashes or lag. The recent improvements definitely helped create a cleaner and more comfortable Android experience for everyday users.
I like projects like this because they remind me how satisfying it is to make something small with your hands and actually wear or use it after. It doesn’t have to stop at bracelets either. I got into simple crochet in the same way, just trying something new, and ended up sticking with it. Fuppys made it feel a lot less intimidating to start, especially when you don’t want to spend ages figuring everything out before you even begin.
This vinyl bead multi strand bracelet DIY is so creative perfect for making a fun and stylish accessory
This vinyl bead multi strand bracelet DIY is so fun and creative! I love how colorful and stylish it looks, and the steps seem easy to follow. A great project for handmade jewelry lovers.
I love this DIY idea! The colors of the vinyl beads are so vibrant, and I can already see how fun it would be to mix and match different strands. Perfect for Happy Hour or just to add a personal touch to my accessories. Can’t wait to try it out!
I love this DIY multi-strand bracelet idea! The combination of vinyl beads is so vibrant and fun. Can’t wait to try this out for my next happy hour gathering. Thanks for the inspiration!
The DIY vinyl bracelet is beautiful and fits well. I love it.
I love this DIY idea! The multi-strand bracelet looks delightful and the step-by-step instructions are super helpful. Can’t wait to try this out with some vibrant vinyl beads I have at home! Thank you for sharing!
I absolutely love this Vinyl Bead Multi Strand Bracelet idea! The colors are so vibrant and perfect for summer. Can’t wait to try this DIY project for my next craft night with friends! Thanks for sharing such a fun tutorial!
Experienced South Florida general contractors providing top-tier construction, remodeling, and renovation services. Serving Pembroke Pines with reliable solutions for homes and businesses.
You can have a lot of fun and amuse yourself playing games online. Check out our website if you’re looking for a place to play entertaining online games.
Thanks for sharing the product links; it’s always helpful to know exactly what supplies to look for.
I have never made jewelry before, but your detailed instructions make it seem quite simple for a beginner like me!
I’m in awe of your talent! Your handmade items are so beautiful and well-crafted. You can tell that you’ve put a lot of time and thought into each piece. I can’t wait to show them off—they’re truly one-of-a-kind!
Creating a Vinyl Bead DIY Multi-Strand Bracelet is such a fun and creative project! The process of carefully selecting colors and arranging the beads allows for endless customization, making each bracelet a unique piece of art.
Handcrafted jewelry makes for thoughtful, personalized gifts.
I love this DIY vinyl bead bracelet idea! The multi-strand design looks so fun and colorful. I can’t wait to gather the supplies and try making one for myself. Thanks for the great tutorial!
This is a stunning testament to creativity, effortlessly blending vibrant colors and textures for a unique and personalized accessory.
Hello, thank you for sharing your special bracelet from special materials. I created a very beautiful bracelet. Thank you very much.
Thank you for sharing this DIY multi-strand bracelet project using vinyl disc beads! It looks like a fun and stylish project.
I really enjoyed this article and recommend it to others
For it GIRL!
Go For it GIRL!
Word games are one of the very hot puzzle game genres. It is very popular. Especially young people. Expand vocabulary with simple to complex puzzles. Definitely won’t be bored
the best article in this web…
thanks for sharing this
well done
great
I’ve never made jewelry before, but this seems simple enough for a beginner like me!
This ring is so beautiful. I like blue color
very goood
I love all your projects and I hope you continue to update! Thank you for all your hard work.
hi, I would like to say thanks to the admin team to post this very informative post I learn i love this article its very helpful to mothers
youre post is very good
I bought your book stamped metal jewelry its awesome so now I bookmarked your site wow love you you’re amazing thank you
Very Amazing! I like this Article
Thank you Adrianne
I can’t get you pictures to copy into the instructions.
These bracelets look great! They are easy and will give anyone who wants to complete a fast project a sense of accomplishment. Thanks for the idea.
I am so glad to get your wonderful projects. I hope things are going well for you and children.
superb
looking good
amazing
nice
Really a Good and informative Article, I like it and bookmarked it!
I bought your book stamped metal jewelry its awesome so now I bookmarked your site wow love you you’re amazing thank you
Wonderful projects for the kids.. Thanks
Woow!! Awesome project ideas for kids. I’ll use this to get them engaged more in this vacation.
Bookmarked your amazing website. Amazing work
Quickest Hotmail login instructions
………………………………………………………………..
Love this little project??
I’m new to DIY Jewelry and this looks like something good to start with!
Thanks !!!
Great weekend project for the kids . Can not find the link of supplies though. If possible can you forward it please
Hi Brian – in the list of supplies needed above, all items are click-able! You can find out more or shop right from the supplies listed. Good luck!