
Summer time is picnic and barbecue season! I shared on Friday my 5 best tips for hosting a great summer barbecue, and if you read it, then you may have spotted a set of cute little utensil pouches on our picnic table. Today I’m going to show you how easy they are to make up. Not only do they make a great grab-and-go item so that no one has to get back up for a napkin, a knife they didn’t realize they’d need, etc. – but they also offer a pop of color on your table as decor with a purpose. Best of all, they’re very inexpensive – it’s the trifecta of useful, pretty, and cheap! Haha.

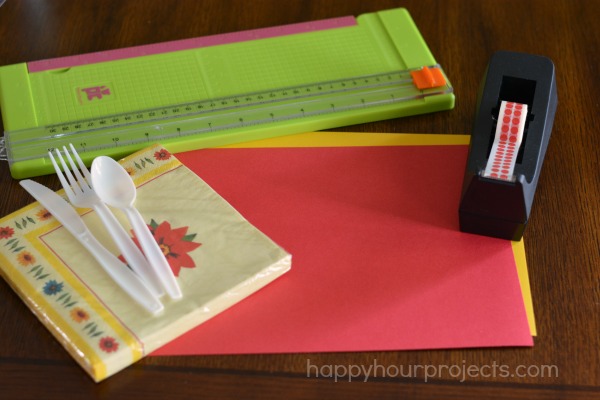
Here is what you will need to make these colorful silverware holders:
- 8.5×11 cardstock in any color(s) that match your theme
- Paper trimmer, and optionally, a bone folder for scoring a perfectly straight line (I didn’t bother with one)
- Washi tape in coordinating or contrasting color(s)
- Plastic spoons, forks, knives, and napkins – whatever you will need for your meal
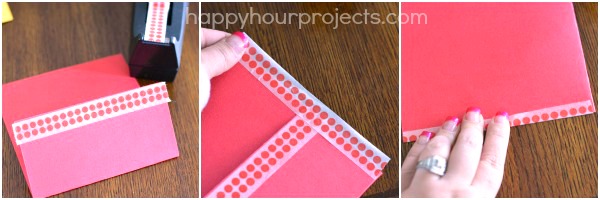
First, trim your cardstock into two equal pieces that are 8.5×5.5. You will be able to make 2 pouches from each sheet of cardstock. I told you it was a cheap project. ;)
The photo below will give you a visual for creating the pouch. First, position your paper vertically on your work surface, and fold up a “pocket”. I folded mine up about 2 inches, leaving an overall pouch dimension of roughly 6.5×5.5 inches. This is totally flexible, though – if you have something taller to include, you can make the fold shorter. It needs to be at least an inch to hold all your goodies, but you decide how deep you need that pocket.
Next, add a 5.5 inch piece of washi tape to the edge of the pocket. This is strictly decorative, so you can skip this step – but you’ll like the looks a lot better if you include it. Next, cut two lengths of washi tape the height of your pocket (in my case, 6.5 inches). Tape the sides closed to form your pocket – wrapping the tape around both the front and back sides.
And yes, I keep my washi tapes in regular tape dispensers. It was a mind-blowing moment when I realized they fit! At first, I re-used old disposable tape rolls – but then I found these dispensers at the dollar store. Hello, organized washi tape…
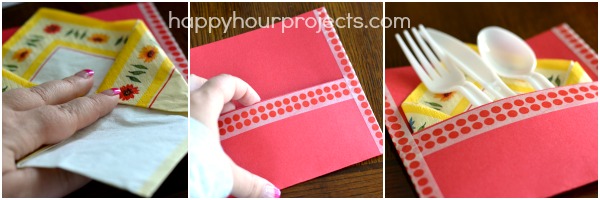
But back to the project! Fold your napkin (you can either fold it in half vertically, or if you want a point sticking out, fold it like I’m doing below. Add your utensils. Voila, finished silverware pouch.
You can make up as many as you need for pennies. Don’t forget – you can mix and match colors and tapes to suit your theme. Add extras like Bingo cards, game instructions if you’re hosting baby or bridal showers, scratch-off lottery tickets – whatever paper-based items your guests will need for the day’s events!

Once you get the first one assembled, the rest go really quickly, and you should be able to finish them in a minute or less. Enjoy your picnic!


These are great for table decorations!
Super cute!!! Love these!!
Oh my word!!!! Love the pouches Adrianne!!! So pretty!!
such a clever and adorable idea! an easy way to add some fun decor to my next picnic-thanks for sharing :)
Useful, pretty and cheap – my kind of project! What s great idea and they look so pretty. I love how they add pretty to a picnic. Pinning!