
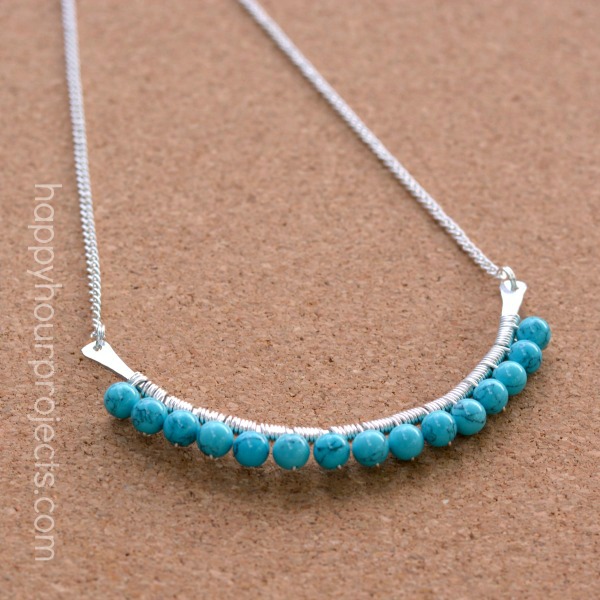
Good morning! I’ve got a fun accessory to show you today that was inspired by a necklace I spotted on the Anthropologie site. I used colors better suited to my wardrobe and I changed the length and the wire wrapping, but I really liked the beaded bib that the original design had. I definitely used the piece as inspiration – well, and I definitely didn’t spend $38, either. I’m going to show you today how you can re-create this look to suit your wardrobe (and budget) too! You’ll need to have some basic wire wrapping skills to get this look, but even if you are a beginner, the technique is straightforward, as long as you have a steady hand.
What you will need to make a wire-wrapped beaded necklace:
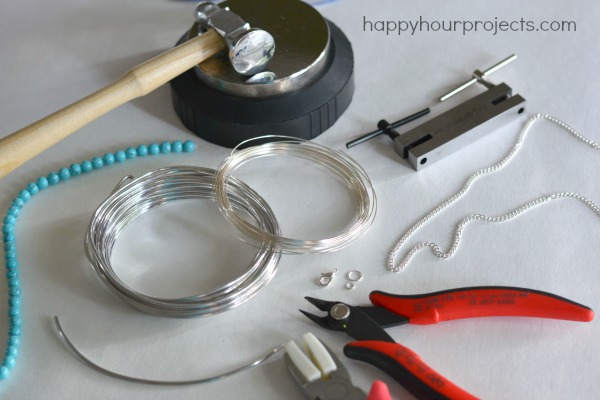
- Bench block, chasing hammer, and 1/16″ metal hole punch for creating your wire base
- 12-gauge aluminum wire – you could really use any metal for the base, but 12 gauge is pretty hefty so you’re most likely to find it in aluminum. I used a silver tone.
- 20-gauge silver plated copper wire – you don’t strictly have to use this, but you want something much stronger than aluminum, because this is what you’ll use to wrap your beads. Again – I opted for a silver tone. Feel free to use another color to match your base, though.
- 8mm-10mm beads – these are a turquoise colored stone bead, and mine are 8mm. Anything up to 10 should be a good size, though.
- Chain, jump rings and clasp – I made my necklace 20″, so I used 15 inches of chain. You may want to go shorter or longer, so your length might vary. This is 2mm chain.
- Wire cutters and nylon pliers for wire wrapping
The first step is to make your bib base. This is where you can get creative, if you want! I opted for a simple curve, but you can shape this however you like. I used 5 inches of wire, and hammered it out flat on the ends. I did hammer the center part of the wire as well, but not as much as the ends. Hammering will harden your wire, so it is helpful to hammer the whole length at least a little to help it retail its original shape.
Next, I punched a hole in each end so that I’d be able to attach chain at the end.

Once your base construction is complete, it’s time for wrapping. Wire wrapping isn’t difficult, it just takes a steady hand, and a pair of nylon pliers (so as not to mar your wire). I measured off several coils of 20 gauge wire (I began with about 4 feet of wire) and wrapped it a few time around my base. Then, I added a bead.
The best way to keep the wire even on your beads is to string the bead on snugly. and bed your wire immediately on the othe side of it. Then, wrap the wire back around the base. You will want to tighten the wraps you make around the wire base as you go; you won’t have much luck sliding them once you’ve gotten a couple wraps on. I wrapped 6 times between each bead, because that’s what fit the spacing given the size beads I was using. If yours are larger, you’ll want more wraps between. My goal was to wrap the entire length of the wire base.
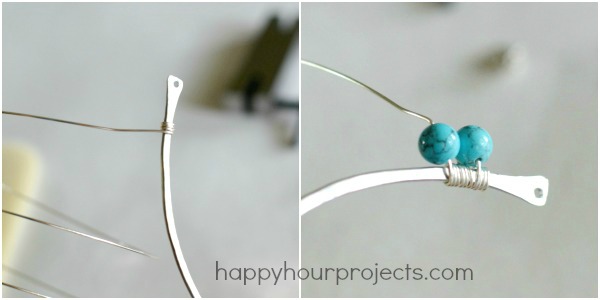
Just keep wrapping, beading, and tightening as you go. If you get a kink in your wire, it can generally be smoothed out with your nylon pliers. Once you get to the end, wrap a couple times to finish it off, and cut the excess with your pliers.
(If you find you don’t have enough wire, you can also cut your base down shorter and hammer the edge of it like you did in the beginning, just bear in mind it may need slight re-shaping if you have to do that.)

Finally, all you have to do is add a chain and clasp. I cut 2 lengths of chain 7.5 inches long, and attached each to the ends of the base with split ring jump rings. (You can easily use normal jump rings; the split rings offer extra security.) Add a clasp set to the ends of your chain.
The final length of 20 inches wears at this length:

You’ll have to pardon the lighting in that photo – I wasn’t going for a full-on modeling session, haha. I just wanted to give you an idea of how this length looks when worn. The bib piece being formed as a curve makes it hit at a shorter length than strung pendants, because it’s wider at the bottom (instead of hanging in a triangular shape). If your base is straighter or wider across, you may want to make your chain even longer – up to 18 inches total, even.

I love how this piece turned out – what do you think of it? Kind of earthy with the stones, but still polished-looking! I still need to work a little on my wire-wrapping skills, but overall, I’m really pleased with the result.

I love it – though I wish there was a way to save it as a PDF. That would make it so much easier to reference.
I see you don’t monetize your site, don’t waste your traffic,
you can earn extra bucks every month because you’ve got hi quality content.
If you want to know how to make extra money, search for:
Mrdalekjd methods for $$$
You have changed your web site and I do not know how to save to my Pinterest account. Please let me know what to do.
This is beautiful thank you so much for sharing. I think I’m going to make one.
I love your necklace!!! it is soooooooo much prettier than the inspiration. Keep up the good work. You’ve got an Adrianne look alike (at least the jewelry is) here in Tennessee!
It would be very helpful if you added at least an estimate of the amount of 20-gauge wire you used. Solid wrapping like this always takes more wire than you think it will!
FYI, when I clicked on the link to the Anthropologie necklace you used for inspiration, it was marked down from $38 to $13. Maybe it didn’t sell as well as they expected it to. :-) Anyhow, I think your version is prettier.
I think you did a great job on the wire wrapping. Thank you for sharing your lovely necklace. I would love to see links to where you get your supplies, sometimes you do that, but didn’t see one for the metal hole punch. thanks again….
Thanks, Jeannie! I am working on setting up a page with links to my most-used tools. I want to be helpful to those who are looking for these items – without pushing a bunch of shop links on people who don’t like to see that. :P I never know if people like that or not?? SO I appreciate your feedback on that!
Anyway – here is a link to the hole punch I used: http://astore.amazon.com/haphoupro-20/detail/B008KRSYLW and I’m happy to help people chase down supplies anytime – feel free to leave a comment anytime you’ve got a question! :)
This necklace is absolutely beautiful! Awesome job and thanks for sharing the how to :)
What keeps the starting and ending wire where it won’t snag your top? It would be nice to see the back of the beaded area. After you thread a bead on do you wrap the wire on the back of that bead to start the wrapping again? Sorry but I love this and want to do it right.