
Easter is almost here! I can hardly believe it. I have an oldie-but-goodie Easter craft to share with you today! This is a kid-friendly project (as long as you’re cool with your kids making a mess, I mean). It only takes a few supplies – and if you already have yarn, then it hardly costs a thing! You can make these yarn eggs in any color to match your decor.

While the crafting takes about an hour for these, you’ll have 24 hours of drying time, so factor that in when you get started.
Here’s what you’ll need:

- Water Balloons
- Yarn & Scissors
- Glue (just general purpose, it doesn’t need to be anything fancy)
- Newspaper for your work surface
- Bowl for your glue mix – something disposable is easiest!
Blow up your water balloons, and cut some 8-10 foot lengths of yarn. Each water balloon will take 25-30 feet of yarn, but when I worked with more than about 10 feet at a time, I found it knotted up a lot more. So I found that three long pieces between 8-10 feet each worked the best. You may want to cut them down even shorter if you have kids, but that’s up to you!
Mix 2 parts glue to 1 part water. For 6 eggs, I used around 4 oz. glue, just to give you an idea how much you’ll need. Do this in a disposable bowl if you can – I saved this one from going into the trash with this project in mind. :)
Dip a strand of yarn into the bowl. I found it worked best to toss one who strand in, soak it completely, and then pull it out of the bowl, squeezing the excess from the yarn as I went.

(This is really tough to photograph when your fingers are covered in goo, but here goes:)

Now, just start wrapping your egg. There’s no right or wrong way to do this. All I will advise is that the more times your yarn intersects and crosses over itself, the stronger your egg will be when it dries. So criss-cross away! Do try to “tuck” your beginning end under one of your wraps as you go to secure it.

I used three strands of yarn on each egg. This is how it looked as I added one strand at a time – you can just quit whenever you like the looks of it. The more yarn you use, though, the more sturdy your eggs will be.

I quit at three 8-foot strands. Adding more than that will also increase the drying time, so keep that in mind, too.
They will also dry faster if you turn them a few times over your day of drying. I turned mine 3 or 4 times. When they feel firm and dry, all that’s left to do is to remove the balloon.

Cut a small hole. The balloon will deflate and pull away from the inside of your egg, and you can just pull it out through one of the holes. On my first try (above) I cut the whole knot off, then had to fish around inside to get the rest of the balloon, so I will suggest just cutting a small hole near the knot, but keep the balloon intact. Then you already have a hold on the end and can pull it out more easily.
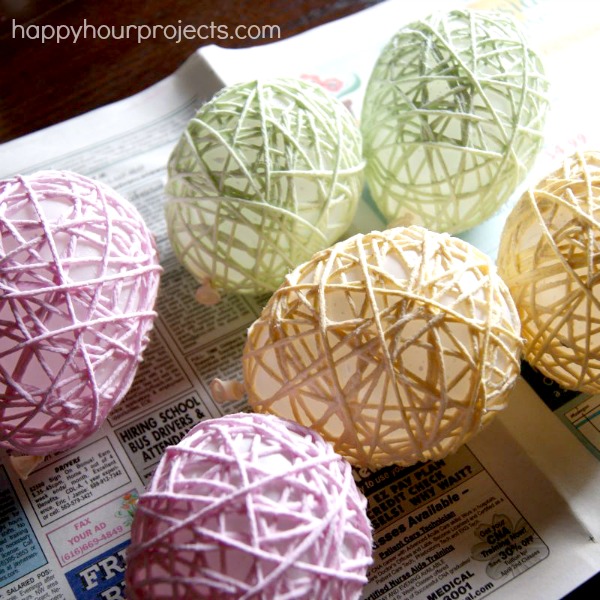
And that’s it! A fun way to add some color to your Easter mantel or table!

I absolutely love this idea! The Yarn Eggs are such a creative way to bring some color and fun to the season. I can’t wait to try making them for my next gathering. Thank you for sharing this delightful project!
These yarn eggs are such a creative and fun idea! I love how simple they are to make, yet they can add such a vibrant touch to any decor. Perfect for spring crafts! Can’t wait to try this project with my kids. Thanks for sharing!
I absolutely love this idea! The yarn eggs are such a creative and fun project for spring. Can’t wait to try making them with my kids! Thanks for sharing!
I absolutely love the idea of using yarn to create these beautiful eggs! They would be perfect for Easter decor or even just as a fun craft project any time of year. Thanks for sharing such a creative and easy tutorial! Can’t wait to give it a try!
I love this idea! The yarn eggs are so creative and perfect for spring decorating. I can’t wait to try making them myself—thanks for the great tutorial!
I love this idea! The yarn eggs are such a fun and creative way to add some color to my spring decor. I can’t wait to try making them for my kids’ Easter baskets. Thanks for sharing this adorable project!
I absolutely love the idea of using yarn to create these adorable eggs! They are so unique and add a fun touch to any spring decor. Can’t wait to try this out for my Easter celebrations. Thanks for the great tutorial!
These yarn eggs are such a fun and creative project! I love how easy they are to make, and they would be perfect for Easter decorations. Thanks for sharing this tutorial!
It looks so adorable!
Very creative idea, I had a very happy experience with my daughter when I made this product for the first time.
I tried this also and yarn kept slipping, I found that using flour and warm water was much more adhering to the balloon. I’m making them to put lights in them!
Mine doesn’t seem hard enough?
Mine dried with glue residue in between the strands everywhere and now it looks like little papers in between stuck everywhere. ?
So I am just finding this . . . HOW ADORABLE!!! I was wondering how these would look if I put them on a string of Christmas lights . . . if they would act as little luminaries.
We made these last night and it was not easy…the string kept slipping off the balloon. It did not turn out that well, but I am going to give it another try. I am going to tweak it a little bit to make it work.
I did this. But, when i went to bust the balloon the yarn dried to the balloon and it collapsed. any tips?
Ok a couple ideas. If your balloon doesn’t have enough latex dust, it can stick. So you can either dust it with something like cornstarch or baby powder, or alternately, grease it up with something like petroleum jelly. That will help keep it from sticking.
Now – did it pop back into shape when you finally got the balloon out? Because the stiffness of the yarn will make a difference too. Like, using more glue to make the strands stronger, or making sure you have better coverage of yarn over the balloon. If you have a photo of what happened, feel free to send it to happyhourprojectsblog@gmail.com. if I can see it, it will help me troubleshoot it. :)
I sent you an email of the collapsed egg and the others I have that i am afraid to pop. Thank you for you help.
Doing this now, but pretty sure you meant to note lengths of yarn with INCHES not FEET? :)
Oh no! They definitely take 25-30 feet of yarn! But that is why I broke them down into 8-10 foot lengths. More than that is too difficult to keep from knotting up as you work with it, and if you get a knot in a 15-foot piece if yarn with glue on it, your best bet is to throw that piece away and get a new (shorter) one. :)
Just gave this a shout out!
http://4you-withlove.blogspot.com/2013/03/easter-inspiration.html
Have a great day!
Marilyn
Love the eggs!! Love the colors too! Thanks for the tutorial!!
Adrianne, I’ve made these before and they are so fun! Thanks for reminding me…gotta get the yarn and glue!
I have always oved the look of these and have wanted to make some of my own. Now, I know how :-) Thanks Adrianne!
Tweeted and G+. I love to reach back for nostalgic crafts.
SUPER cute!! :) I love this!!
These turned out SO cute! Love the fun colors. The kids would love these, thanks for sharing!
These would look great as part of a spring mantle decor…Alright, I better get my bum in gear and get my spring mantle together.
These are darling, thanks for the tutorial! Happy Easter!
Those are very cute and your tutorial is great! happy Easter to you
Those are gorgeous!!! How pretty for Easter! Thanks so much for sharing this as well at Thursday's Temptation.
Jill
I've been wanting to make these for a while now and just haven't had the time! I'm wanting to do a roundup of all sorts of egg decorating things. Is it ok to feature this project??
Thanks! :)
Wow!! Love it!!! :)Nice idea!! <3
Love it – so cute!
These are so cute! I love all the colors you used for them too!
These are adorable! I am totally going to do these with my kiddos. Pinning! :)
These are so cute, Adrienne. Thanks for the tutorial.
I love these eggs but feared it would be too messy of a project. You make it look fairly neat. I must try this. I was thinking that a wreath made of smaller ones might even look nice. Hmmmm,….great tutorial.