• Skip to primary navigation
  • Skip to main content
  • Skip to primary sidebar

  • home
  • about adrianne
  • buy the books
    • DIY T-Shirt Crafts (2015)
    • DIY Stamped Metal Jewelry (2016)
    • Rock Painting for Beginners (2019)
  • videos
  • crafts
    • diy beauty projects
    • kids’ crafts
    • paper craft projects
    • polymer clay
    • sewing projects
  • jewelry
    • bracelet projects
    • earring projects
    • necklace projects
    • jewelry tools & supplies
  • metal stamping
    • beginners’ tutorial
    • video tutorial
    • project ideas
    • metal stamping supplies
  • recipes
    • cocktail recipes
    • appetizers
    • main and side dishes
    • sweets and treats
  • by season
    • birthdays
    • new year
    • valentine’s day
    • st. patrick’s day
    • easter and spring
    • mother’s day
    • patriotic
    • fall
    • halloween
    • christmas
    • thanksgiving
  • privacy

Happy Hour Projects logo

09/30/2014

Riveted Flower Necklace

I have another riveted metal project for you to check out today for layering metals and creating dimension.  I made up this necklace for my daughter – who was totally thrilled with it, by the way!  There are a few techniques I am going to show you, and you can combine them in any way you like to make your own stamped and riveted piece.

Stamped and Riveted Floral Necklace at www.happyhourprojects.com

The links below go to Goody Beads, and if you make a purchase through them, it helps my blog at no extra cost to you.  So many of you ask “where can I find this stuff?” and Goody Beads has an awesome metal-worked jewelry supply section.

  • Bench Block and Hammer
  • Design stamp – this 3mm heart is from ImpressArt’s new Juniper font set, but any design you love will do
  • Crystal Rivets
  • Rivet setter and rubber block
  • Large hole punch to make a 1/8″ hole
  • 1″ Round aluminum bank
  • 15/16″ Flower blank
  • Dapping Block
  • Optional 3.7mm eyelets and eyelet setter tool for finishing your hole
  • Small hole punch for a 3/32″ hole (to accomodate eyelet – otherwise any size unfinished hole is fine)
  • Jump rings and 18″ chain

Stamped and Riveted Floral Necklace at www.happyhourprojects.com

First, I stamped the petals of my floral blank with the 3mm heart.  This was a really nice size design stamp to get a good, clean impression.  If you haven’t done any stamping and you’re looking for more information on getting started, I have an in-depth beginners metal stamping tutorial with supplies, techniques, and even a video you can check out.

Stamped and Riveted Floral Necklace at www.happyhourprojects.com

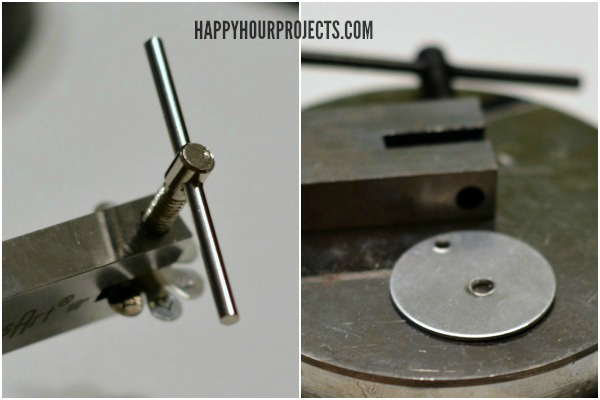
Next, I punched a 1/8″ hole in both my flower blank and the round blank.  I also punched a 3/32″ hole at the top of the circle, for stringing it.

Stamped and Riveted Floral Necklace at www.happyhourprojects.com

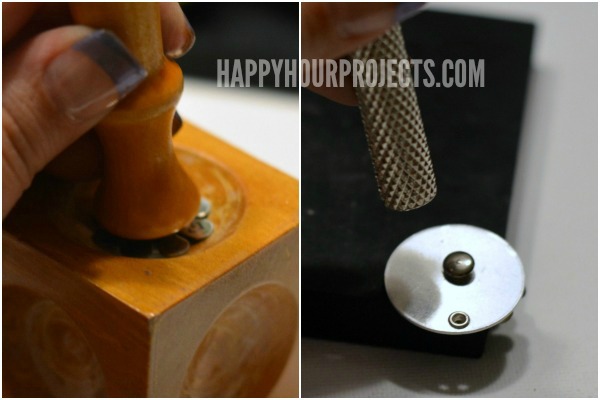
Next, I finished the stringing hole with a 3.7mm eyelet.  Eyelets are an easy way to finish raw holes in a professional-looking way – you just set the setter base on your bench block, add an eyelet, and then place your piece.  Position the setter tool on the small end of the eyelet, and tap the top of it with a hammer a few times (it usually takes me 4-5 taps).  You’ll end up with an eyelet curved over both sides of your blank.

Stamped and Riveted Floral Necklace at www.happyhourprojects.com

Next, I put the flower in the dapping block, and domed it.  This makes the petals stick out and gives the necklace a 3-D effect.  Then, I assembled the two pieces together with a crystal rivet.

Using a crystal rivet here is a little more tricky than a metal rivet, because you need to place the crystal side against a rubber bench block to absorb the strike without cracking.  I achieved this by positioning it face down on the corner of the block, allowing the raised petals to hang over the edge of the block.

I don’t have really good step-by-step photos on this project, but if you want more detail, last week I just posted a bracelet with crystal rivets, so you can look at that in more detail if it’s still not clear from my explanation.

Stamped and Riveted Floral Necklace at www.happyhourprojects.com

All that’s left now once it’s assembled is to add a rump ring (or two, or a split ring – totally your preference. I like the look of two rings) and then string it on a 18″ chain.  If you’re not using a pre-assembled chain, you will also need to add a jump ring and clasp at the end of your chain.

Stamped and Riveted Floral Necklace at www.happyhourprojects.com

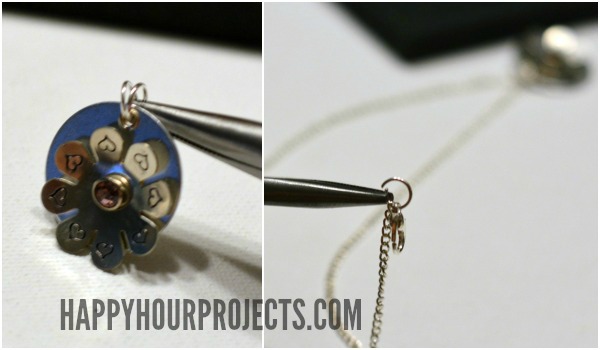
Then, just enjoy the 3-D effect!  This metal isn’t thick, so the flower can spin a little.  (If you don’t care for that, you can add a second round blank in between to tighten the rivet’s hold.)  I know this is more a spring style, but my daughter just LOVES this all-girly design. :)

Stamped and Riveted Floral Necklace at www.happyhourprojects.com

adrianne signature


Filed Under: Fashion, Jewelry, Metal Stamping, Necklaces, Tutorials Tagged With: accessories, flower floral, hearts, jewelry, metal, metal stamping, necklace, riveted, rivets, stamped

copyright policy and terms of use

I love it when you love my work! All tutorials and photos published at Happy Hour Projects are copyrighted. If you would like to feature my tutorial on your website or share it on your social media you may use one photo to feature, as long as you provide a link back to the original post.

If you feature a photo, it may not be accompanied by the project tutorial or recipe, whether in my own words as it originally appears or paraphrased by you. This also includes personal sharing on social media and Pinterest. Publishing multiple photos from a project, or including instructions with an accompanying photo are not permitted and you will be asked to remove them.

I love to share my projects, and my tutorials, recipes, and e-books are ALL free for your personal use. However, photos and ideas that are published to this site are my protected intellectual property. You may print them at home, but please do not copy or distribute them. I also allow all designs to be made and sold at fundraisers, craft fairs, etc. If you are selling a piece made from one or more of my free tutorials in your online shop, I require that you use your own, original photography, and include a link back to my website to credit me as the designer.

I hope you enjoy what you read here, and please be fair when you share!

Reader Interactions

Comments

  1. Bethany says

    10/01/2014 at 6:02 pm

    LOVE it! :) More inspiration for my newest crafting addiction!

    Reply
  2. Marilyn says

    09/30/2014 at 3:52 pm

    Adrianne, as soon as I think you’ve created the most beautiful piece of jewelry ever, I stop by and think WOW, this one is NOW my favorite! Thanks so much for inspiring me!

    Reply

Trackbacks

  1. 12 Creative Metal Stamped DIY Jewelry Ideas - i can make says:
    10/31/2014 at 10:21 am

    […] a dimensional delight with Happy Hour […]

    Reply
  2. CraftCrave | DigiFree | CraftCrave says:
    10/01/2014 at 9:32 am

    […] Riveted Flower Necklace – 1 freebie(s)? […]

    Reply

Leave a Reply Cancel reply

Your email address will not be published. Required fields are marked *

Primary Sidebar

Hello, and welcome! I'm Adrianne, an artist, author, designer, and blogger in mid Michigan. I work from home, chase my two kids, and this once-city-girl is learning how to care for chickens and adjusting to life out in the country. I have a compulsion for daily creativity... sometimes it's jewelry-making, paper crafting, metal stamping, mixing and baking, or giving new life to recycled items. But with 2 young kids, time is short! My goal here at Happy Hour Projects is to share projects and tips that you can do in an hour or less. The ideas you find here are designed to add a little creativity in your day, no matter how much (or how little) time you have!

BUY MY BOOKS!

Copyright © 2026 Happy Hour Projects on the Brunch Pro Theme