
Good morning! How was your weekend? We had an AWESOME holiday weekend – I really don’t want to go back to work today, haha. I am totally envying all of you who get the entire summer off work – I had 4 days to stay home and play with my family, and I’m totally spoiled now! I will say it’s tough to get a lot of craft time, being out of a normal routine, but I have a fun summery piece to share with you today: a beachy bead and hemp ankle bracelet.
I shared this tutorial over at Crafts Unleashed to kick off summer, but in case you didn’t see it, I wanted to also share the full tutorial for you here.

There’s a lot of room for variation with this design depending on the beads you like. I love the sunset colors in the double-row look, but as with any piece, the beauty of DIY is making it *exactly* how you like it.
When I post over at Crafts Unleashed, I use supplies from their website, consumercrafts.com. So I am going to leave the product links here in case you are having trouble locating any of these supplies. Most are available at any craft store, and I’m not making any kind of commission if you do place an order – but because I do so often get questions about my specific findings and supplies, you may find these links helpful.
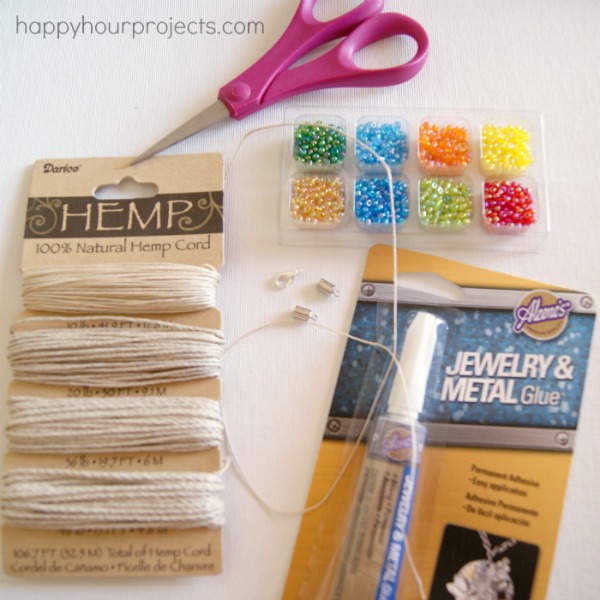
- Hemp Jewelry Cord (I love this variety pack from Darice, you can use any thickness to suit your beads. I used six 24-inch strands of 10 lb. hemp for my ankle bracelet.)
- Seed Beads – you know you have some laying around! If not (or if you want a new color for the new season) choose either 6/0 or 8/0 size. I used size 8/0 in this project.
- Set of 5mm Glue-on End Caps
- Lobster Clasp
- Aleene’s Jewelry & Metal glue
- Scissors
- You will also need a pin, clip, or clipboard to hold your bracelet while you work
First things first: trim your hemp cord to six strands of 24-30 inches. Why the range? Well, hemp is made from several strands wound together. As you string beads onto it, it can begin to unravel. If this starts to happen, you should trim off the frayed end to keep working. The size of hole in your bead will make the most difference in how much your hemp will fray as you work. The larger the bead, the less fray you will have, but if it’s a snug fit, you will want it a little longer. You can always trim off excess when your bracelet is finished, but you can’t add more length if you run short.
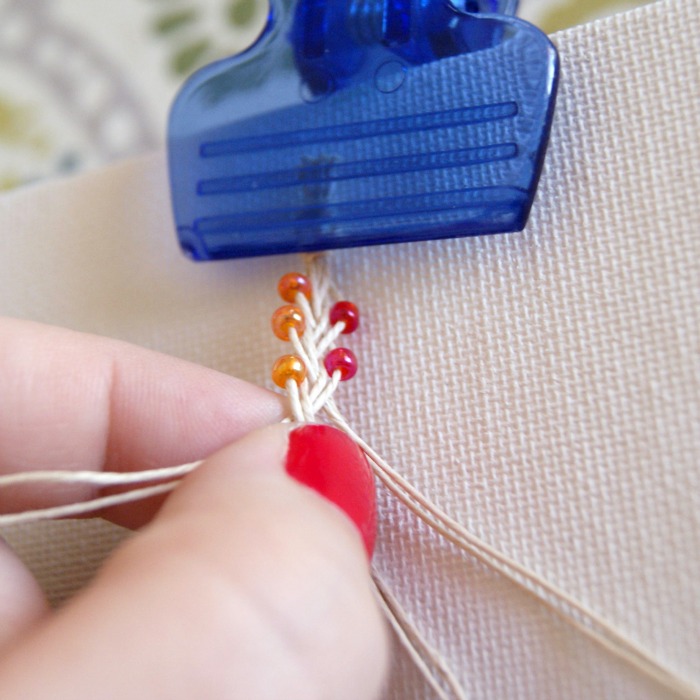
Tie your six strands together with an overhand knot. Then, secure the end to your workplace. I clipped mine to a canvas board because that is what I had handy, but a clipboard will work well for woven bracelets, too!
Separate your strands into three groups of two strands each. We will be making a basic braid, but to give the bracelet weight and texture, we are doubling up the amount of cord going into the bracelet. On the outermost strand, thread on a bead, and begin to braid. I begin working left to right, but it makes no difference.

When you get to the other side of your braid, again, thread a bead onto the outermost strand, and braid the two strands to the center. You will continue this pattern for the whole bracelet. In my case, each time I pulled from the left, I added an orange bead. Each time I pulled from the right, I added a red bead.
This gave me two separate rows of color. You could incorporate even more colors, or you could make the whole bracelet a single color – this is where you make the pattern your own! Continue adding beads into your braid like this for the length of the bracelet, which should be a final braided length of 8 to 9 inches. (The range accounts for your own preference. Standard ankle bracelets are 9 or 10 inches, depending on which size the wearer prefers. We will be adding one inch of length when we add the clasp at the end.)
When you reach your desired length, tie an overhand knot to secure your braid.

You can trim the tails quite short, because we will be gluing on ends caps. I LOVE these end caps, particularly for woven bracelets like this. Let me show you a closer look of how the set comes:

A toggle clasp is included with the 5mm set, but for additional security, I like to replace it with a lobster clasp. Toggle clasps work well for bracelets, but as much movement as your legs do, I don’t recommend them on ankles. You can save the toggle findings for a future jewelry project!
All you have to do is trim your bracelet “tails” to the length of the cap, which is roughly 1/4 inch. Add a dab of jewelry glue to the inside of the cap, and cover your bracelet tails. Give it a good twist to ensure that it fully coats, and allow it to dry. Do this for both ends. It will be dry enough to finish your piece in about 5 minutes, but give it at least 30 minutes before wearing your bracelet.
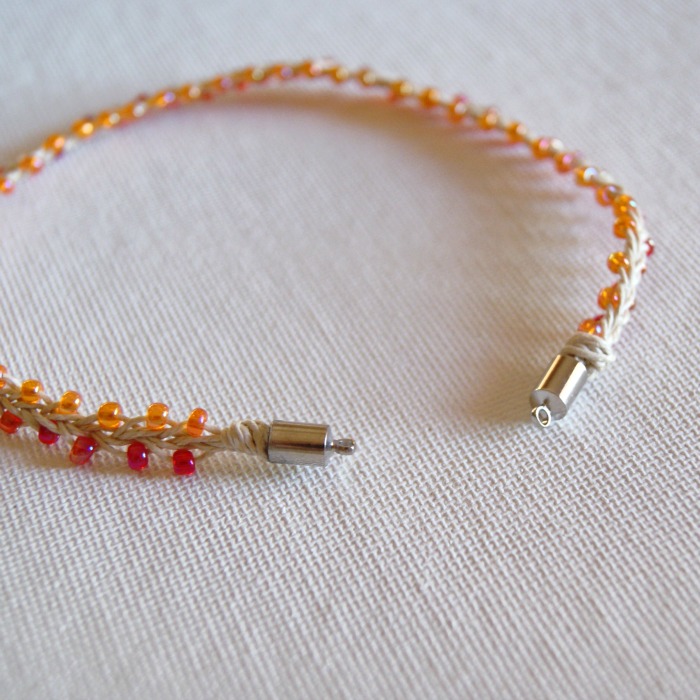
Now, just add a jump ring and lobster clasp to finish your piece (or, if you opted to make it wrist-sized, you can use the toggle clasp that comes with the end caps) and that’s it!

If you are new to jewelry and findings intimidate you, or you know you will be wearing it all summer long, you can also make this a friendship-style bracelet, and leave the tails long to be tied onto ankles (or wrists) for the season. Mine needed to be removable for my big ol’ pregnant ankles, haha. Speaking of which – little man will be here THIS MONTH!! My doctor won’t let me go past July 31, and I can definitely tell he’s getting ready to make his arrival. So stay tuned for that news sometime in the next three weeks… eeek! ;)
Meanwhile – have a GREAT Monday and a wonderful week!

During the sweltering summer months, this jug is the perfect option for serving your favourite drinks including water, mixed drinks, or fresh juice. It has endearing hand-painted chequered-weave patterns that will undoubtedly win your loved ones over. The blue textured textures give the design a little of depth and complexity.
To enjoy your favourite drinks with everyone at the dinner table, pair it with saan ceramic tumblers from the same line.
Love it!
This post is genuinely a good one it helps new internet visitors, who are wishing in favor of blogging.
Skype has opened up its website-based client beta to the
world, right after launching it extensively within the
United states and You.K. earlier this 30 days.
Skype for Website also now works with Linux and Chromebook for instant text
messaging interaction (no video and voice nevertheless, individuals
call for a connect-in installment).
The expansion of your beta adds assistance for a longer selection of different languages to aid bolster that overseas user friendliness
Might as well make it ammo; I can't afford enough gold or silver to be actually useful. I mean, crap, have you seen what silver's up to? And yeah, the Tulsa show's going to see ammo going out by the case and pallet again.
Not as good as balls and much better than that dulux ad. I agree, maybe they should have stuck with bunnies throughout and the music is a touch obvious, but it’s great fun and makes me feel good in a gorilla drumming kind of way.
This could not pobsisly have been more helpful!
Beautiful bracelet! Looks so hard and intricate to make but so easy! LOVE IT!
Just made one similar to this. The one you did is WAY better but I’ll do another one and see how it goes.
You make it look so easy. Thank you for the tutorial. This is one I am definitly going to try.
I LOVE it!
Hi Adrianne. I wanted to say a couple of things. First off, I absolutely love the craft projects you come up with! You are so creative, and by sharing your wonderful ideas, your are allowing me to be creative as well! So, Thank You!
Secondly, I wanted to offer my congratulations on your – soon to be arriving – bundle of joy! I am new to your site, so my congratulations are a bit – delayed, but heartfelt nonetheless! Take care and wishing you and yours all the best!
Rachella
Love this bracelet. Where do you find clasps like those. I have been looking for them, and haven’t found them at my local craft stores!?
I get mine at consumercrafts.com – here is a link to the ones I used: http://www.consumercrafts.com/store/details/catalog/jewelry-cord-kumihimo-braiding-findings-and-kits/1999-4711
Wonderful! Thanks for the link! :)
This looks so cool!
Thanks for the tutorial. I love making your jewelry. Perfect for the seasons.
I love the jewelry you make! This is so pretty Adrianne – and your tutorials are always so easy to understand. I keep telling myself I’m going to make something one of these days. :)
Great tutorial! I would never have thought to string the bead onto only the outside strand. And yes, we’re waiting along with you for good news!
You generated a handful of good ideas with your post, “Speaking and Media pae;.€âI’gll wind up coming back to your web page soon. Thanks ,Guy
I LOVE this Adrianne!
Thank you for yet another fabulous tutorial!!
All the best with the upcoming delivery of your baby :)
Rhondda
I love this bracelet! You made it easy to understand how to do!
I love this bracelet – really nice colour of beads too!
I can’t believe your little one will be here already. Seems like only a short while ago you announced the pregnancy. Hope all goes well.
Claire
Oh wow, that so pretty I have to try a braided bracelet so cute!
Absolutely adorable! Love your step-by-step pics!