
Well I couldn’t resist another bird-themed stamped project with Beaducation’s “Be an original” contest. I just couldn’t. It’s a challenge that’s metal stamping. That has Adrianne written all over it.
Or maybe stamped all over it, like so.

What do you think? (If you like it, you can click to vote for it in the challenge! I also entered my copper roof bird house earlier this week!) I’m going to show you today how I made it, in case it’s inspiring you to make up a version of your own.
Supplies
- ALLLL your metal stamping supplies. I’m going to give the short version on stamping today. If you would like more detail, please visit my metal stamping for beginners post. You can learn everything you need to know there.
- Chasing hammer for texturing
- 1/16″ metal hole punch
- Aluminum Bird Blank – this is a design that only Beaducation makes – that’s what qualifies this for the “originals” contest.
- Bracelet bender (this is optional)
- About 18 feet (6m or so) of hemp cord. You will need to cut 18 strands of hemp, all a foot long.
- Crimp-on ribbon ends (I get mine from Consumer Crafts) and jewelry glue
- Jump rings, a lobster clasp, and jewelry pliers
- Size 6/0 seed beads that coordinate with your design. I used colors that ranged between earthy (for the hemp “nest”) and silvery to go with the silver bird blank.
- Scissors
First, I designed my bird.

I stamped my name, darkened it with a Sharpie, and punched three holes on each side of the blank to accommodate the hemp. I used the rounded end of my chasing hammer all around the outside edge to give it a finished look, and over the beak, wing, and tail to texturize it. Please forgive the one hole that gave me fits and got scratched – fortunately, the hemp covers it nicely.
Next, I used my bracelet bender to curve the blank. This helps it sit nicely on your wrist, though it is an optional step.

Now, feed one strand of hemp through each hole, so that the center of the 12-inch strand lands at the bird, and the ends are an even 6 inches. Tie an overhand knot as close to the bird as possible to secure all the cords. You should now have 6 strands of hemp to work with, all longer than 5 inches long.
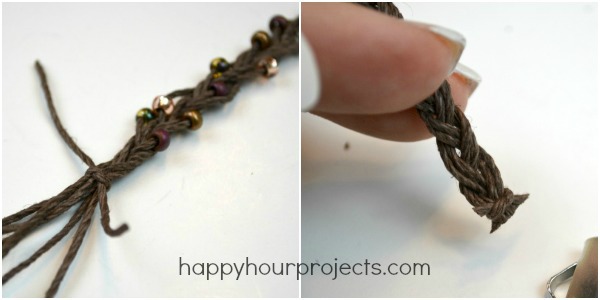
Separate your strands. I just make a regular braid, each section with 2 strands. That gives it enough bulk. Now, you can get fancy and braid a 6-strands braid if you know how, but 3 double strands are just WAY faster. :P
As I worked, I added seed beads onto the cords at random. The photo below will show you this.

Each braided segment coming off from the bird should be about 3 inches, for a finished overall length of about 7 inches. When I got to the end, I took a small tail of hemp and tied the braid tightly to hold it.
You have 2 more braids to finish for a complete bracelet, but those are more simple since they won’t have a bird in the middle. For those, you can just tie an overhand knot at one end to begin, and braid a 7″ length just the same as on the focal strand.
Once you get to the ends, make sure your knots are nice and tight, and cut them off very close to the finished end.
To make sure they are secure in your bracelet, add some jewelry glue to the inside of a ribbon end. Arrange the three braids inside the ribbon end, and use a pair of pliers to crimp it firmly shut. Between the teeth on the end, and the glue you added, it will be very secure.

Finally, just add your clasp to finish your bracelet! I like the security of a lobster clasp, though a toggle clasp would also work fine.

I know this project is a little more complicated than I like to show you, and I didn’t have as many photos as normal, but to be honest, I really just enjoyed designing it without trying to document it so meticulously. :) So I hope it made sense! This is a really fun and springy piece that I’ve enjoyed wearing it this week.

Love this! A proper magpie’s birdsnest with some many shiny things!
This is so gorgeous!!! Love love love it, and voted for it too!
I love it! The bird is so sweet; I’d gladly wear this! (And voted, of course!)
I voted for your bracelet! Love it!