
Lately, I’ve really been looking at metal stamping as more than a way to make jewelry. It can also be a fun and beautiful way to personalize all kinds of items. You may have seen last week’s music box locket project as an example of what I’ve been playing around with (okay, that WAS jewelry, but the blank was part of a larger piece). Today I’m expanding that idea even further by partnering with ImpressArt to share this project that’s close to my heart: a leather journal, embellished with crystal rivets and a hand-stamped tag.
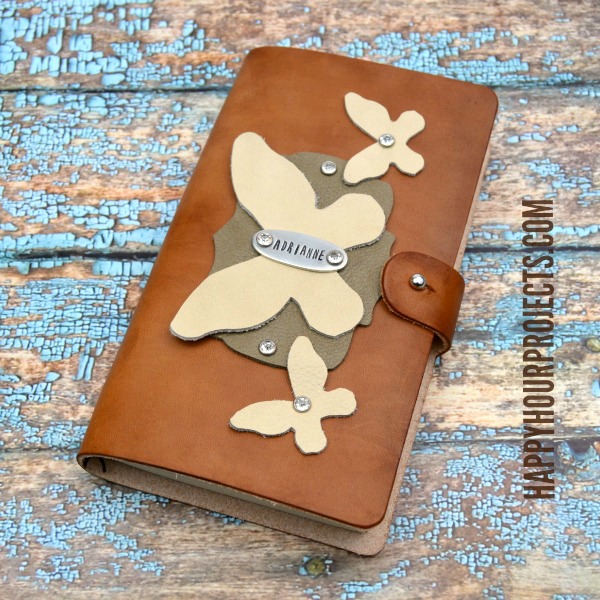
So, not to get too off-topic, but I was shocked at how easy it is to work with leather, staining and prepping it, cutting, punching, and riveting. I’ve done it with metal plenty of times, and it’s so similar. ImpressArt’s crystal rivets were perfect for attaching the butterflies! I will tell you that I did use a pre-cut kit to make my journal and I assembled it myself, but you could probably just as easily find a leather-bound journal and embellish that, since you’ll be working just on the cover. Personally, though? I loved getting my hands on it from start to finish. It makes it so much more… mine.
You can, of course, embellish your journal in whatever way is meaningful to you! But I will share with you the products I used, in case you’re drooling over any part of this idea.

- ImpressArt’s Lollipop font
- ImpressArt’s SoftStrike pewter blank, 1-3/8 oval with two holes
- ImpressArt’s Czech Crystal snap rivets
- Rubber block and river setting tool
- 1 lb. brass stamping hammer and bench block
- Stamp Straight tape
- Sharpie marker and polishing cloth
- Leather journal kit
- Leather upholstery scraps
- Sizzix Big Shot and Butterfly and Labels die
- Brown leather stain and finish
- Leather punch
- Gutermann Creativ glue (any leather-appropriate glue will work fine)
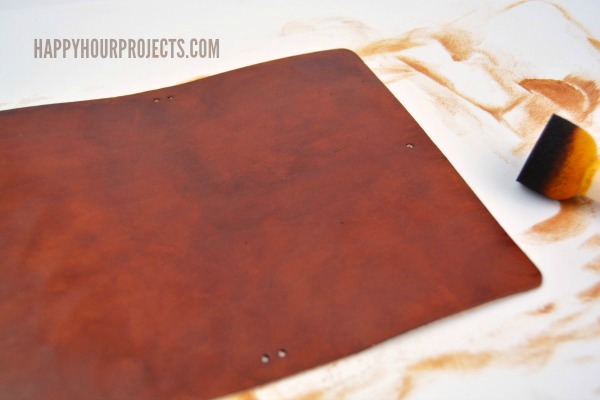
First, I prepared my journal by staining it, and when it was dry, I finished it. I am very much NOT an expert on this – if you’d like to know more then I recommend searching on YouTube, or do what I did, and visit your local leather shop. I told them what I wanted to do, they handed me the products I’d need and told me how to use them.
Next, I prepared my leather die-cuts. You can trace and cut by hand, or, you can take the easy route like I did if you have a manual cutting machine. I just cranked out a few die-cut butterflies and a large label. I laid them out to decide where I planned to rivet them, and used my leather punch to make 1/8 inch holes.
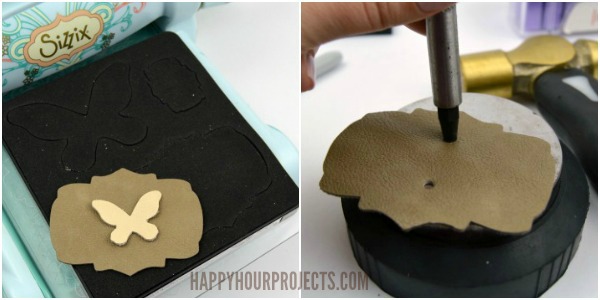
Now, for the fun stuff. Stamp your metal blank with the inspirational word, verse, or name you want (I added my own name). I have been LOVING the Lollipop font. Not only is it cute, but because it’s so narrow, you can fit a lot more letters onto your blanks. My name is 8 letters long, which typically means I can barely fit it. But it stamped up really nicely!

If you haven’t gotten into metal stamping before, I recommend you read my beginner’s metal stamping tutorial. But for a quick overview, I’ll tell you the basics today:
- Plan what you’re going to stamp, and mark off the line with stamp straight tape. This will help keep your stamping vertically aligned. Mark off your letter placement, if it makes you more comfortable (I always do – it helps with my spacing).
- Hold your stamp straight, and give it one firm tap of your hammer. Just one. More, and you risk double-impressions. If you find your impressions aren’t deep enough, then start with a SoftStrike blank, like this one I’m using in pewter.
- Darken the impressions. I use a permanent marker and use a polishing cloth to remove the excess ink. You can also use acrylic paint or even gilder’s paste – this is purely a matter of preference and convenience. Polish your blank.
- Punch holes if you need them – this two-hole blank was already perfect for riveting to my journal. That means it’s also a great size and shape for riveting onto a leather bracelet!
Next, I riveted! I did add a bit of glue to my leather pieces just to help them hold. The rivets will do the bulk of the work, but I didn’t want an edge to catch, get bent, or flop around later. To set the rivets, push them through your holes, and snap the backs on. Then, turn them over on your rubber block with the crystal side down (the rubber will help keep them from cracking). Center the riveting tool over the backside of the snap, and tap it with a hammer firmly a few times, until it’s compressed securely. You should be able to rivet 2 layers – 2 layers of leather, two layers of metal, or metal onto leather.

I riveted the layers of leather together first, then riveted the leather to the front of my journal. I also completed the final assembly of the journal – which was really easy.

Finally, I have a really personal journal to enjoy. It’s like no other and it showcases all my loves: writing and sketching, and working with leather and metal. It’s feminine with the butterflies and sparkly rivets, and I made it with my own two hands, with my favorite tools. It’s a win all the way around!
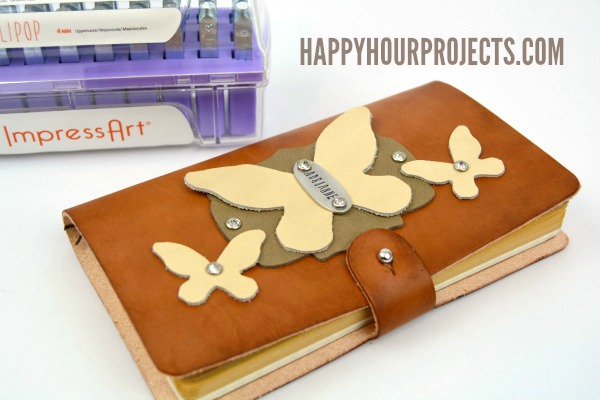
If you read here often, I know it goes without saying that I’m a fan of the ImpressArt metal stamps, blanks and tools. I use them often! I’m so happy to team up with ImpressArt this year to show you new products and share my ideas – so stay tuned for more projects to come!


this is a great looking project, well done. Are you able to provide a source for the journal blank? thanks
Thanks Judith! I used this one (the link is to Amazon) http://www.amazon.com/gp/product/B00FI9IY4M/ref=as_li_tl?ie=UTF8&camp=1789&creative=390957&creativeASIN=B00FI9IY4M&linkCode=as2&tag=haphoupro-20&linkId=SRO3VNUTB3ZSS2GN
I also stained it with this: http://www.amazon.com/gp/product/B001ASKU4M/ref=as_li_tl?ie=UTF8&camp=1789&creative=390957&creativeASIN=B001ASKU4M&linkCode=as2&tag=haphoupro-20&linkId=YSBSDCQHZ2YTS62I
And finished it with this: http://www.amazon.com/gp/product/B003RBG0XK/ref=as_li_tl?ie=UTF8&camp=1789&creative=390957&creativeASIN=B003RBG0XK&linkCode=as2&tag=haphoupro-20&linkId=JODQYJ33ECSWESYW
The stain and finish will go a long way if you enjoy working with leather. The journal itself was a nude color before dyeing it.
Your journal is absolutely gorgeous! Thanks for the tutorial!